I grew up eating meat with tzatziki, a garlicky, lemony-yogurt sauce. Most often it was aside this chicken souvlaki , a favorite summer meal, but in addition to mint sauce , it often was on the table with lamb , too.
In recent years, I’ve learned I love yogurt sauce just as much with vegetables — I love how its tang so nicely complements the earthiness of roasted squash, cauliflower, eggplant and others. I love how it turns vegetable side dishes into more substantial entities, meals in their own right. I love how it assumes the flavor and seasonings of whatever vegetables it finds itself with, thinning as it absorbs the excess liquid, ultimately becoming the perfect consistency to mop up with slices of crusty bread.
I find I miss it now when it’s not there.
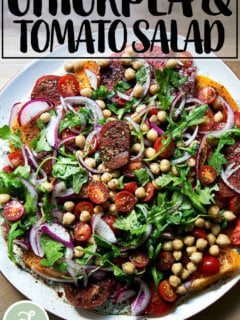
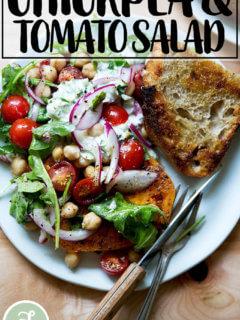
Over the weekend I opened a favorite cookbook, Six Seasons , turned to the “late summer” chapter, and found this recipe: Israeli-spiced tomato and chickpea salad with — wait for it — yogurt sauce!
I made it, loved it, and am here to tell you why you should make it immediately.
First: Summer isn’t over. The start of the school year might have us feeling otherwise, but we still have 13 more days, and, more important, we have so many months of roots and gourds ahead of us. Let’s try to savor every last beefy tomato we can get our hands on. My garden has nearly stopped producing, but the farmers’ market, my CSA, friends’ gardens, and our local grocery stores are still delivering. I hope yours are, too.
Second: Yogurt Sauce. If you haven’t paired it with vegetables, raw or cook, you’re in for a treat. Moreover: cucumber -yogurt sauce! The cucumbers are still abounding, and if you find yourself overwhelmed, grate one or two, stir it into some Greek yogurt, season it with salt, lemon, and any other seasonings or herbs you wish.
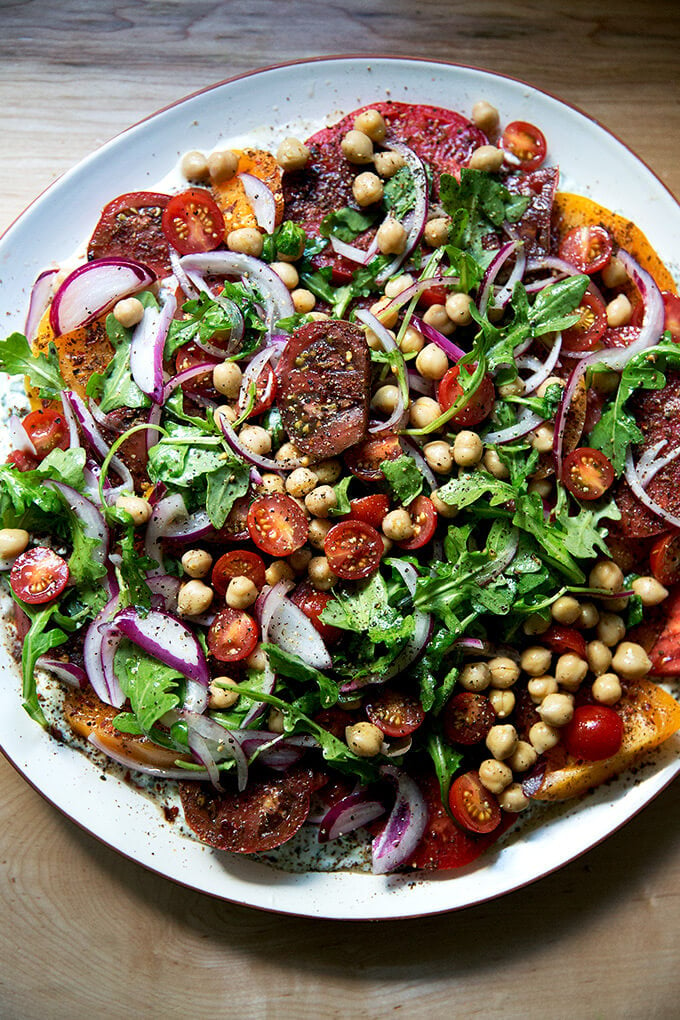
Third: Nacho-style assembly: More and more, I love a layered salad — I love how, once served, the layers mingle and jumble, and the bites in which all the elements collide are spectacular, though as a whole it never tastes like a tossed salad, unified by a single dressing. I can’t say enough good things about this Israeli-spiced layered salad, but feel free to make it your own. Here’s a rough guide:
Nacho-Style Salad Assembly:
Layer 1: Yogurt Sauce Smear
The first layer, a yogurt sauce smear, can be as simple as yogurt + lemon + salt. You can add garlic for a little zing or herbs such as mint or chives or parsley for a little more flavor. You could drizzle the yogurt smear with olive oil + za’atar, as here; you could add toasted, ground spices, such as cumin, as here ; or you could grate in cucumber as in the tomato salad featured here. As long as the yogurt is seasoned well with salt and lemon, you can’t go wrong.
Note: If you are looking for that creamy, tangy element but are avoiding dairy, you could replace it with a tahini sauce .
Layer 2: Raw or Cooked Vegetables
The vegetables can vary from roasted cauliflower , eggplant , and delicata squash to raw tomatoes, shaved zucchini, and grated beets or carrots — truly whatever you like. Whether the vegetables are raw or cooked, they should be seasoned well with salt, any spices you wish, and, at times, with olive oil and maybe some sort of acid, too.
Layer 3: Something Sharp: Salsa, Sauce, or (Another) Salad
This final layer can be as simple as a squeeze of lemon with a sprinkling of za’atar or a drizzle of olive oil . It can be a spiced, herby sauce, such as skhug (my favorite!). It can be textured and bright, such as this walnut-caper salsa , for these cauliflower steaks . It can be a light tomato-and-arugula salad, as here , or a more substantial chickpea-and-red onion salad as featured in this tomato salad.
Whatever you use, be sure it is on the sharp side — go big with the lemon, lime, or vinegar. Like a salsa for nachos, it should have a nice acidic bite.
Some Layered Salad Inspiration:
- Roasted Cauliflower Florets with Skhug and Lemony-Yogurt Sauce
- Whole Roasted Cauliflower with Lemony-Yogurt Sauce
- Cauliflower Steaks with Walnut-Caper Salsa
- Roasted Eggplant Salad with Cucumber-Yogurt Sauce and Tomatoes
- Moroccan Carrot Salad with Harissa and Avocado
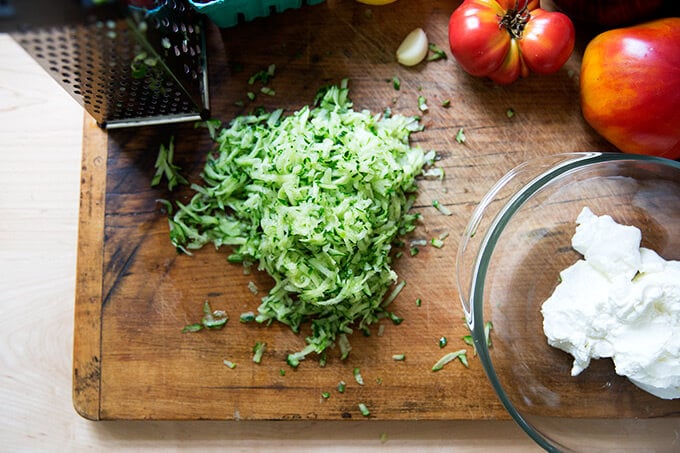
Here’s the play-by-play: Grate 1 or 2 cucumbers:

Add them to a bowl of yogurt with garlic, lemon juice, and salt.
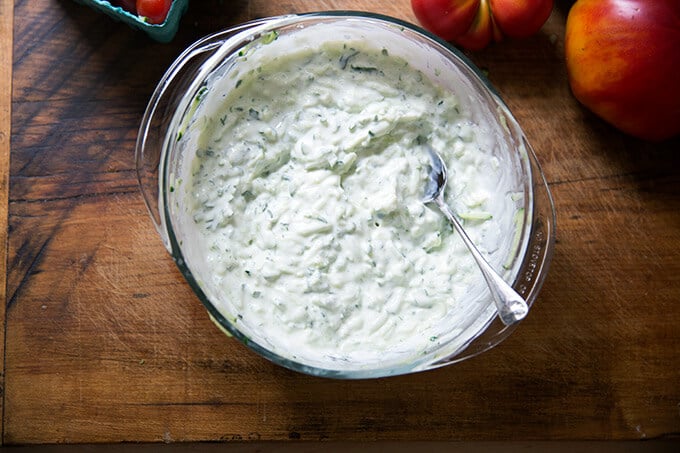
Stir to combine.
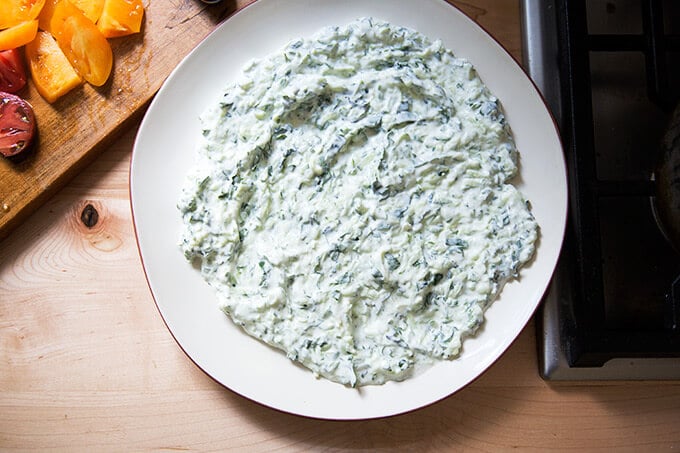
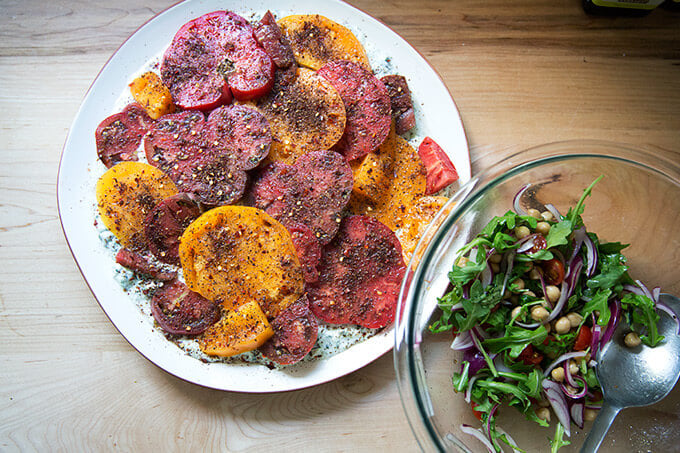
Smear this yogurt sauce on a large platter.

Slice up some tomatoes.
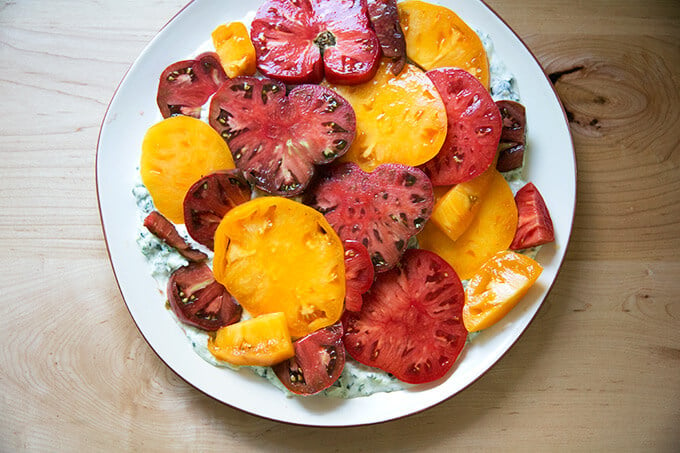
Arrange them on top of the cucumber-yogurt sauce.
Gather some spices: toasted and ground (if you wish) cumin and coriander, sumac, crushed red pepper flakes.
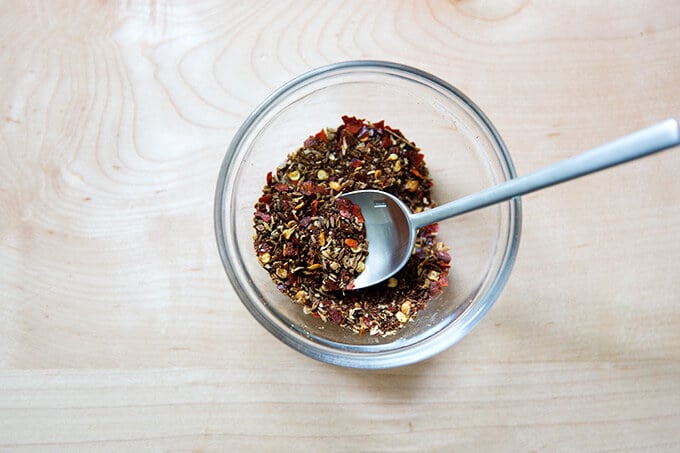
Combine them.
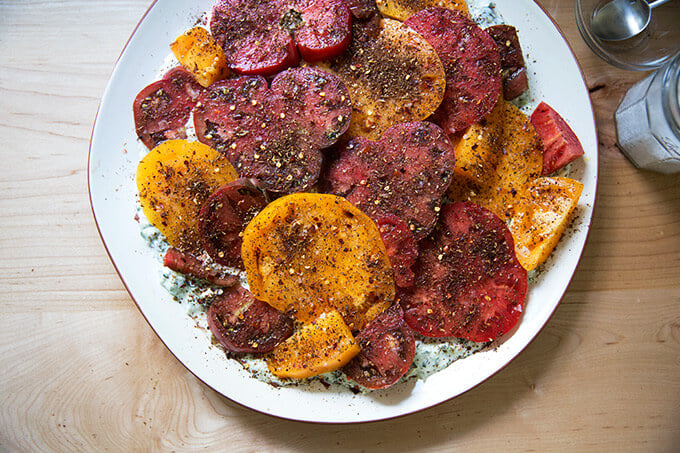
Season the tomatoes with the spice mixture as well as with salt and freshly cracked black pepper.
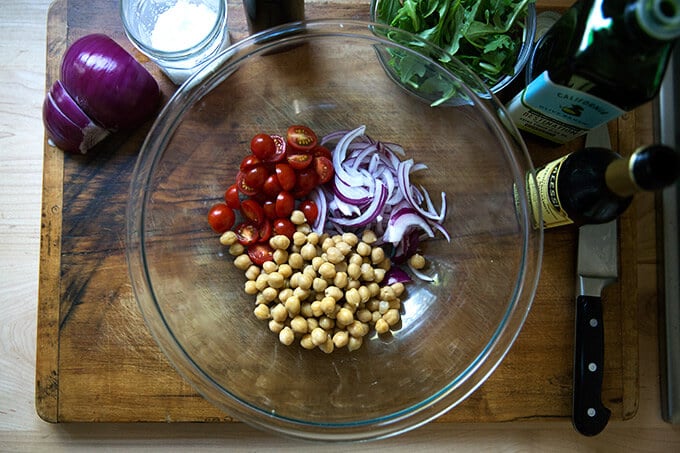
Final step: Combine chickpeas, red onion, and more tomatoes in a bowl.
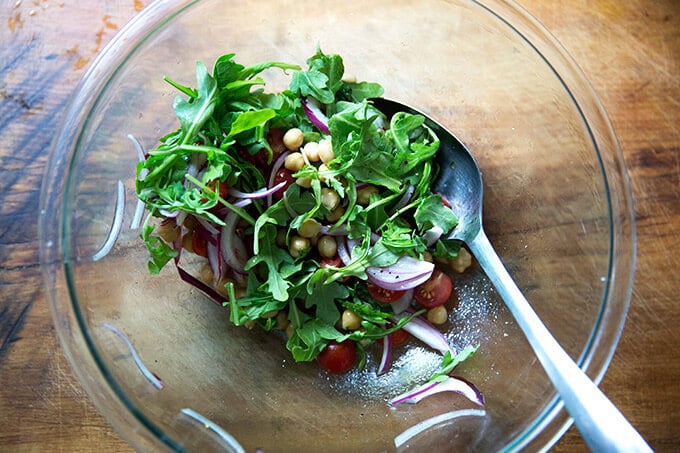
Dress with salt, pepper, olive oil, and vinegar. Gently fold in a handful of arugula.
Ready to unite!
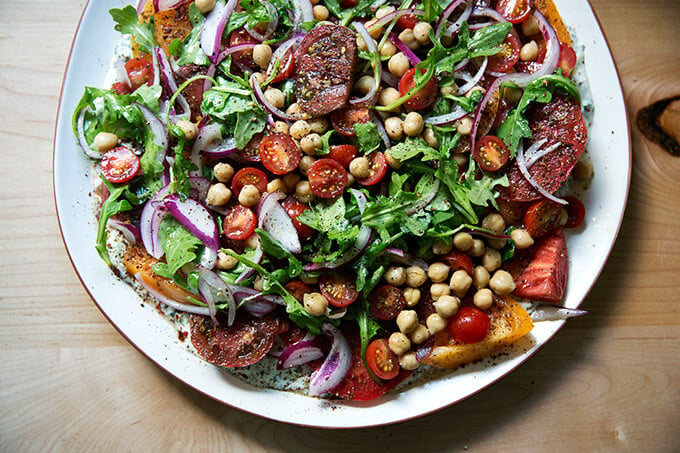
Spread the chickpea salad on top of the tomatoes.
Serve with…
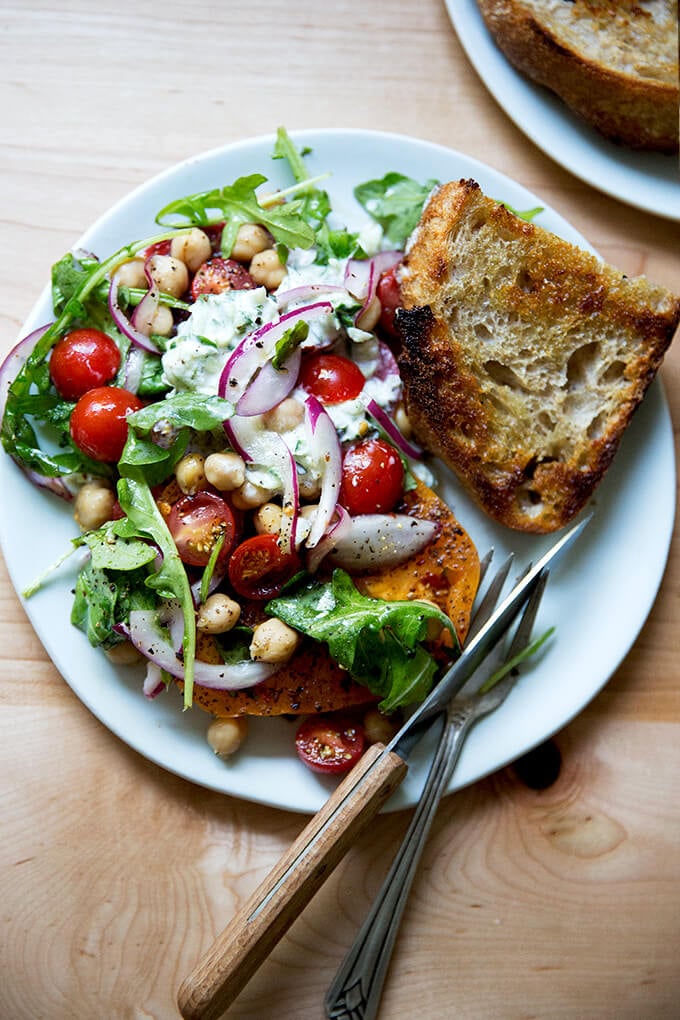
… olive-oil toasted bread, of course.
Description
Adapted from Joshua McFadden’s Six Seasons
A Few Notes:
- I love toasting whole cumin and coriander seeds, then grinding them with my mortar and pestle. If you wish to do this, too: toast the seeds in a dry skillet over medium heat until they begin browning and smoking; transfer immediately to your mortar; grind with your pestle till fine.
- This may sound odd given the title includes “Israeli-spiced,” but consider any or all of the spices optional. This salad would be delicious simply with salt and pepper.
- Sumac can be hard to find. I ordered mine online but have since found it at various local markets.
- As you know, I prefer to cook beans from scratch. Here’s my favorite bean-cooking method: How to Cook Beans or Chickpeas from Scratch: Brining Method
For the yogurt sauce:
1 cup Greek yogurt
1 or 2 small cucumbers
kosher salt
1.5 tablespoons fresh lemon juice, from about half a lemon
1 clove garlic minced
1 teaspoon sumac (see notes above)
1/2 teaspoon ground coriander
1/2 teaspoon ground cumin
1/2 teaspoon red pepper flakes
flaky sea salt, such as Maldon, and freshly ground black pepper
3 to 4 large beefsteak or heirloom tomatoes
1/2 red onion thinly sliced
1 cup cooked chickpeas
1 cup cherry tomatoes, halved
1 handful of arugula
2 tablespoon vinegar (white balsamic, red wine, white wine, champagne)
2 tablespoons olive oil
Good bread for serving
- Grate the cucumber coarsely on a box grater. In a medium bowl, stir the cucumber into the yogurt, along with the garlic and the lemon. Season with salt, starting with 1/4 teaspoon kosher salt, adding more by the 1/4 teaspoon to taste. Add more lemon to taste as well — this sauce should taste nicely seasoned. Spread this yogurt sauce onto a large platter.
- In a small bowl, stir together the sumac, coriander, cumin, and dried chile flakes.
- Slice the tomatoes and arrange over the yogurt sauce in an even layer. Season all over with the spice rub. Season generously with sea salt (kosher salt is fine, too). Season with freshly cracked black pepper to taste.
- In a large bowl, toss the cherry tomatoes, onion, and chickpeas with a good pinch of flaky sea salt, pepper to taste, and the olive oil and vinegar. Taste. Adjust seasoning as necessary. Add the arugula and toss gently. Spread this salad atop the tomatoes. Serve, being sure to include each of the elements — the yogurt sauce, the tomatoes, the chickpea salad — with each serving.
- Prep Time: 30 minutes
- Category: Salad
- Method: Dress
- Cuisine: Israeli
Find it online : https://alexandracooks.com/2019/09/10/israeli-spiced-tomato-and-chickpea-salad-with-yogurt-sauce/

This French apple tart recipe is simplicity at its best: buttery pastry dough + unpeeled, thinly sliced apples + a sprinkling of sugar + a few pads of butter. That’s it! It’s so easy, so pretty, and so delicious .
A few weeks ago I came across a photo of an apple tart in Sarah Copeland’s Every Day is Saturday that stopped me in my tracks. For one, it was stunning. But two, the apples had their skins on!
I am ALWAYS peeling apples for pies, tarts, galettes, and the like, but: maybe , this photo had me wondering, I didn’t have to?
It turns out: I didn’t.
Last Sunday, for a local event, I made, as planned, two apple-frangipane galettes , one of my all-time favorite fall desserts. With the extra round of pastry I had on hand, I gave the unpeeled-apple tart a whirl.
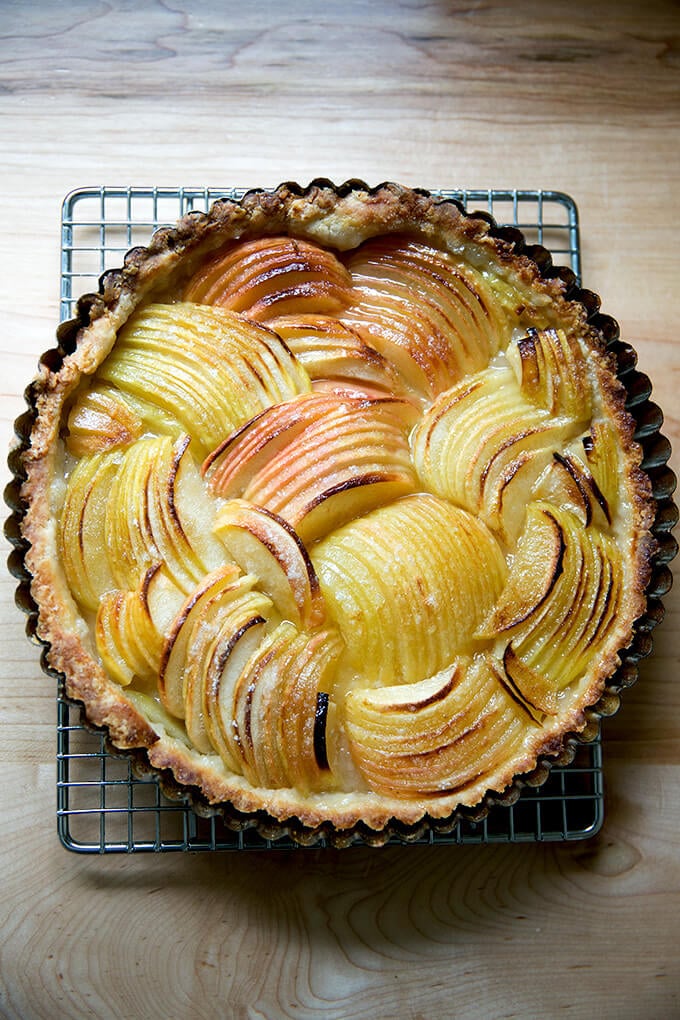
The result? Where to begin?
The Beauty of A French Apple Tart…
… lies in its simplicity.
If you’ve been reading for a while, you know I’m always pushing the frangipane with these sorts of desserts — I find the combination of almond cream + flaky pastry + fruit to be irresistible.
But this tart, without the frangipane, is just as irresistible, just as difficult to pass on seconds, just as impossible to avoid slicing off teensy slivers every time you walk by. And it couldn’t be simpler: Apples. Sugar. Butter.
That’s it!
The hardest part about making this tart is slicing the apples thinly and keeping the apple “fans” together as you slice. I appreciated a note from Sarah in the recipe in regard to arranging the apple slices: “Don’t overthink it!” (A French apple tart I had made years ago, which called for creating apple “roses” drove me nearly mad.)
But Sarah’s right: the elegance of this presentation is in the union of random and uniform. It’s such a fun tart to assemble but an even more fun one to eat. I highly recommend whipping up some heavy cream and salting it just a touch more than you might normally. The sweet with the salty is, well… c’est parfait.
Note: The recipe below follows Sarah’s method for the filling but not the crust. Her “easier-than-pie-apple-tart” calls for making a gluten-free press-in-the-pan crust made with almond flour, which looks and sounds lovely. The recipe below calls for my favorite, foolproof, all-purpose, all-butter food processor pastry dough . It comes together in less than five minutes and yields the flakiest of flaky crusts. Bonus: no blind-baking (for this tart at least) required!
How to Make a French Apple Tart Ahead of Time
Last fall I learned you could freeze entirely assembled un-baked pies; then bake the frozen-solid pies directly from the freezer… no thawing required. This fall, I gave the method a go with this French apple tart.
The result? Five stars ⭐️⭐️⭐️⭐️⭐️
For this recipe, simply follow the process through step 5, stopping after you add the cubed butter. Transfer the tart to an airtight bag; then transfer to the freezer for up to 3 months. When ready to bake, proceed with the recipe, baking the tart directly from the freezer (i.e. no need to thaw in the fridge or on the counter overnight.
PS: 9 Apple Recipes to Make Right Now
How to Make a French Apple Tart: A Step-by-Step Guide
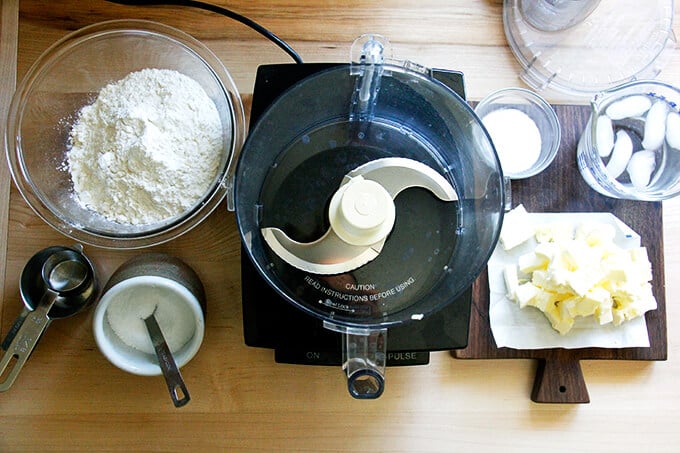
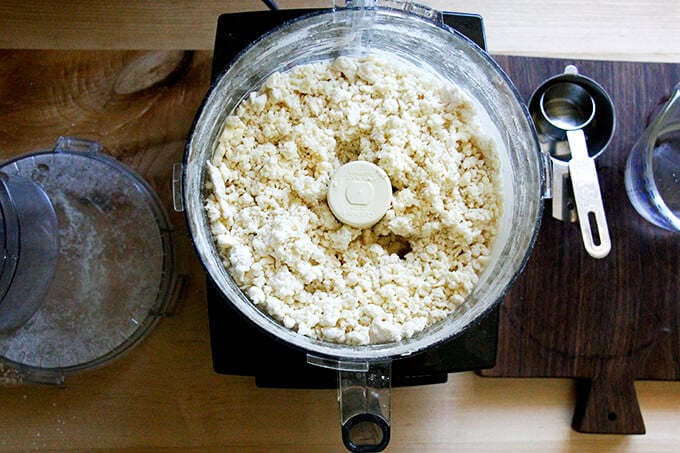
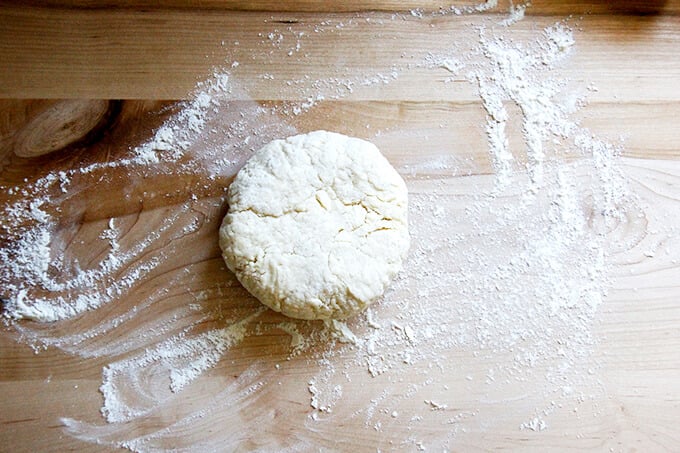
Make the dough. Gather your ingredients: flour, salt, sugar, butter, ice water. (Note: The pictures below show a double batch of dough being made; the recipe in the recipe box is for a single batch of dough.) First pulse the flour, sugar and salt together.
Add the butter and pulse 10 times (about).
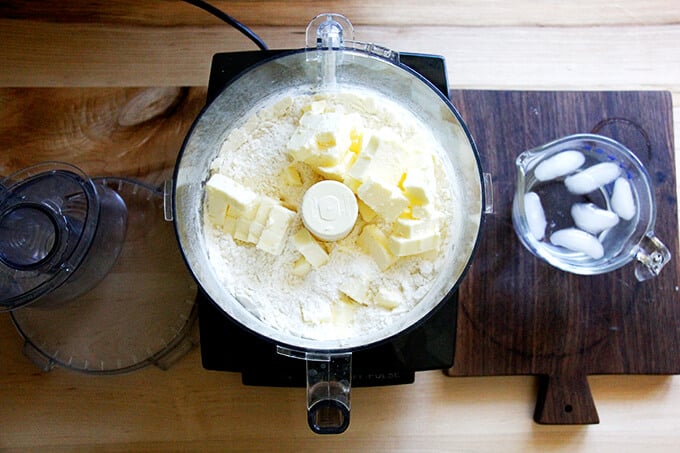
The butter should be the size of peas (about).
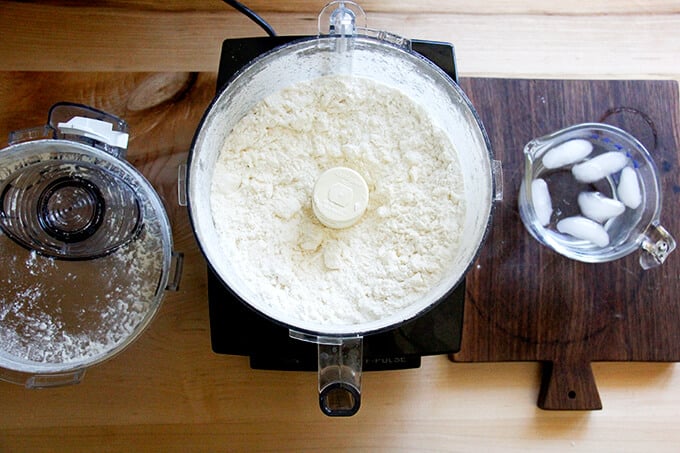
Add ice water.
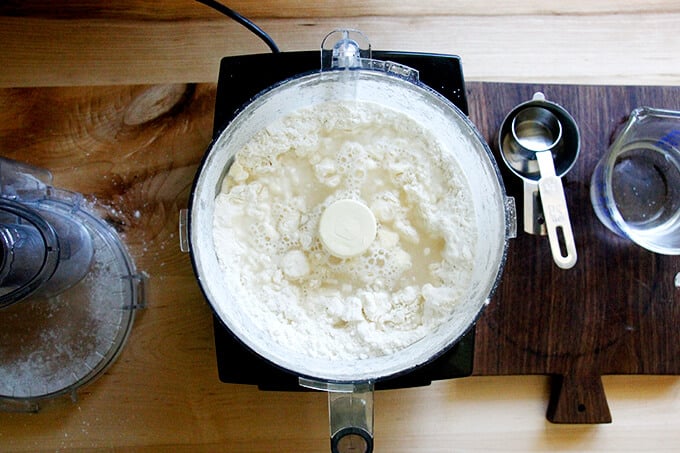
Pulse again about 10 to 15 times or until the dough is still crumbly, but holds together when pinched.
Divide dough between two clean tea towels. I love these tea towels by Now Designs .
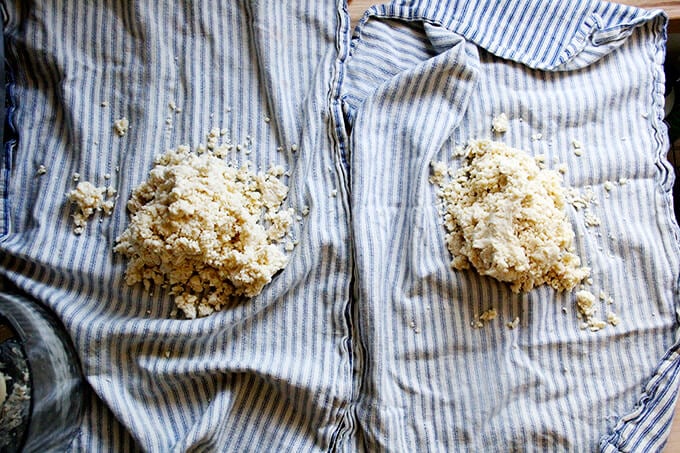
Gather towel into a beggar’s purse, and squeeze to form a round.
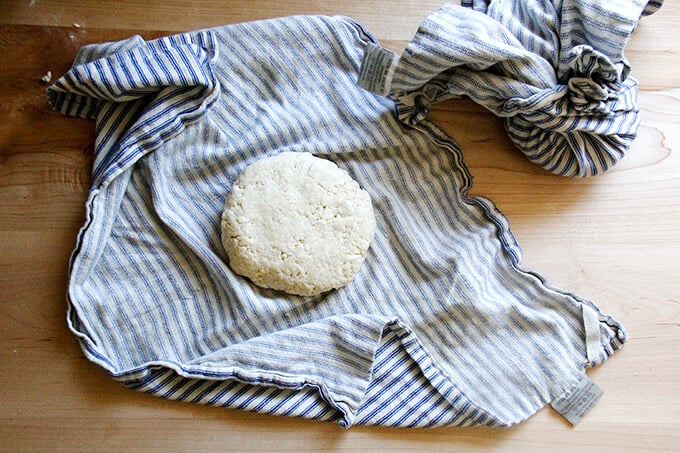
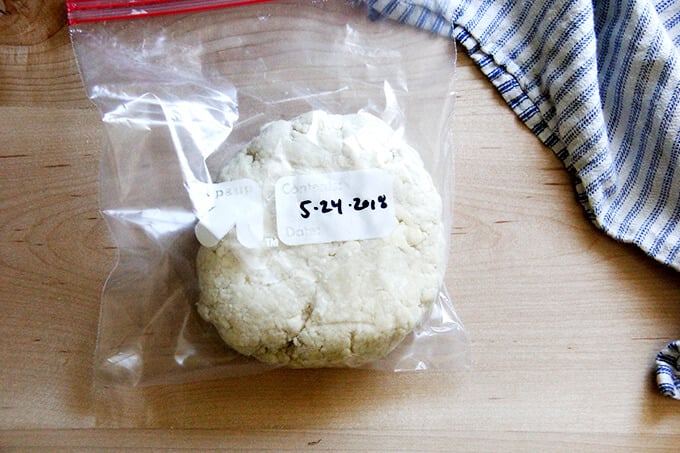
Transfer one to the freezer for a future use.
On a lightly floured surface, roll out the remaining round into a circle about 12- to 13-inches in diameter.
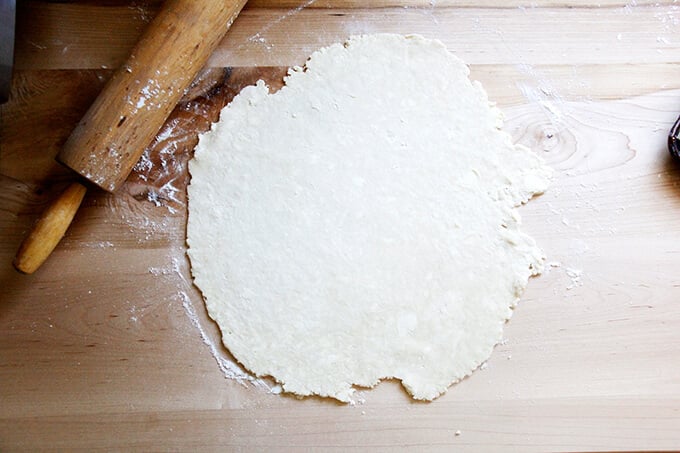
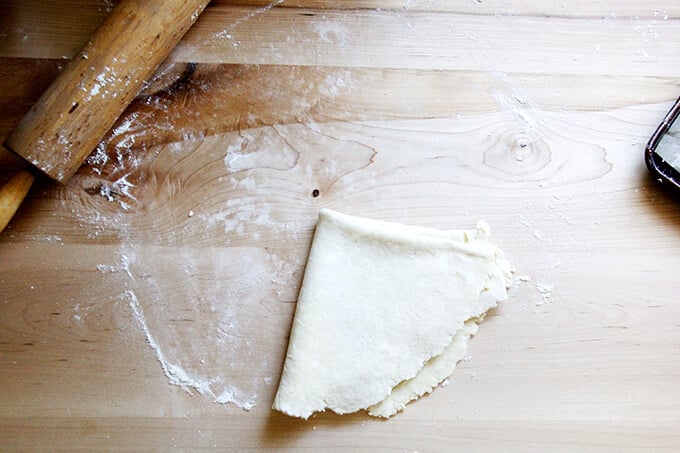
Fold dough into quarters for easy transfer to tart pan. Sorry no picture of the filled-in tart pan. At this point, the tart pan should chill in the freezer for 30 minutes.
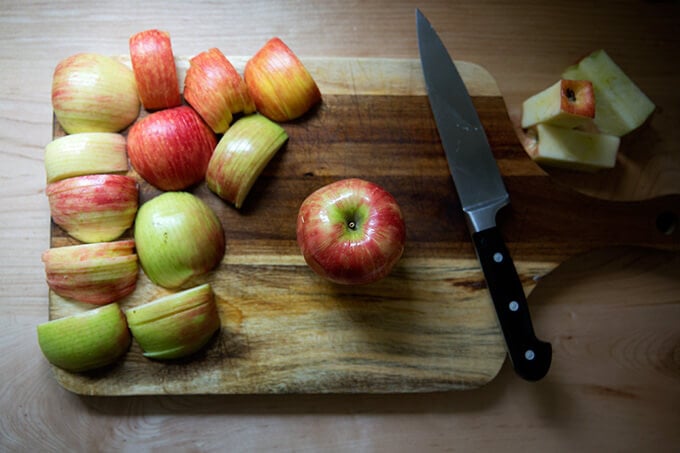
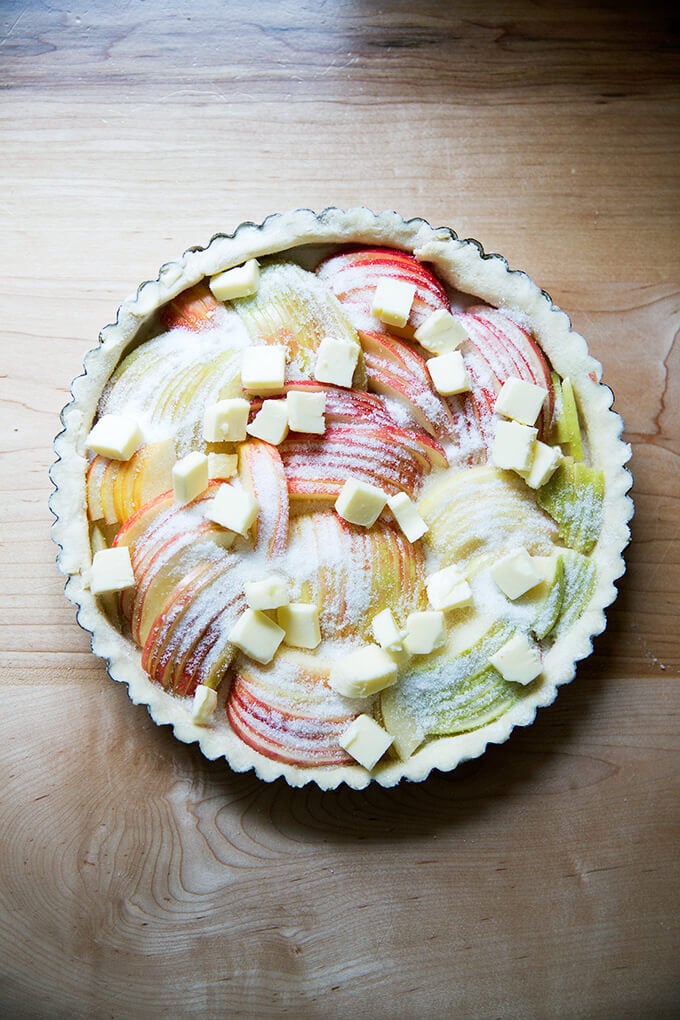
Meanwhile, cut 3 to 4 apples straight down around the core to create 4 “cheeks”. Then slice thinly, keeping the cheeks together.
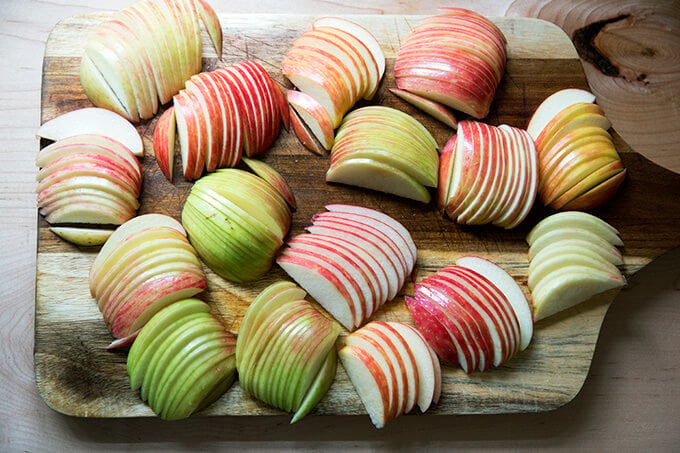
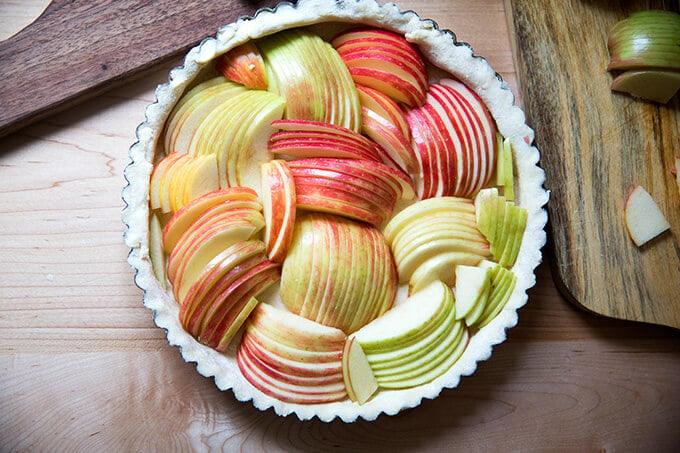
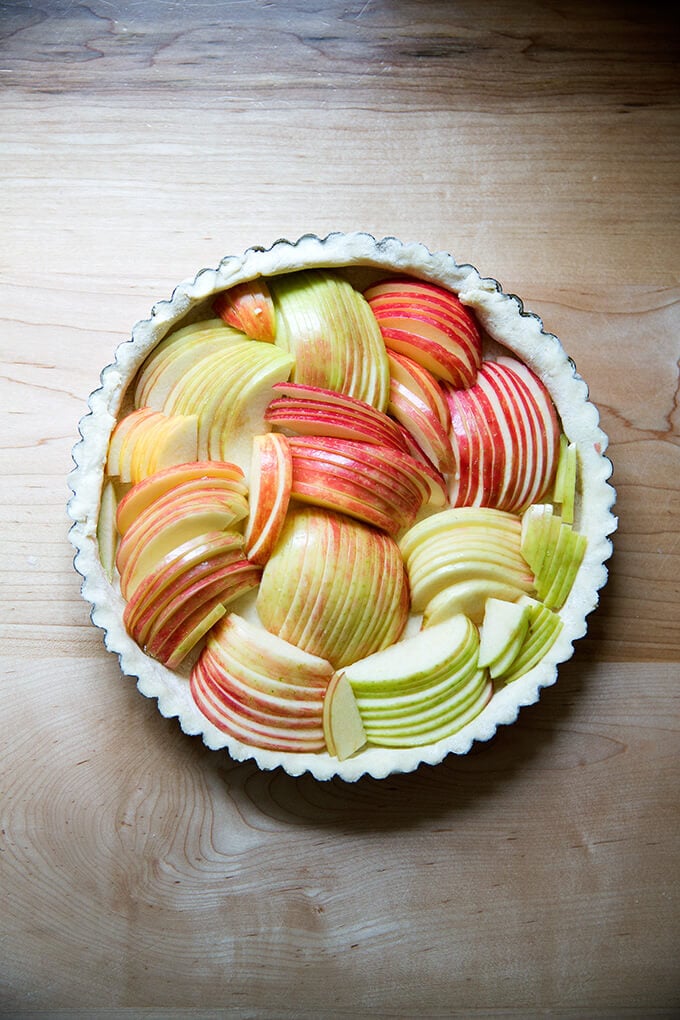
Fill your tart shell with fans of apples, cutting as necessary to fit.
Sprinkle with 1/4 cup sugar.
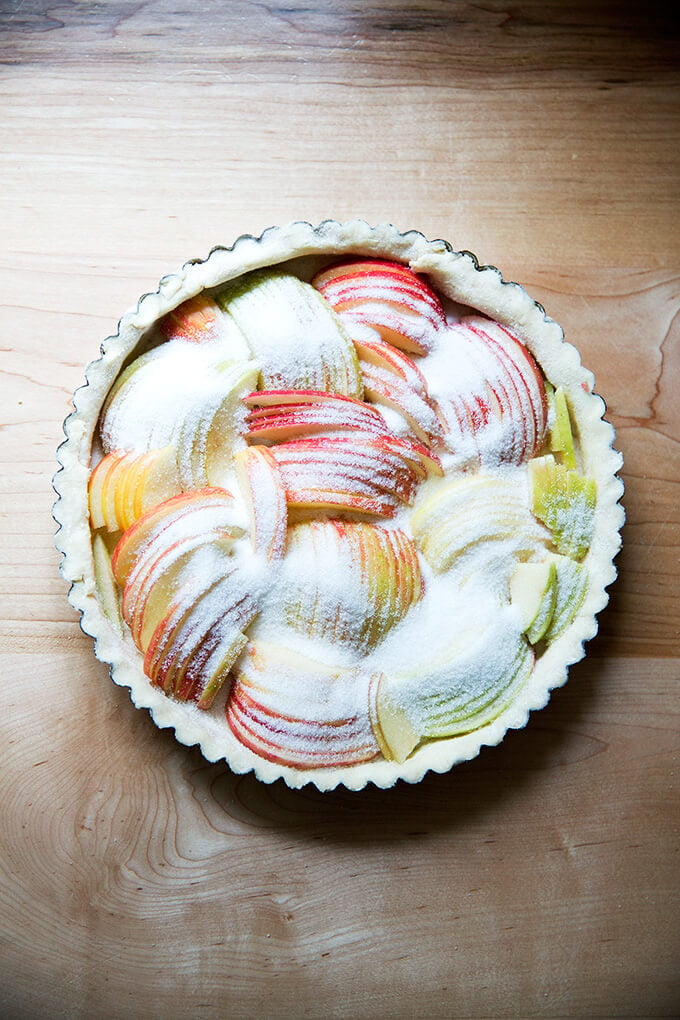
Dot with 1/4 cup cubed butter.
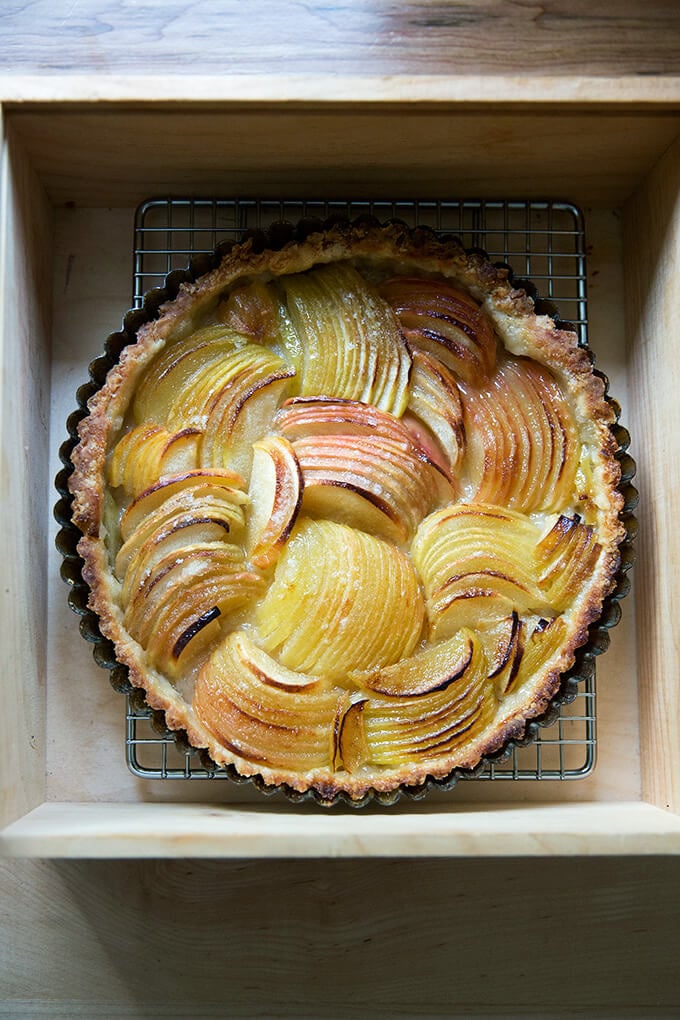
Bake till slightly caramelized at the edges. Let cool before serving …
…or packing away to bring to a party! Any excuse to break out the Pie Box .

Description
Dough recipe: This is the only pie dough, tart dough, galette dough, pastry I use. It’s foolproof. Here are five recipes I use it in.
Dough can be made up to 3 days in advance and stored in the fridge or made weeks in advance and stored in the freezer. I typically make a double batch and freeze one round for a future use, but I’ve written the recipe below to yield one pastry round.
The filling for this French apple tart recipe is inspired by Sarah Copeland’s Every Day is Saturday , in which there is a lovely gluten-free variation.
Save your pie dough scraps and make cinnamon snails .
For the tart dough:
- 1 1/4 cups ( 160g ) all-purpose flour
- 1 tablespoon ( 14 g ) sugar
- 1/4 teaspoon table or kosher salt
- 8 tablespoons ( 114 g ) cold, cubed butter, salted or unsalted
- 1/4 C. + 1 T. ( 71 g ) ice water
For the apple tart:
- 3 to 4 apples, I typically use Honey Crisp; use what you like
- 1/4 cup ( 57 g ) butter, salted or unsalted
- 1/4 cup ( 61 g ) sugar
For serving:
- 1 cup heavy cream
- confectioner’s sugar to taste
- flaky sea salt, such as maldon, if you have it, kosher or other salt if you don’t
- Make the pastry: In the bowl of a food processor, pulse the flour, sugar and salt together. Add the cold, cubed butter to the food processor. Pulse at 1-second intervals until butter is the size of peas—should be about 10 quick pulses. Add the ice water and pulse again about 10 times until the mixture is crumbly but holds together when pinched. Lay a clean tea towel on a work surface. Dump the crumbly dough mixture into the center of it. Grab the four corners of the towel together and twist to create a beggar’s purse, pressing the dough into a round.
- On a lightly floured work surface, roll out the dough into a 12- or 13-inch round. Use as much flour as needed to prevent the dough from sticking, and every few rolls, flip the dough over. Transfer dough to a tart pan with a removable bottom. Fit the dough into the pan, trimming the edges. (Save the scraps; see notes above.) Transfer to freezer for 30 minutes.
- Preheat the oven to 425ºF and place a rack in the center of the oven.
- Prepare the apples. Cut the “cheeks” of the apples off the core into four pieces — each piece will have one large flat side. Lay each piece on its flat side and slice thinly, keeping the slices together as you go. Arrange the slices around the tart in any pattern you desire, fanning the apples as you go. You may need to cut some of the apple fans to fit.
- Sprinkle evenly with the 1/4 cup sugar and 1/4 cup cubed butter. Transfer to a rimmed sheet pan. (I like to line with parchment paper for easy cleanup.) Transfer to the oven for 35 to 40 minutes, checking after 15 minutes: if it is browning too quickly, lower the temperature to 400ºF. I find 425ºF works perfectly, and I actually will turn the oven to convection bake during the last 2 to 3 minutes to get some more caramelization on the apples. This is unnecessary — the uncaramelized apple slices taste delicious, too — but I find it visually appealing and tasty.
- Make the whipped cream. Place the heavy cream in the bowl of a stand mixer and whip until soft peaks begin to form. (You can do this by hand, too, with a bowl and whisk.) Add confectioner’s sugar — start with 1/4 cup and add more to taste. Add a big pinch of sea salt and beat to combine and until the peaks begin getting firmer. Taste — the mixture should be slightly sweet and the salt should be noticeable, though the whipped cream should not taste salty.
- Serve the tart warm or at room temperature with dollops of the whipped cream.
- Prep Time: 1 hour
- Cook Time: 45 minutes
- Category: Dessert
- Method: Oven
- Cuisine: French, American
