Before Thanksgiving this past year, I experimented with baking stuffing on a jelly roll pan. Many of you, I imagine, understand the thought process: Why limit the best part of the stuffing to a single layer? Why not make the entire stuffing taste like the crispy bits bobbing at the top?
The stuffing came out well — not well enough to share with you — but I’m hoping to have that taken care of before this November.
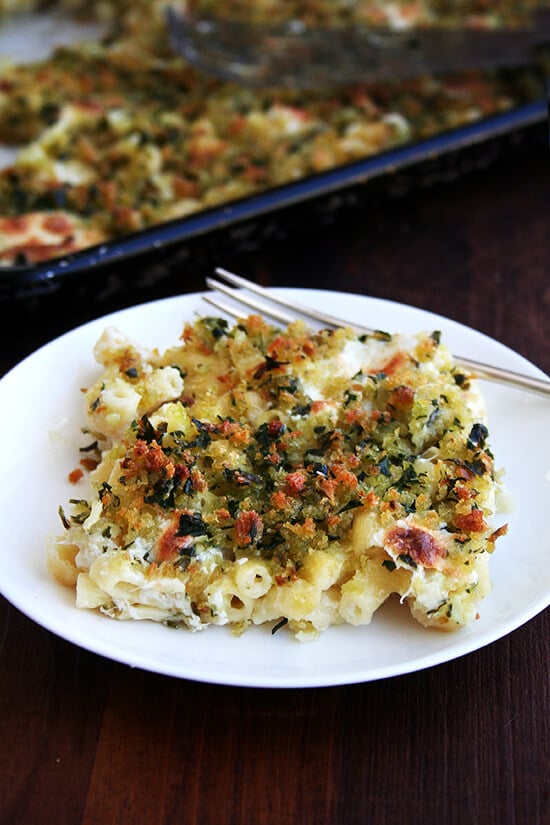
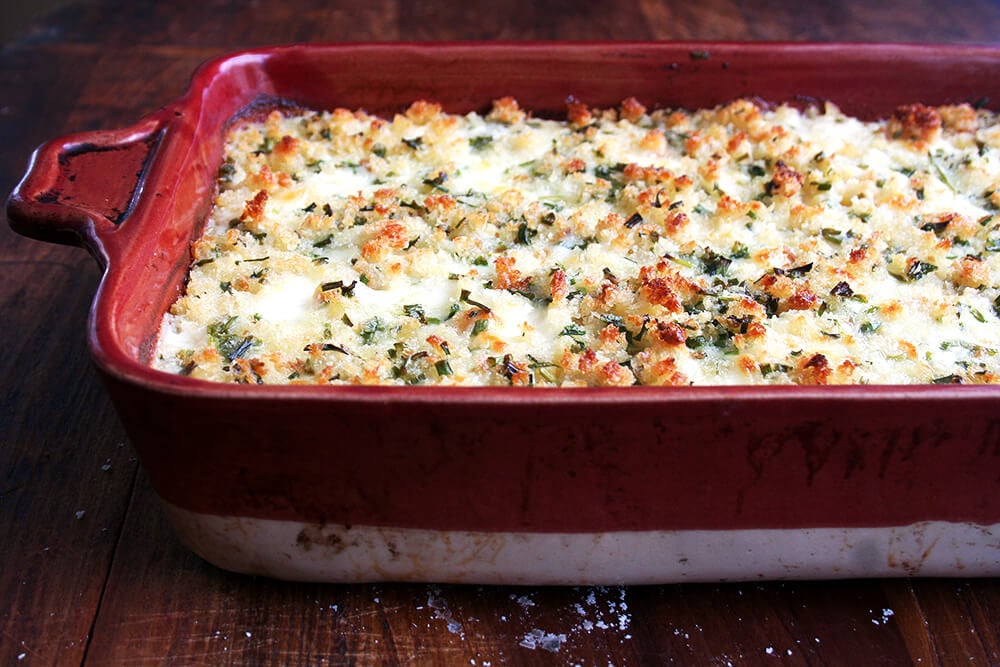
The experiment, however, made me want to bake everything (within reason — bread pudding, pasta gratin, etc.) on a sheet pan and thus far, I’ve had one success: this mac n’ cheese. And when I tell you there’s no going back, I mean it.
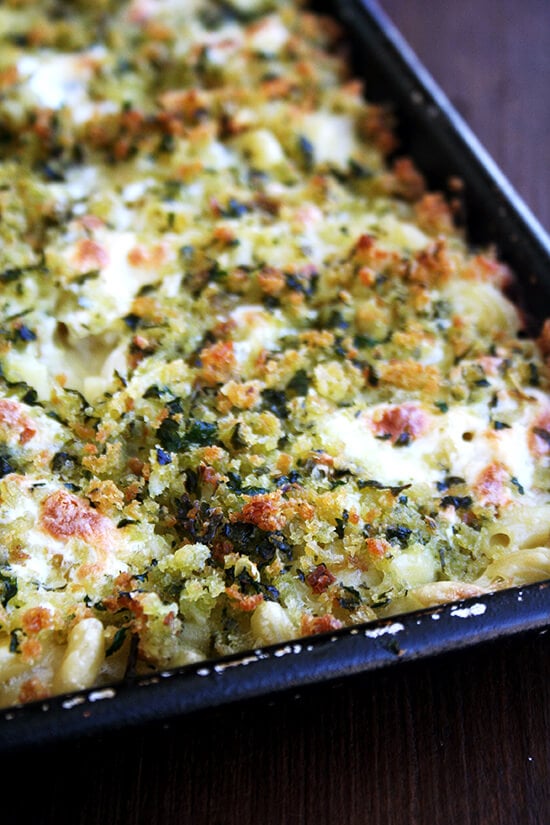
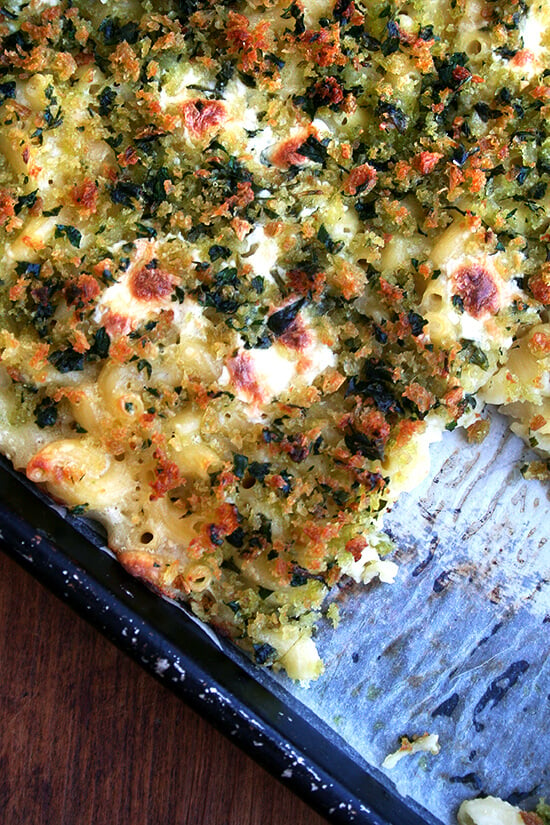
When baked on a sheet pan, the ratio of topping to noodles increases by at least half, ensuring that buttery breadcrumbs fill every bite. In this mac n’ cheese, blistered cubes of mozzarella peek through a golden, herb-speckled topping, stretching with every pull of the fork, clinging relentlessly to the layer of crispy crumbs. It tastes — not that this was the goal — surprisingly light and looks surprisingly elegant or as elegant as macaroni and cheese can.
It’s the slab pie, the brownie edge, the grilled cheese frico of mac n’ cheese, and I think you and any Super Bowl guests you find at your house this Sunday will approve.
Are you not feeling so daring? If so, this is a more traditional mac n’ cheese , my favorite before discovering the sheet pan variation. It’s a no-boil recipe and super easy to throw together.
Description
Making this sheet pan macaroni can be broken down into three phases:
- Boiling the macaroni until it’s less than al dente.
- Making a very thin bechamel using equal parts water and milk.
- Baking it all together with a layer of garlicky, herbed, buttered breadcrumbs. Once you have the method down, you can get creative with the additions, cheeses, breadcrumb seasonings.
- 3/4 pound elbow macaroni
- 8 tablespoons unsalted butter, divided
- 1/4 cup flour
- 2 cups whole milk
- 2 cups water
- 1 1/4 teaspoons kosher salt
- Freshly ground black pepper to taste
- 6 oz fresh bread to be pulsed into crumbs ( 3 cups once pulsed)
- parsley, a medium to large bunch
- 2 to 3 cloves garlic
- 1/4 teaspoon kosher salt
- 1 1/2 cups ( 4 ounces ) Parmigiano Reggiano, grated
- 1 cup ( 8 oz ) Fresh Mozzarella, diced into small cubes
- Preheat oven to 425°F.
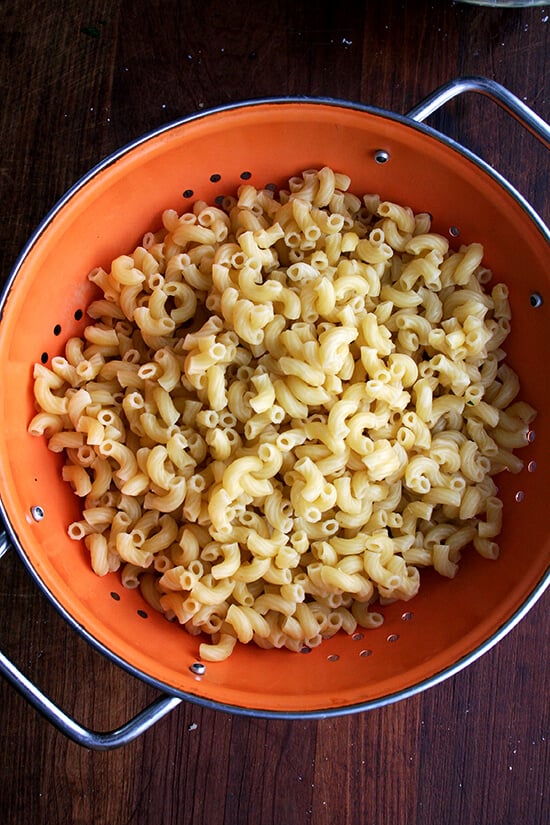
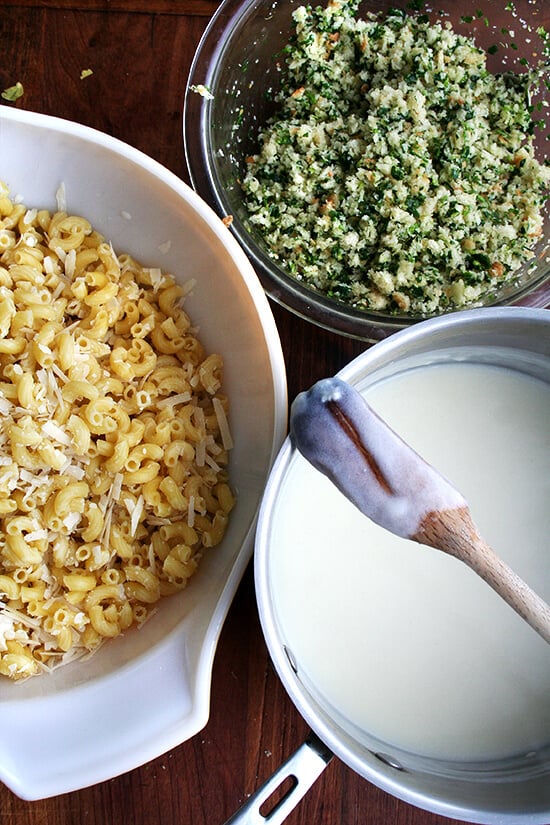
- Bring a large pot of water to a boil. Add a tablespoon of kosher salt. Boil macaroni for about 5 minutes or for 2 minutes less than the box’s suggested al dente time. (For example, my macaroni box said ‘al dente perfection’ in 7 to 9 minutes. I boiled mine for 5.) Drain. Do not rinse. Set aside.
- In the same large pot, melt 4 tablespoons of butter over medium-high heat. Add flour, whisking constantly for about a minute. Add milk and water, whisking to remove any of the flour-butter mixture from bottom of pan. Bring to boil, then reduce heat and gently simmer. Add 1 1/4 teaspoons kosher salt and pepper to taste. Simmer until mixture begins to thicken, about 20 minutes. Note: the mixture will not get super thick, but it will coat the back of a spoon, and if you run your finger through the coating, the trail should stay — see photo. Remove from the heat.
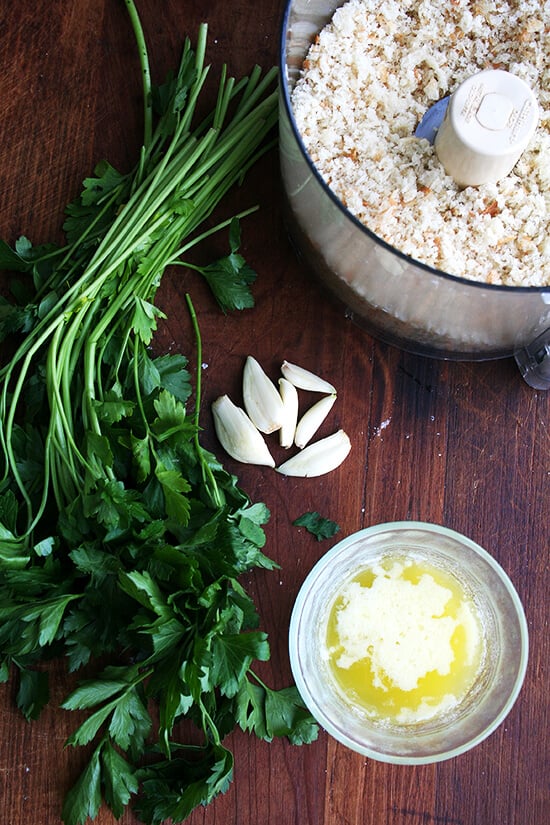
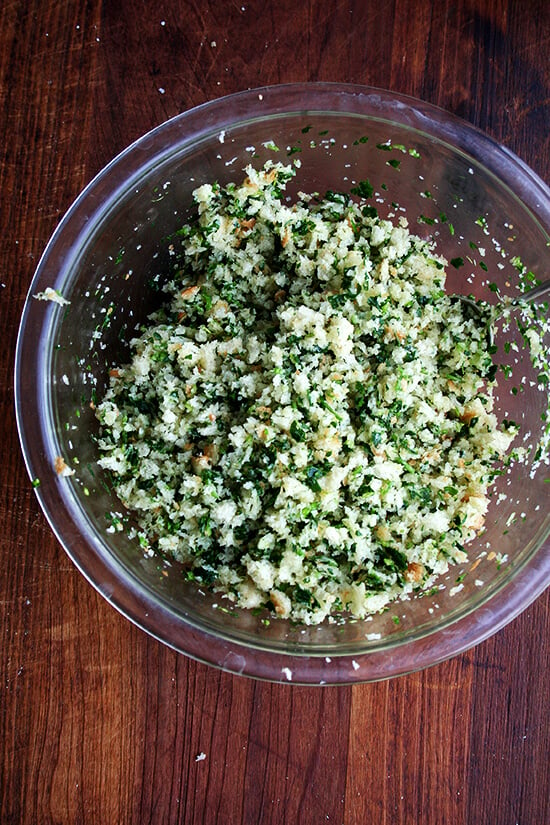
- Meanwhile, melt remaining 4 tablespoons of butter stovetop or in microwave. Pulse bread in food processor to make crumbs. Measure 3 cups and place in a mixing bowl. Add parsley (it’s ok if the tender stems are included — use the top 3/4 or so of the bunch) and garlic to food processor. Pulse until fine, then add to bowl with breadcrumbs. Season with 1/4 teaspoon kosher salt. Pour butter over top and mix with spatula until combined.
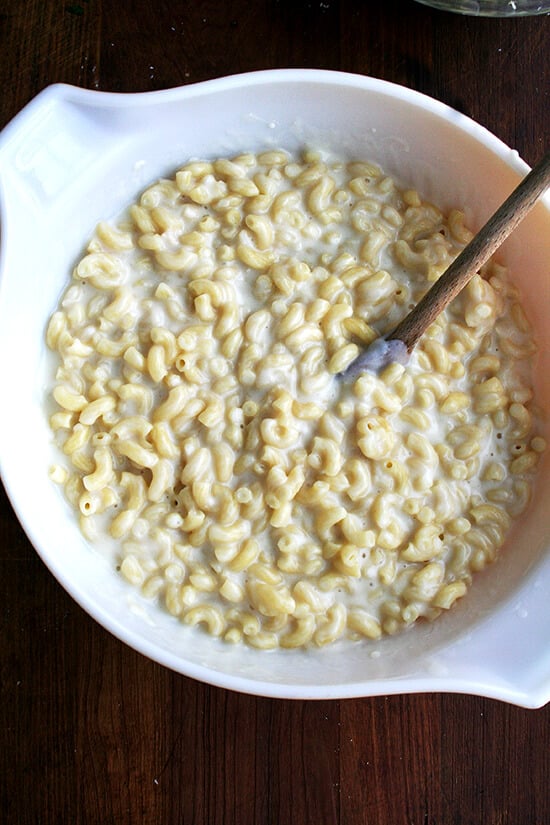
- In a large mixing bowl, toss macaroni with grated Parmigiano Reggiano — it’s ok if the noodles are sticking together; they will separate once the béchamel is poured over top. Pour the béchamel over top and stir to mix.
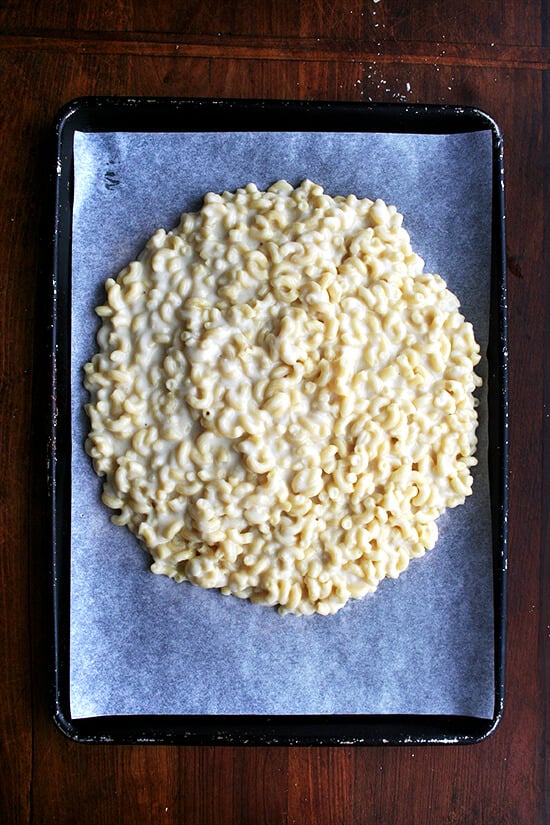
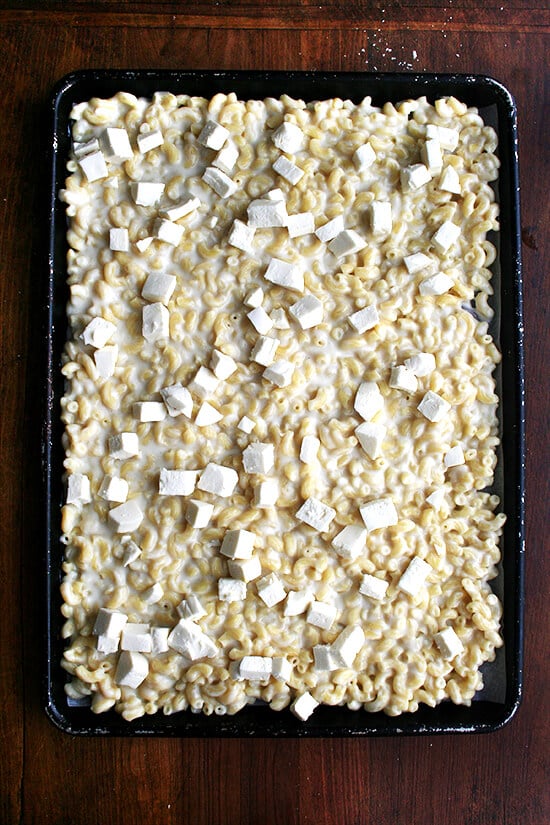
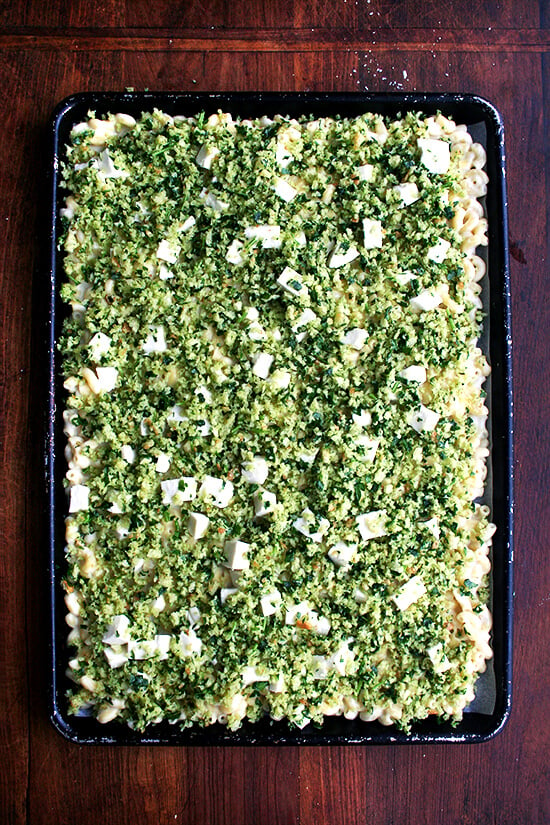
- Line a jelly roll pan with a sheet of parchment paper. Spread macaroni mixture over top. Distribute mozzarella cubes over top. Scatter breadcrumb mixture evenly over top.
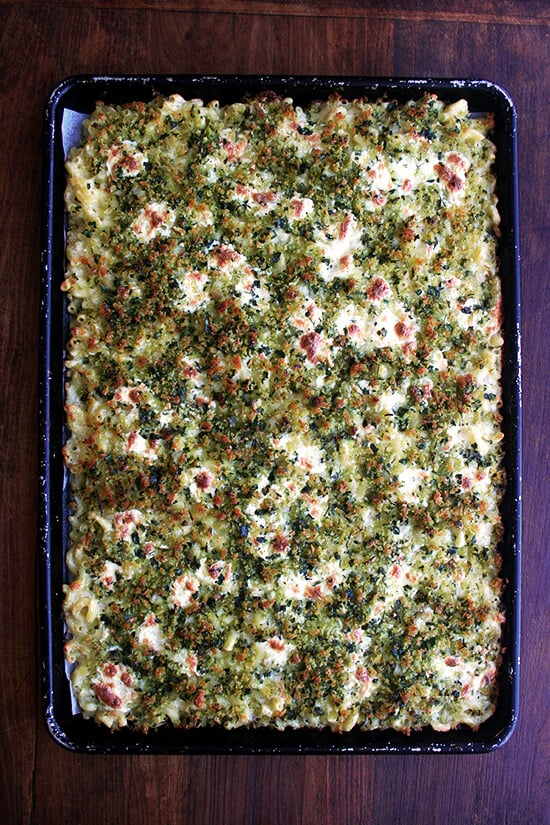
- Bake for 25 to 30 minutes, or until top is golden and the macaroni is bubbling. Let sit 10 minutes before serving.
- Prep Time: 15 minutes
- Cook Time: 1 hours
- Category: Pasta
- Method: Baked
- Cuisine: American
Description
Making this sheet pan macaroni can be broken down into three phases:
- Boiling the macaroni until it’s less than al dente.
- Making a very thin bechamel using equal parts water and milk.
- Baking it all together with a layer of garlicky, herbed, buttered breadcrumbs. Once you have the method down, you can get creative with the additions, cheeses, breadcrumb seasonings.
- 3/4 pound elbow macaroni
- 8 tablespoons unsalted butter, divided
- 1/4 cup flour
- 2 cups whole milk
- 2 cups water
- 1 1/4 teaspoons kosher salt
- Freshly ground black pepper to taste
- 6 oz fresh bread to be pulsed into crumbs ( 3 cups once pulsed)
- parsley, a medium to large bunch
- 2 to 3 cloves garlic
- 1/4 teaspoon kosher salt
- 1 1/2 cups ( 4 ounces ) Parmigiano Reggiano, grated
- 1 cup ( 8 oz ) Fresh Mozzarella, diced into small cubes
- Preheat oven to 425°F.
- Bring a large pot of water to a boil. Add a tablespoon of kosher salt. Boil macaroni for about 5 minutes or for 2 minutes less than the box’s suggested al dente time. (For example, my macaroni box said ‘al dente perfection’ in 7 to 9 minutes. I boiled mine for 5.) Drain. Do not rinse. Set aside.
- In the same large pot, melt 4 tablespoons of butter over medium-high heat. Add flour, whisking constantly for about a minute. Add milk and water, whisking to remove any of the flour-butter mixture from bottom of pan. Bring to boil, then reduce heat and gently simmer. Add 1 1/4 teaspoons kosher salt and pepper to taste. Simmer until mixture begins to thicken, about 20 minutes. Note: the mixture will not get super thick, but it will coat the back of a spoon, and if you run your finger through the coating, the trail should stay — see photo. Remove from the heat.
- Meanwhile, melt remaining 4 tablespoons of butter stovetop or in microwave. Pulse bread in food processor to make crumbs. Measure 3 cups and place in a mixing bowl. Add parsley (it’s ok if the tender stems are included — use the top 3/4 or so of the bunch) and garlic to food processor. Pulse until fine, then add to bowl with breadcrumbs. Season with 1/4 teaspoon kosher salt. Pour butter over top and mix with spatula until combined.
- In a large mixing bowl, toss macaroni with grated Parmigiano Reggiano — it’s ok if the noodles are sticking together; they will separate once the béchamel is poured over top. Pour the béchamel over top and stir to mix.
- Line a jelly roll pan with a sheet of parchment paper. Spread macaroni mixture over top. Distribute mozzarella cubes over top. Scatter breadcrumb mixture evenly over top.
- Bake for 25 to 30 minutes, or until top is golden and the macaroni is bubbling. Let sit 10 minutes before serving.
- Prep Time: 15 minutes
- Cook Time: 1 hours
- Category: Pasta
- Method: Baked
- Cuisine: American
Find it online : https://alexandracooks.com/2014/01/28/sheet-pan-mac-n-cheese/

So you probably have your Super Bowl menu all lined up. Chips and dips , sliders and smokies — your bases are covered. But have you thought about dessert? No? Phew. Because I’ve got just the thing: Mollie Katzen’s Chocolate Eclipse, a pudding cake that feeds a crowd. Everyone will go gaga.
I learned about Chocolate Eclipse from one of you — thank you! — via email, and after finding the recipe online, I made it immediately. It was too intriguing not to.
Now, let me preface this by saying I know absolutely nothing about making pudding cakes — chocolate, lemon, buttermilk, whatever — but this cake was like none I had made before, including its dainty, molten soft chocolate kin .
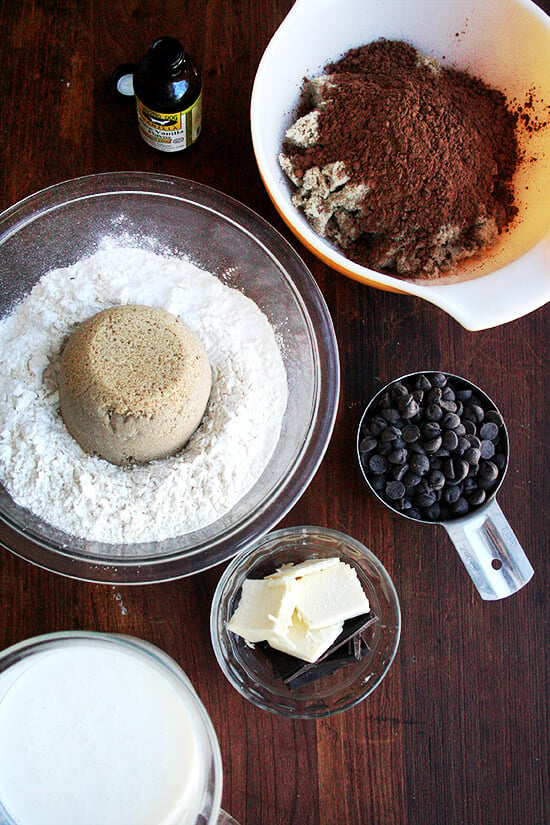
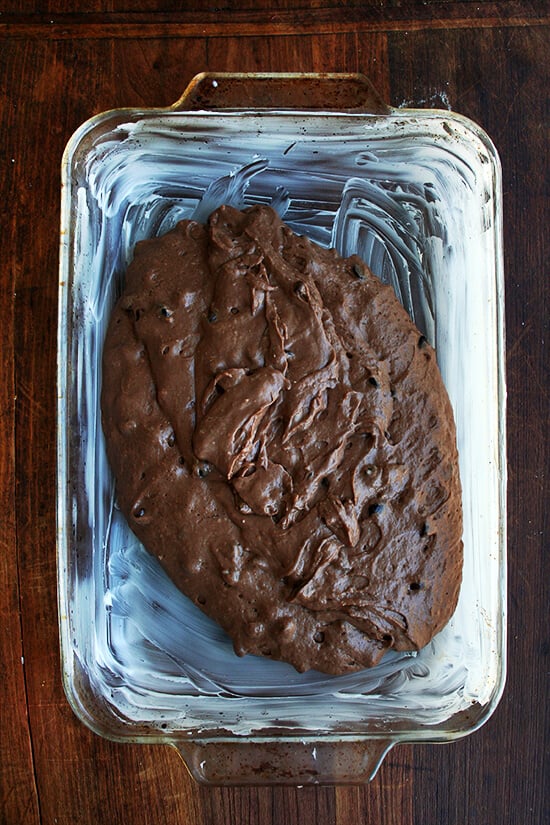
The process starts off familiarly: wet ingredients (buttermilk, vanilla, melted chocolate and butter) get stirred into dry ingredients (flour, brown sugar, salt and leavenings), chocolate chips are folded in, and after everything is mixed together, the batter gets spread into a 9×13-inch pan.
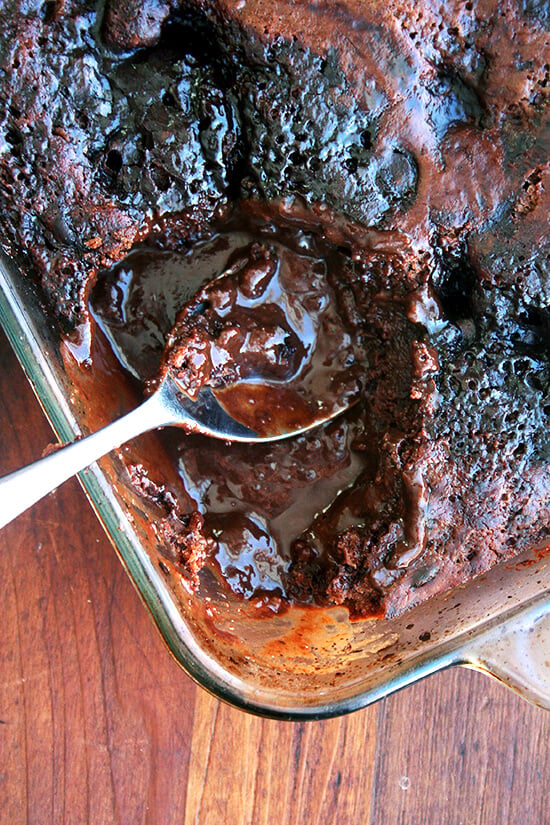
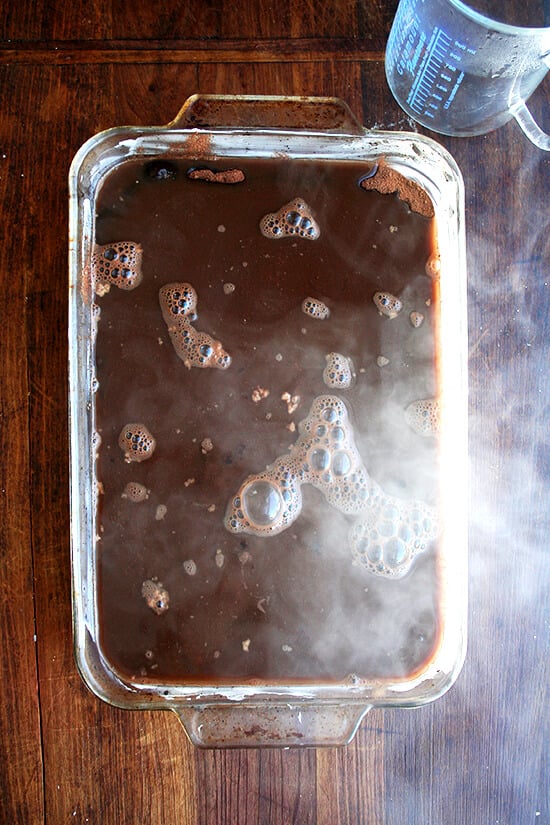
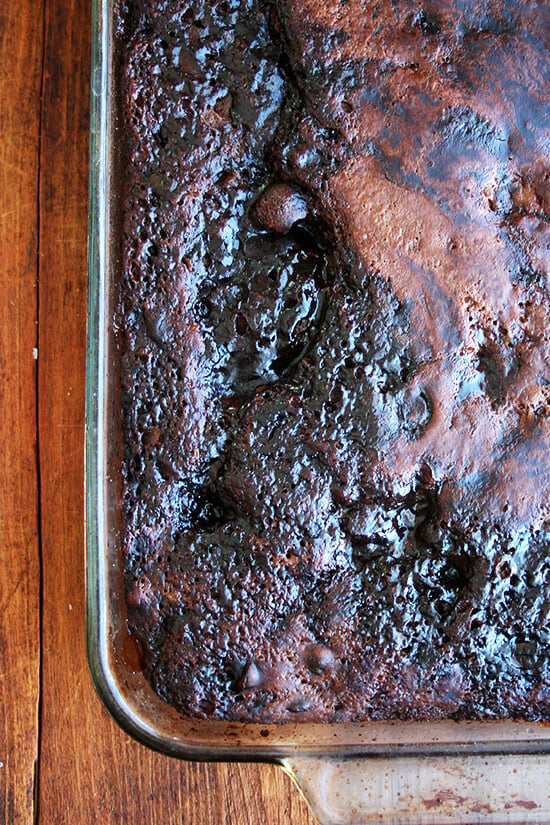
But then the assembly takes a wild turn. After the batter is covered by a blanket of brown sugar and cocoa powder (which ultimately become the pudding), 2.5 cups of boiling water get poured overtop. As the water meets this sandy layer, plumes of cocoa rise and swirl, and when the cake begins looking like a Breaking Bad set prop, you’ll need some encouragement. Katzen offers it: “It will look terrible, and you will not believe you are actually doing this, but try to persevere.”
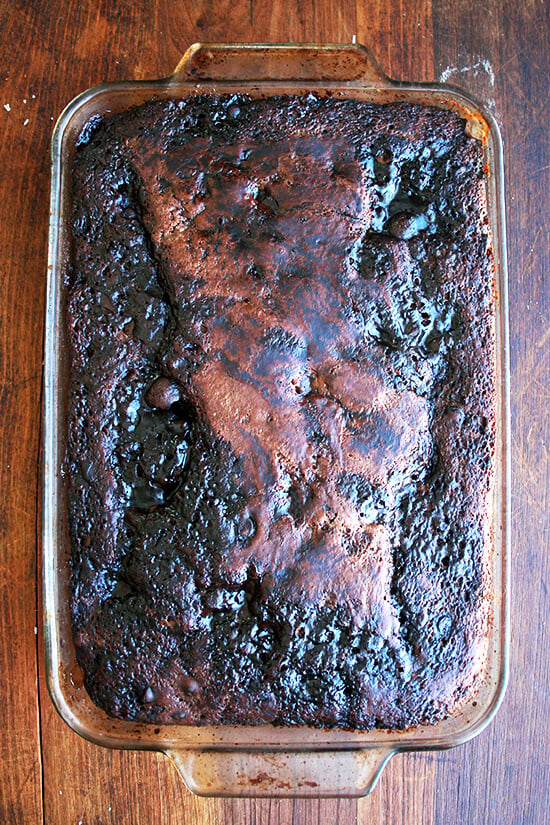
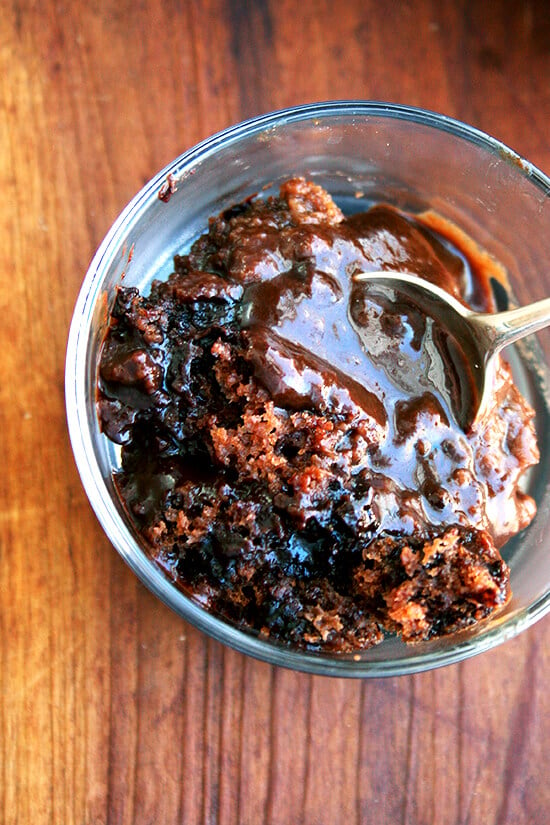
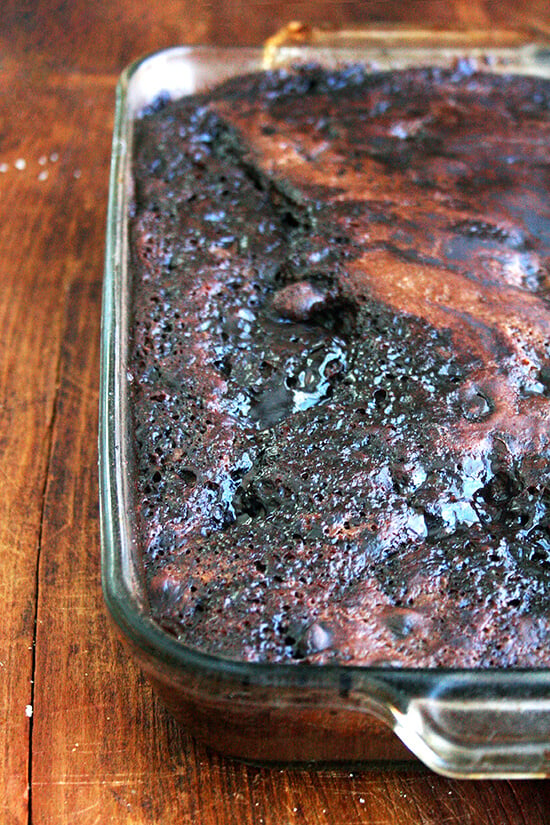
In the oven, the pudding layer sinks to the bottom and the cake rises to the top, emerging with a surface dimpled with deep fudgy craters. When inverted into serving bowls, the built-in fudge sauce becomes the topping, and while a scoop of vanilla ice cream would make for an ultimate experience, this pudding cake is utterly delicious on its own.
Katzen notes that Chocolate Eclipse tastes best about an hour or two after it has emerged from the oven, but waiting this long will take some serious meditation. And you don’t have to. Try refraining for at least 30 minutes, then tuck in.
Chocolate Eclipse: part cake; part pudding. Who says you can’t have your cake and eat your pudding, too? Have a wonderful weekend, Everyone.

Description
- butter for greasing
- 2 tablespoons butter
- 2 ounces unsweetened chocolate
- 2 cups buttermilk
- 1 teaspoon vanilla extract
- 2½ cups ( 11.25 oz | 318 g ) unbleached all-purpose flour
- 2¼ cups packed brown sugar, divided (w eight measurements in recipe)
- 3 teaspoons baking powder
- 1 teaspoon baking soda
- ½ teaspoon salt
- 1 cup semisweet chocolate chips (optional)
- ½ cup plus 2 tablespoons ( 1.75 oz | 48g ) unsweetened cocoa
- 2½ cups boiling water
- Preheat the oven to 350°F. Butter a 9 x 13-inch baking pan.
- Melt the butter and chocolate together. (I did this in the microwave.)
- In a separate saucepan, heat buttermilk gently until just a little warmer than body temperature being careful not to boil or cook it. (Note: I barely heated my buttermilk because I was so worried about it curdling, and next time, I am going to just skip this part. I will report back.) Remove from heat and set aside.
- In a large mixing bowl combine flour, 1 cup (7.25 oz | 208 g) of the brown sugar, baking powder, baking soda, and salt. Mix well (use your hands, if necessary, to break up any little lumps of brown sugar), making as uniform a mixture as possible.
- Pour melted chocolate and butter into dry ingredients. Pour in buttermilk and vanilla. Stir until combined. Stir in chocolate chips, if desired. Spread into the prepared pan.
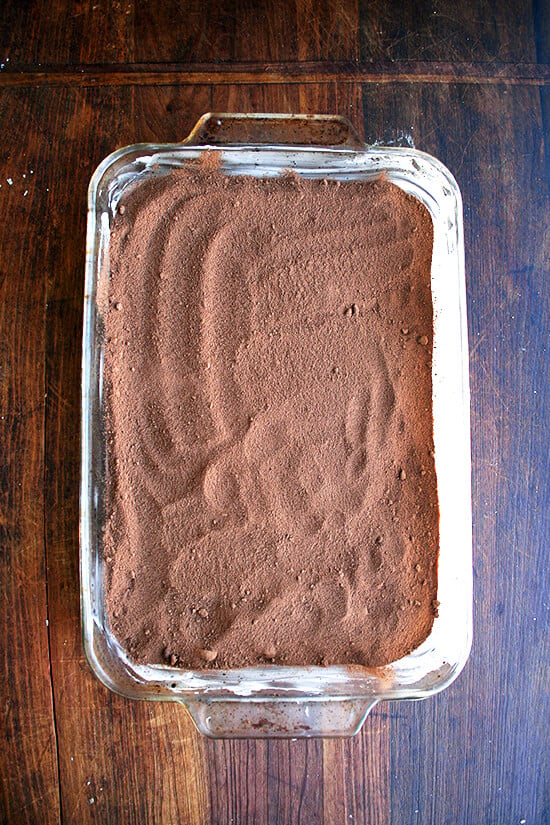
- Combine the remaining 1¼ cups (260 g | 9.25 oz) brown sugar with the unsweetened cocoa in a small bowl. Sprinkle this mixture as evenly as possible over the top of the batter.
- Pour on the boiling water. It will look terrible, and you will not believe you are actually doing this, but try to persevere.
- Place immediately in the preheated oven. Bake for 30 to 40 minutes (I say closer to 30 — I did 31), or until the center is firm to the touch.
- Cool for at least 30 minutes before serving. Invert each serving on a plate so that the fudge sauce on the bottom becomes a topping. Serve hot or at room temperature.
- Prep Time: 15 minutes
- Cook Time: 50 minutes
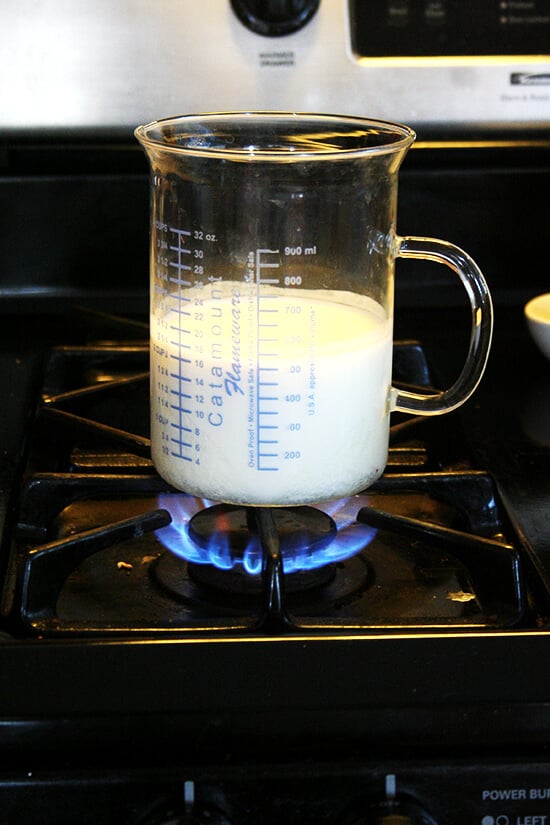
Incidentally, this might be one of my favorite kitchen tools: a 4-cup catamount measuring cup . It is made of borosilicate glass (super strong glass, the material of the old Pyrex), which means you can, among other things, put the measuring cup directly over a flame. I know, amazing, right? I feel like Walt every time I use it.
