These overnight oats are loaded with fiber and protein, and I find them irresistible. They take no time to assemble and the recipe can easily be doubled or tripled for make-ahead breakfasts for the week.
In May, en route home from the Pizza Night photoshoot in Northern California, I grabbed a cup of the overnight oats from the Dolores Park Cafe stand at SFO. I typically don’t love overnight oats from these places for a few reasons — they tend to be too sweet and the fruit included often is on its last legs — but I was short on time and craving something healthy-ish.
Once settled in my seat on the plane, I tucked in, and immediately wished I had bought two, because they were so tasty: not too sweet, loaded with fresh berries, and garnished with toasted coconut. These oats had a higher ratio of chia seeds than others I had tried, and I loved the creaminess they provided.
I vowed to re-create the recipe upon returning home, thinking it would be so nice to have a stash of overnight oats in the fridge to wake up to each morning. I saved the lid, which listed the ingredients on a sticker, for weeks — months — but finally tossed it when I never got around to making them.
I mostly forgot about the oats until a few weeks ago, when my friend Serena Wolf posted a reel of her favorite breakfast of late — overnight coconut chia oats! — noting her creation was “heavier on the chia seeds than normal overnight oats, but too oat-y to be a true chia pudding.”
Serena’s oats looked exactly like those DPC oats I so loved, and I made her recipe immediately, subbing in oat milk for the coconut milk. Friends! These oats are irresistible, perfectly sweet, vanilla- and cinnamon-spiced, and oh so satisfying.
The beauty of this recipe is that it can be tailored to your liking by using the milk, sweetener, and flavorings of your choice. It takes no time to stir together and yields enough for two servings, but can be doubled or tripled for make-ahead breakfasts for the week. And while I loved the toasted coconut garnish at DPC, I skip it at home, opting for fresh fruit instead.
How to Make Overnight Chia Oats, Step by Step
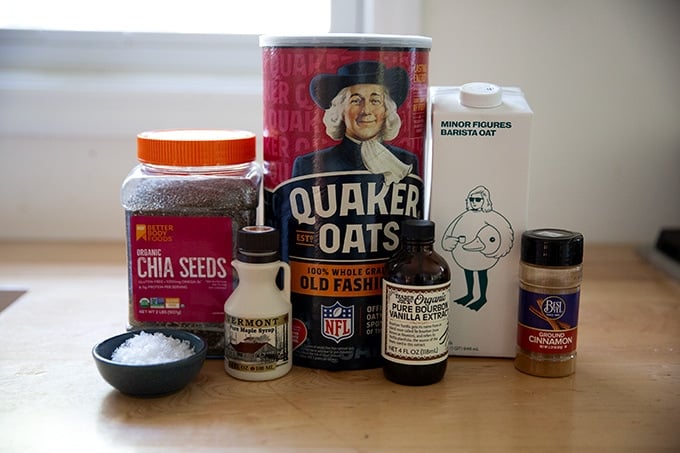
Gather your ingredients: chia seeds, oatmeal, oat milk or milk of choice, maple syrup, vanilla, cinnamon, flaky sea salt.
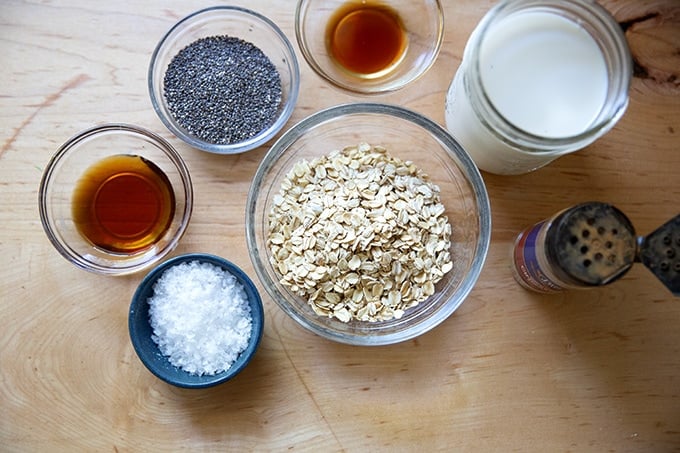
Measure your ingredients…
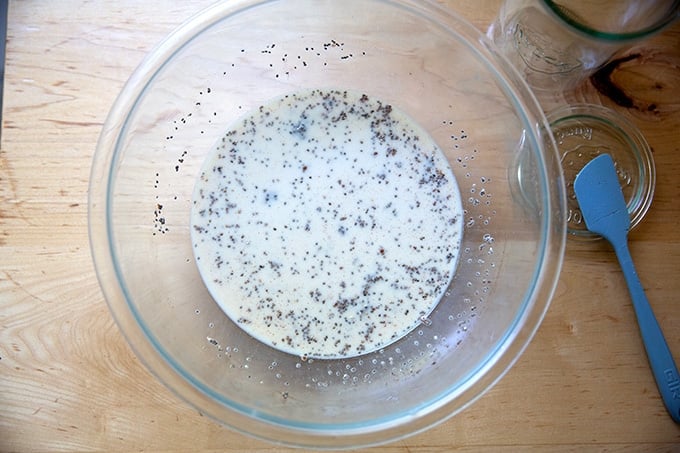
… then combine them all in a large bowl.

Stir to combine…
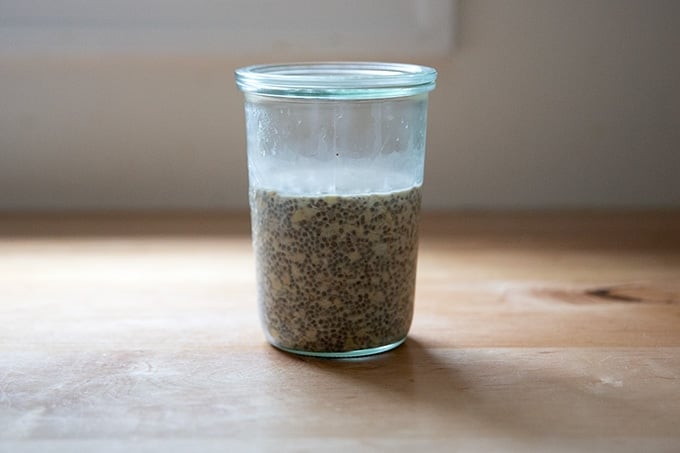
… then transfer them to a storage vessel. I love these Weck Jars .

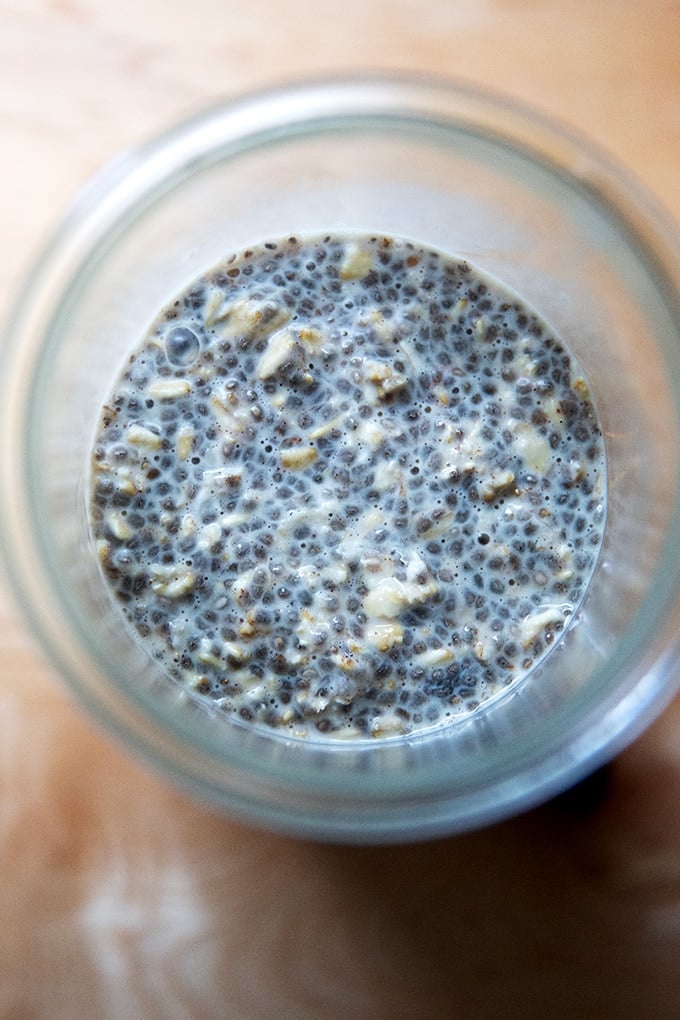
Transfer to the fridge for at least 4 hours but preferably for at least 8 to 12 hours. During their time in the fridge, the chia seeds swell and the oats hydrate and soften.
I find them irresistible.
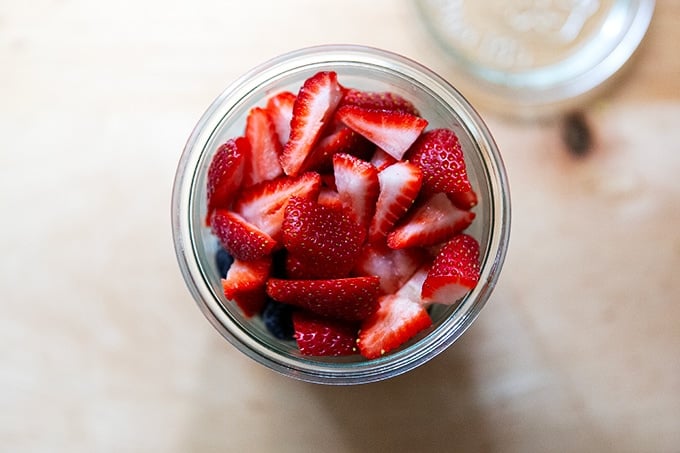
Top with fruit of choice (if desired)…
… and store until you are ready…
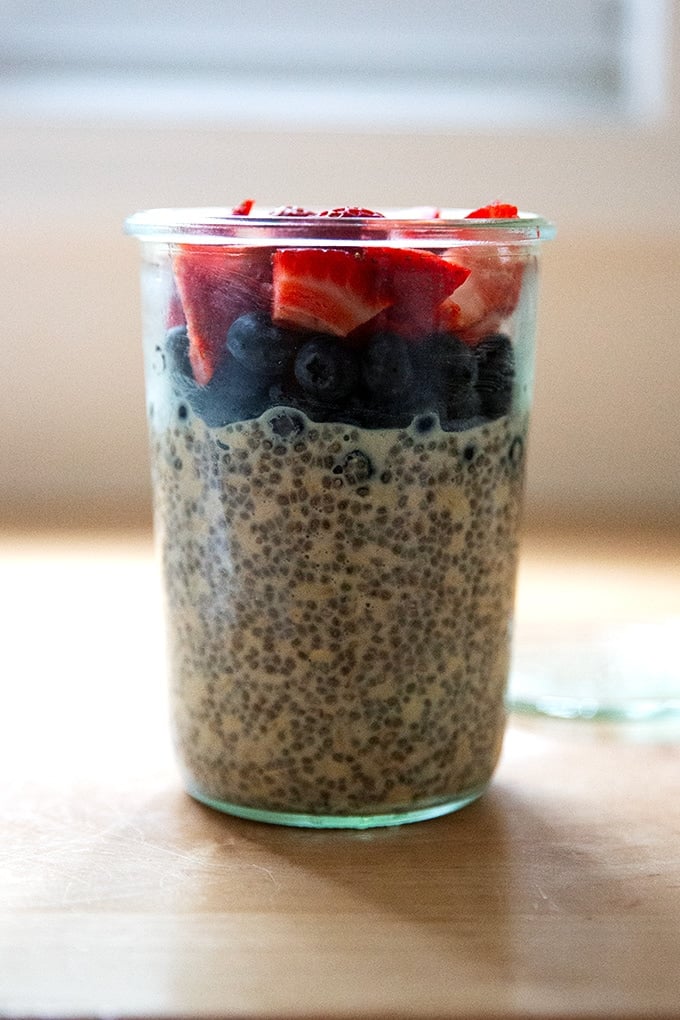
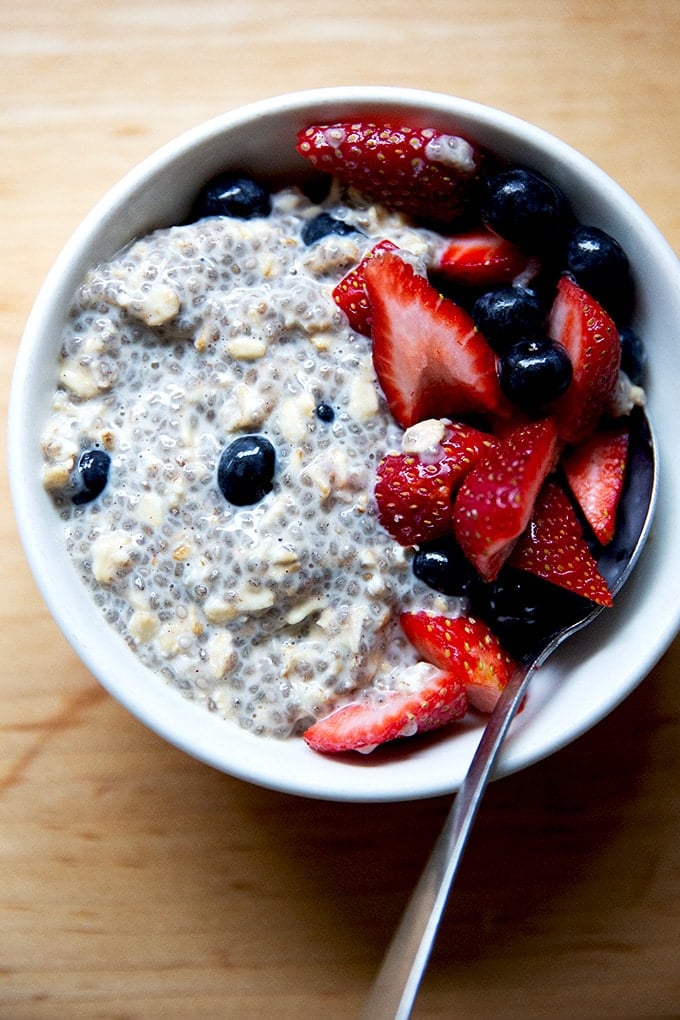
… to enjoy. Such a treat.
Description
Adapted from my friend Serena Wolf’s recipe, which can be found here. Her apple pie overnight oats are also a favorite but entail a teensy bit more work.
Notes
Oat Milk: I love the Minor Figures oat milk for my morning muesli , for my sleeping chocolate ( Beam ), and, now, for these oats. As noted below, use whatever milk your heart desires.
Weck jars: I love these Weck jars for storing the muesli because one is large enough for the entire batch with room for fruit.
Individual Jars: I also love these jars for making individual portions, in which case to each jar I add:
- 2 tablespoons of chia seeds
- 1/3 cup rolled oats
- 3/4 cup oat milk
- 1 teaspoon vanilla
- 1.5 teaspoons maple syrup
- pinch sea salt
- dash cinnamon
Large-Batch Portion: When I can’t locate all of those cute jars, I make a large batch and store it in one of these 2-quart vessels . Then I dish out smaller servings as needed.
¾ cup chia seeds
2 cups rolled oats
4.5 cups oat milk
2 tablespoons vanilla
¼ cup maple syrup
1 teaspoon sea salt, plus more to taste
1 teaspoon cinnamon
3 tablespoons chia seeds
3/4 cup rolled oats
1 1/4 – 1 1/2 cups oat milk or milk of choice
1 teaspoon vanilla extract
1 tablespoon maple syrup
a big pinch of flaky sea salt
cinnamon, to taste
- Combine all of the ingredients in a bowl, using 1.25 cups milk if you like a thicker “oatmeal” consistency and 1.5 cups milk if you like a milkier mixture. Transfer the mixture to a storage jar and place in the fridge for a minimum of 4 hours but ideally 12 or more. The oats can stay in the fridge for 4 to 5 days.
- Remove the jar from the fridge and transfer the contents to two bowls. Top with fruit if desired, then serve.
- Prep Time: 5 minutes
- Category: Breakfast
- Method: Stir
- Cuisine: Amerian
These overnight oats are loaded with fiber and protein, and I find them irresistible. They take no time to assemble and the recipe can easily be doubled or tripled for make-ahead breakfasts for the week.
In May, en route home from the Pizza Night photoshoot in Northern California, I grabbed a cup of the overnight oats from the Dolores Park Cafe stand at SFO. I typically don’t love overnight oats from these places for a few reasons — they tend to be too sweet and the fruit included often is on its last legs — but I was short on time and craving something healthy-ish.
Once settled in my seat on the plane, I tucked in, and immediately wished I had bought two, because they were so tasty: not too sweet, loaded with fresh berries, and garnished with toasted coconut. These oats had a higher ratio of chia seeds than others I had tried, and I loved the creaminess they provided.
I vowed to re-create the recipe upon returning home, thinking it would be so nice to have a stash of overnight oats in the fridge to wake up to each morning. I saved the lid, which listed the ingredients on a sticker, for weeks — months — but finally tossed it when I never got around to making them.
I mostly forgot about the oats until a few weeks ago, when my friend Serena Wolf posted a reel of her favorite breakfast of late — overnight coconut chia oats! — noting her creation was “heavier on the chia seeds than normal overnight oats, but too oat-y to be a true chia pudding.”
Serena’s oats looked exactly like those DPC oats I so loved, and I made her recipe immediately, subbing in oat milk for the coconut milk. Friends! These oats are irresistible, perfectly sweet, vanilla- and cinnamon-spiced, and oh so satisfying.
The beauty of this recipe is that it can be tailored to your liking by using the milk, sweetener, and flavorings of your choice. It takes no time to stir together and yields enough for two servings, but can be doubled or tripled for make-ahead breakfasts for the week. And while I loved the toasted coconut garnish at DPC, I skip it at home, opting for fresh fruit instead.
How to Make Overnight Chia Oats, Step by Step
Gather your ingredients: chia seeds, oatmeal, oat milk or milk of choice, maple syrup, vanilla, cinnamon, flaky sea salt.
Measure your ingredients…
… then combine them all in a large bowl.
Stir to combine…
… then transfer them to a storage vessel. I love these Weck Jars .
Transfer to the fridge for at least 4 hours but preferably for at least 8 to 12 hours. During their time in the fridge, the chia seeds swell and the oats hydrate and soften.
I find them irresistible.
Top with fruit of choice (if desired)…
… and store until you are ready…
… to enjoy. Such a treat.
Description
Adapted from my friend Serena Wolf’s recipe, which can be found here. Her apple pie overnight oats are also a favorite but entail a teensy bit more work.
Notes
Oat Milk: I love the Minor Figures oat milk for my morning muesli , for my sleeping chocolate ( Beam ), and, now, for these oats. As noted below, use whatever milk your heart desires.
Weck jars: I love these Weck jars for storing the muesli because one is large enough for the entire batch with room for fruit.
Individual Jars: I also love these jars for making individual portions, in which case to each jar I add:
- 2 tablespoons of chia seeds
- 1/3 cup rolled oats
- 3/4 cup oat milk
- 1 teaspoon vanilla
- 1.5 teaspoons maple syrup
- pinch sea salt
- dash cinnamon
Large-Batch Portion: When I can’t locate all of those cute jars, I make a large batch and store it in one of these 2-quart vessels . Then I dish out smaller servings as needed.
¾ cup chia seeds
2 cups rolled oats
4.5 cups oat milk
2 tablespoons vanilla
¼ cup maple syrup
1 teaspoon sea salt, plus more to taste
1 teaspoon cinnamon
3 tablespoons chia seeds
3/4 cup rolled oats
1 1/4 – 1 1/2 cups oat milk or milk of choice
1 teaspoon vanilla extract
1 tablespoon maple syrup
a big pinch of flaky sea salt
cinnamon, to taste
- Combine all of the ingredients in a bowl, using 1.25 cups milk if you like a thicker “oatmeal” consistency and 1.5 cups milk if you like a milkier mixture. Transfer the mixture to a storage jar and place in the fridge for a minimum of 4 hours but ideally 12 or more. The oats can stay in the fridge for 4 to 5 days.
- Remove the jar from the fridge and transfer the contents to two bowls. Top with fruit if desired, then serve.
- Prep Time: 5 minutes
- Category: Breakfast
- Method: Stir
- Cuisine: Amerian
Find it online : https://alexandracooks.com/2023/10/01/overnight-chia-oats-gluten-free-dairy-free/

The weather this week called for soup. Wanting something new, I turned to Sally Schneider’s A New Way to Cook and found a recipe for roasted pumpkin and garlic soup described as “utterly simple” and “exceptionally creamy,” all of which sounded perfect.
The recipe called for roasting sugar pumpkins or any winter squash and a head of garlic together, then puréeing the flesh of the two together with stock.
It sounded too simple to be good, but Sally has never steered me wrong, so I made it and was astonished by its flavor. After puréeing the soup, Sally suggests stirring in a few tablespoons of heavy cream or crème fraîche, which I did, but I wouldn’t have missed this final enrichment had I not.
What was going on here? Why was it so good? For two reasons, I think. Time, for one: during the 40 to 60 minutes in the oven, the flavors of both the squash and the garlic intensify. As they roast, they sweeten and soften, emerging meltingly tender with caramelized edges.
And second, the stock. Sally suggests using chicken stock, but I used vegetable stock , which, if you have never made, I can’t recommend enough: it takes no time to throw together, simmers for only 45 minutes, and tastes complex and rich upon completion. I made the stock while the squash and garlic roasted.
Upon being blended, the roasted vegetables transform into the silkiest purée, needing nothing more than a pinch of salt, a few twists of pepper, and, of course, a loaf of bread for dunking.
How to Make Roasted Butternut Squash and Garlic Soup, Step by Step
Gather your ingredients: garlic and butternut squash.
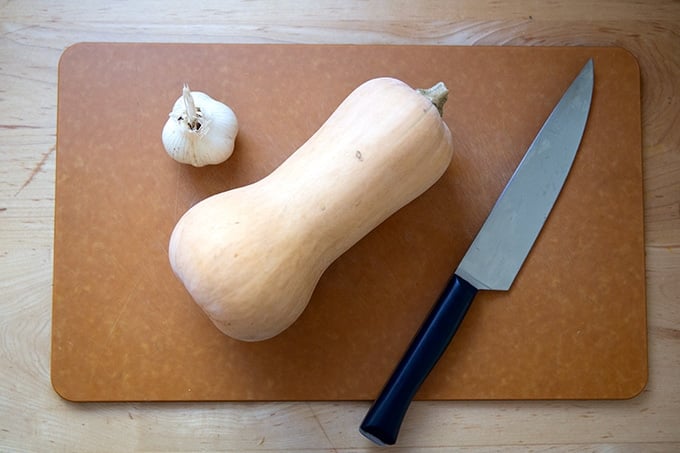
To prep the squash, halve it, and scoop out the seeds. To prep the garlic, cut the head in half crosswise (through the equator).

Rub the squash with a drizzle of olive oil. For the garlic, drizzle a small amount of oil on the sheet pan, and rub the halved head of garlic in it, cut side down. You only need one head of garlic for this recipe, but I recommend roasting more so that you have those buttery soft cloves on hand to spread over olive oil-toasted slices of bread.

Roast for 1 hour, checking after 40 minutes — you’ll want to remove the garlic at the 40-minute mark if it’s looking caramelized and delicious.

The squash, at the solid end (not the hollowed-out end), should be very knife-tender.
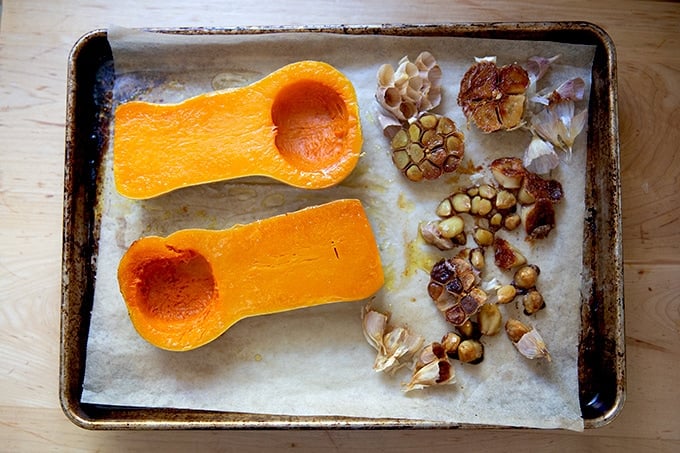
The garlic should be caramelized at the edges and knife-tender as well… some of these are overdone.

You also need stock. This vegetable stock will materialize in the time your squash and garlic roast away in the oven, and if you haven’t yet made it, you will be blown away by its flavor. Promise.
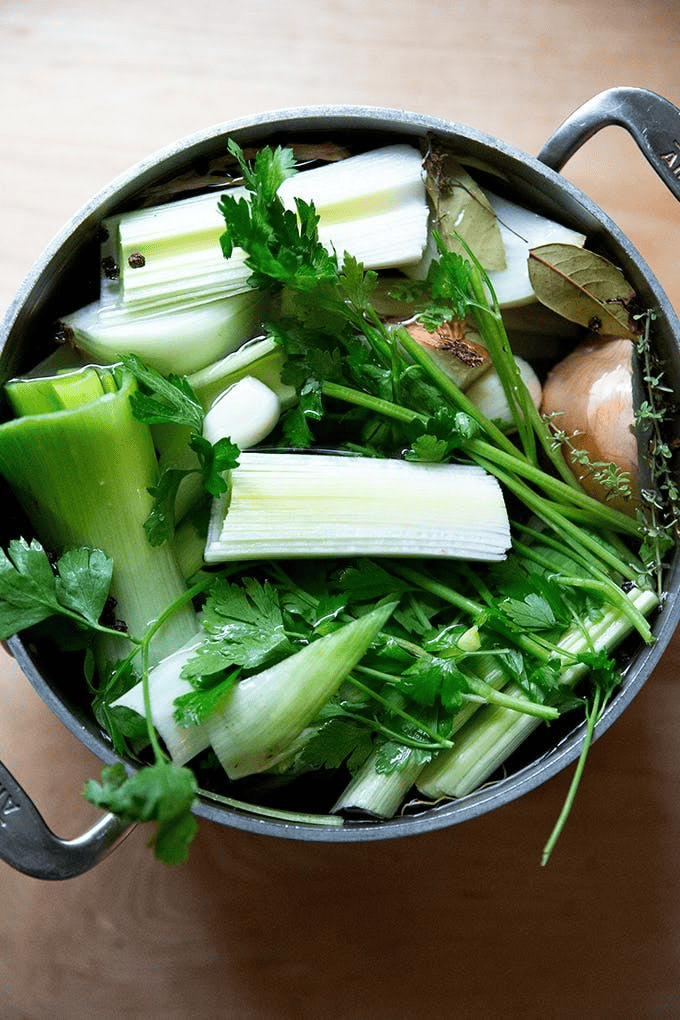
After 45 minutes of simmering, drain the stock…

… and transfer it to storage containers. (I love these deli quart containers ). You will have two quarts of stock.

Scoop out the flesh of the squash and the cloves from 1 head of garlic and place them in a pot. Add 1 quart of stock.
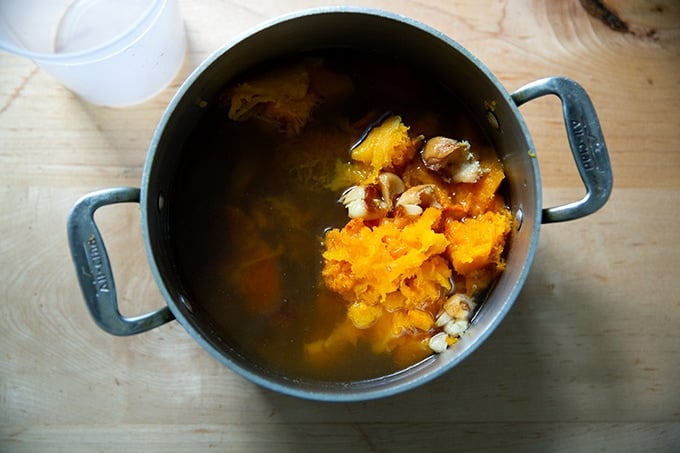
Bring to a simmer, the purée until smooth.

At this point, taste for salt and pepper. I consistently add 1 to 1.5 teaspoons of Diamond Crystal kosher salt, but, of course, you should add salt to taste. I am astonished by how tasty it is at this point, but even so, I do add the recommended 3 tablespoons of heavy cream or crème fraîche.

Whisk or stir to incorporate, then taste and adjust as needed with more salt and pepper to taste.

Serve as you wish…

If you’re feeling up for it, you could top the soup with frizzled sage leaves and olive oil-toasted bread…
… but, real talk: bread of some sort is all you need. Peasant bread is never a bad idea…

… neither is olive oil-toasted croutons: to make these, simply heat up some extra-virgin olive oil in a skillet stovetop, add torn bread cubes, season with salt, and cook for about 2 minutes or until the cubes are golden at the edges.

Description
Adapted from Sally Schneider’s A New Way to Cook .
Notes:
You need 1 whole head/bulb of garlic for this recipe — not a single clove.
- 1 whole butternut squash, 2.25 to 2.75 lbs
- 1 whole head/bulb of garlic, see notes above
- extra-virgin olive oil
- 1 quart of stock of choice, such as vegetable or chicken
- kosher salt
- 3 tablespoons of crème fraîche or heavy cream, optional
- Fresh cracked pepper to taste
- bread for serving, such as peasant bread or focaccia or no-knead thyme dinner rolls
- Preheat the oven to 350ºF. Line a sheet pan with parchment paper (for easier cleanup).
- Halve the butternut squash: slice off the bottom of the bulbous end, stand the squash upright, then carefully cut straight down through the center. Use a spoon to scoop out the seeds and discard. Rub the halved sides with a drizzle of olive oil then place them halved side down on the prepared sheet pan. Cut the head of garlic in half through the equator. Rub a small amount of olive oil on the sheet pan and place the garlic, cut side down, in the olive oil. Transfer to the oven.
- After 40 minutes, check on the garlic. If it is knife-tender and caramelized at the surface, remove it, otherwise, let it continue roasting with the squash until done. Cook the squash for roughly 1 hour or until knife tender at the solid end.
- Let the squash and garlic cool for 20 minutes or until cool to the touch. Scoop the squash flesh into a pot. Squeeze the roasted cloves of garlic into the pot as well. Add the quart of stock. Bring to a simmer.
- Use an immersion blender to purée the mixture — alternatively, transfer the mixture to a blender or food processor and purée until smooth. If you transferred the mixture to puree it, return it to the pot and bring it to a simmer. Taste. Adjust to taste with salt and pepper to taste. I consistently add 1 to 1.5 teaspoons of Diamond Crystal kosher salt.
- If you wish, add the heavy cream or crème fraîche and whisk to incorporate. Depending on the size of the squash, you may need to add more stock to thin it to the right consistency.
- Ladle into bowls and serve with bread on the side.
- Store the soup in the fridge for up to a week or freeze for up to 3 months. When reheating day- or days-old soup, you may need to add water or more stock to thin — it thickens as it sits.
- Prep Time: 10 minutes
- Cook Time: 1 hour
- Category: Soup
- Method: oven, stovetop
- Cuisine: Amerian
