Before I begin, I would like to note this is not an authentic recipe for butter chicken, a classic creamy Indian curry. I adapted this recipe from Urvashi Pitre’s recipe on Food52 and you can find many more authentic Indian recipes on Urvashi’s blog, Two Sleevers .
Let’s start from the top: My friend Michelle has been telling me about this Instant Pot butter chicken recipe for years. For reasons I will get to, I only just got around to making it last month and instantly understood her enthusiasm. The meal takes no time to throw together, and it is very, very tasty. Five-sixths of my family inhaled it.
Why is it so tasty? Well, there are spices and aromatics, tomatoes, flavorful chicken thighs (you could use breasts, of course), and, ahem, a stick of butter and a quarter cup of heavy cream. This — the quantity of butter and cream — is what deterred me all these years.
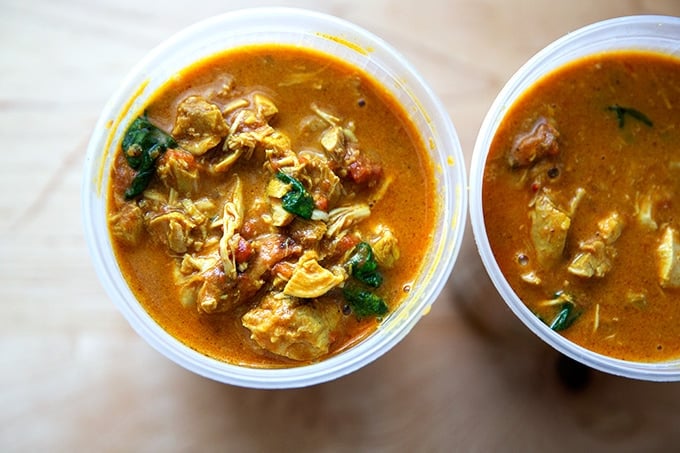
But upon making the recipe for the first time, I realized the sauce yields enough for double the amount of chicken. Urvashi calls the recipe “Now & Later” Butter Chicken because the recipe makes too much sauce, half of which she instructs you to save for your next meal.
When I did the math, the amount of butter and cream didn’t seem so bad. For eight chicken thighs or about 3.25 lbs. of meat, which yields ten servings, that’s less than a tablespoon of butter and less than a half tablespoon of cream per serving — that’s nothing! Phew. And besides, as Julia Child says: “Fat gives things flavor.”
Can I tell you what else astounds me about the recipe? Nearly all of the ingredients enter the pot and cook at the same time. You don’t need to sauté the garlic and the ginger first. You don’t need to toast the spices. You don’t need to marinate the chicken. You don’t need to methodically add the ingredients one after another. You simply place everything (with the exception of the butter and cream) into the Instant Pot at once; then set it.
Once the chicken is cooked, you remove it and chop it up; then you add the butter, heavy cream, and finally the chopped-up chicken. Start to finish the meal takes about 40 minutes to make — 20 minutes for the pot to come to pressure, 10 minutes of cooking time, 10 minutes of cooling — but the active time is very minimal. This meal has been a welcomed addition to the weeknight rotation. I hope it proves the same for you.
A Few Notes:
- In place of all of the spices, I use 2 tablespoons of Madras curry powder . If you wish to use the spices called for in the original recipe, go for it, but I find this substitution works really well and simplies the process.
- If you don’t have an Instant Pot , don’t despair! This method works equally well on the stovetop.
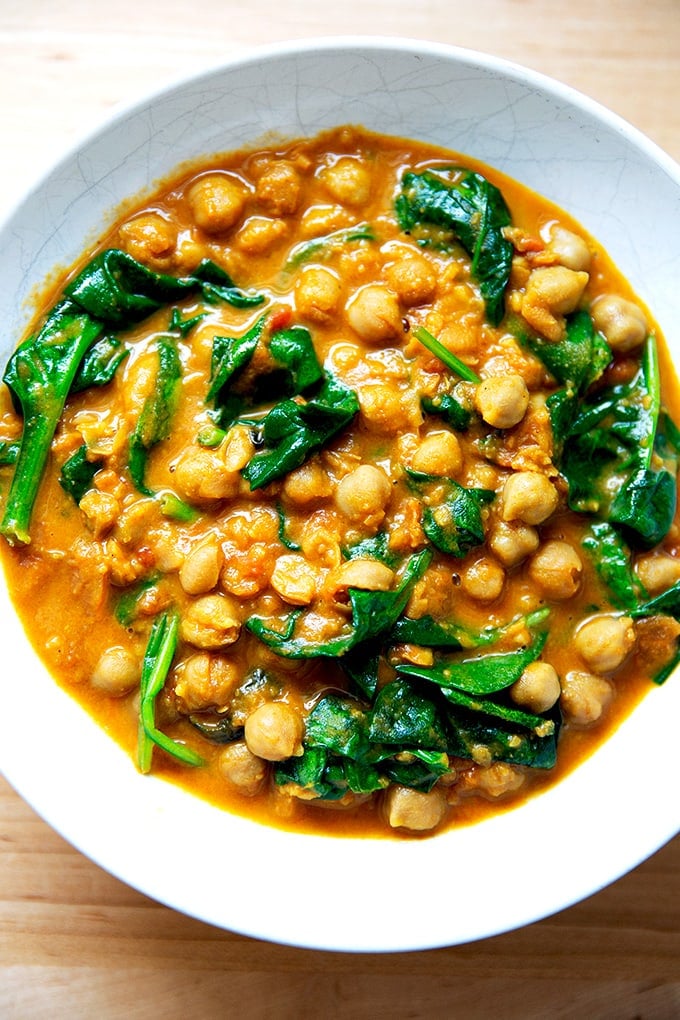
- For a vegetarian version, simply swap in 4.5 cups of cooked chickpeas (or three drained 15-oz cans) and add 1/2 cup of water.
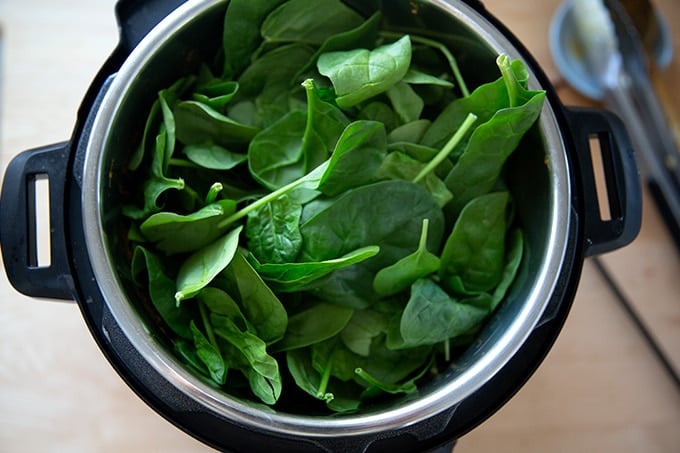
- To make this more of a meal, I wilt in spinach at the end. My children prefer it without the spinach, so I don’t always do this, but I like the addition.
- If cooking 8 chicken thighs feels like too much, know that you can freeze the finished dish or you can simply halve the recipe.
- When I have time, I’ll make homemade naan , but often I buy those mini packs of Stonefire naan , the ones that say “perfect for the toaster.” My children love them.
How to Make Instant Butter Chicken, Step by Step
Gather your ingredients. Incidentally: these Colavita crushed tomatoes are a recent discovery for me, and I really really like them — they’re the perfect combination of puréed + chopped tomatoes for my liking. The box is 13.76 ounces but I use it anytime a recipe calls for a 15-oz can of tomatoes.
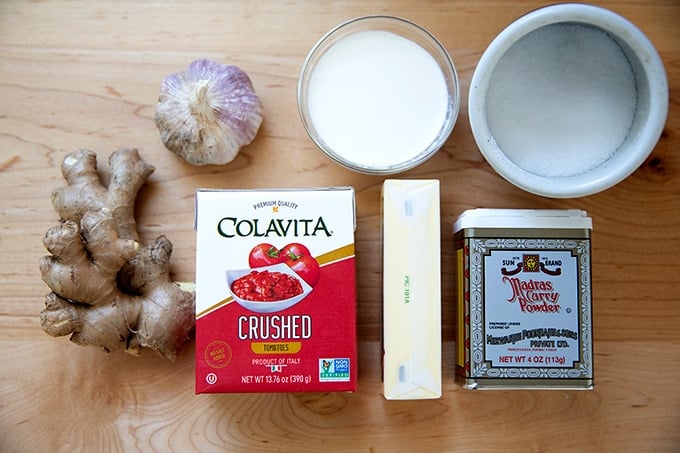
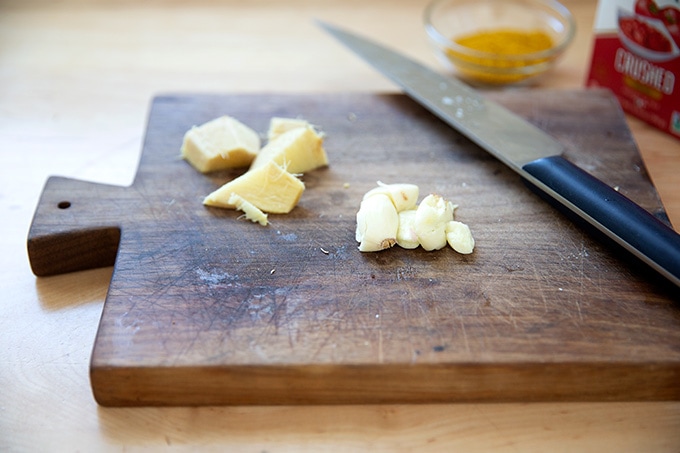
You’ll need about a tablespoon each of minced garlic and ginger. I’ve been doing this in the food processor. I find the food processor can get a finer mince on ginger than I can with my knife, and I hate mincing ginger, so it feels worth dirtying a machine. Also, I find if I remove the garlic and ginger immediately and give the food processor a quick rinse right away, dirtying the machine doesn’t feel like such a big deal.
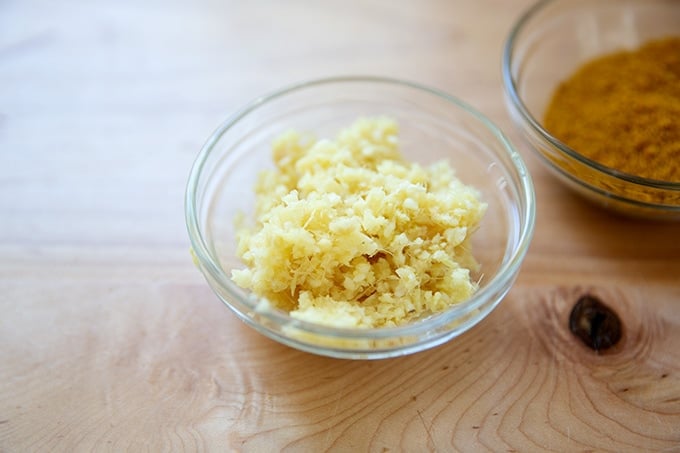
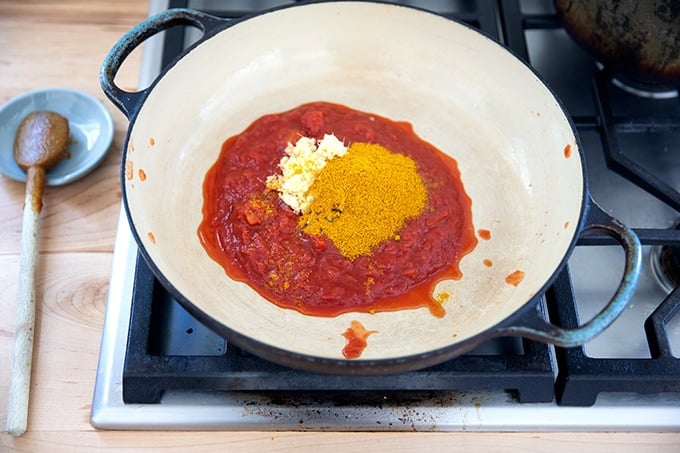
Add the crushed tomatoes, 2 tablespoons curry powder, minced garlic and ginger, and 2 teaspoons kosher salt to the Instant Pot.
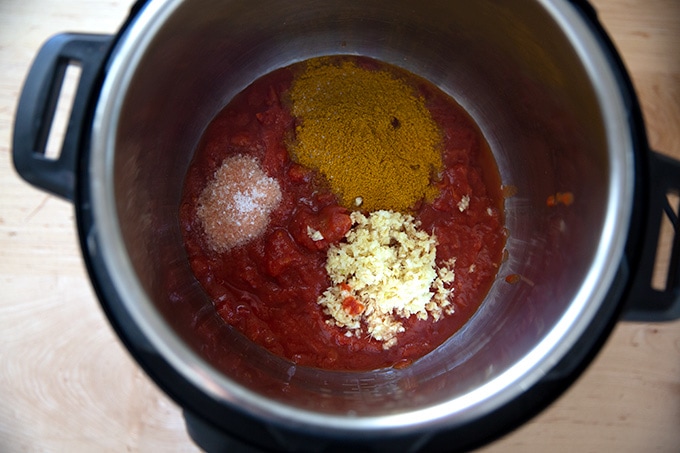
Stir to combine.
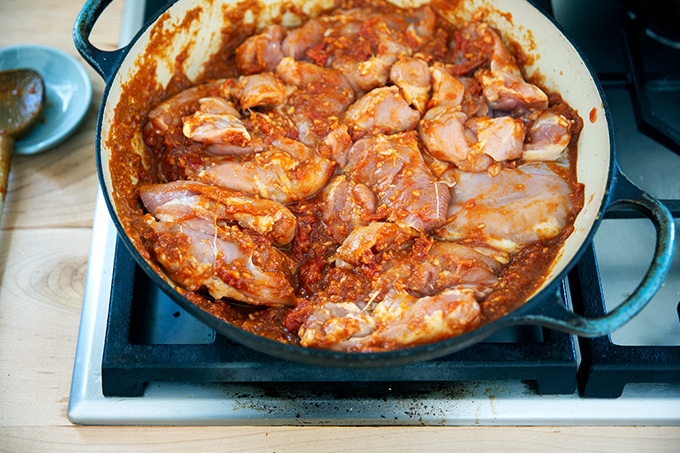
Then add the chicken (or chickpeas, see below) and stir to combine. This is 8 boneless, skinless chicken thighs, about 3.25 lbs.
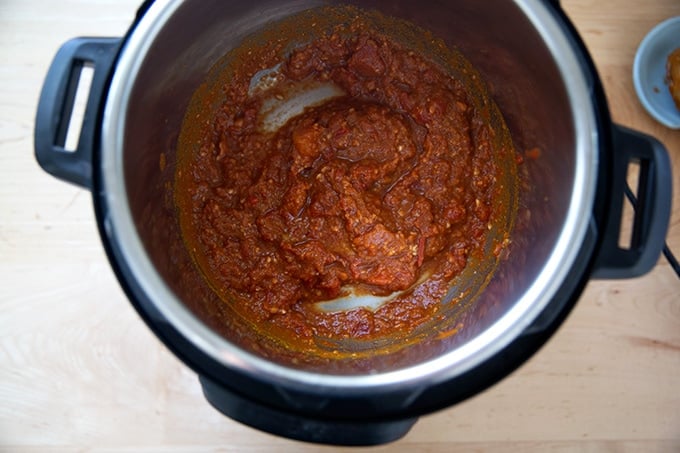
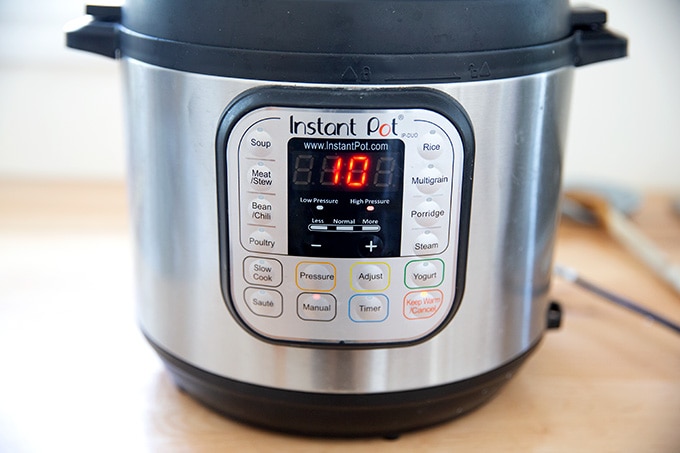
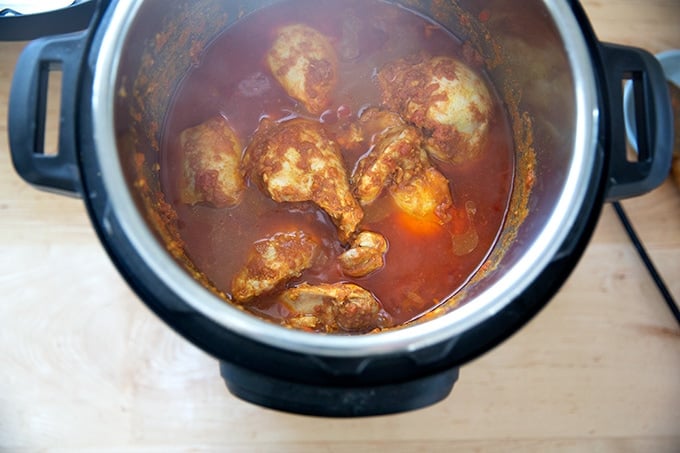
Cover the Instant Pot, set the valve to sealing, and cook on high pressure for 10 minutes.
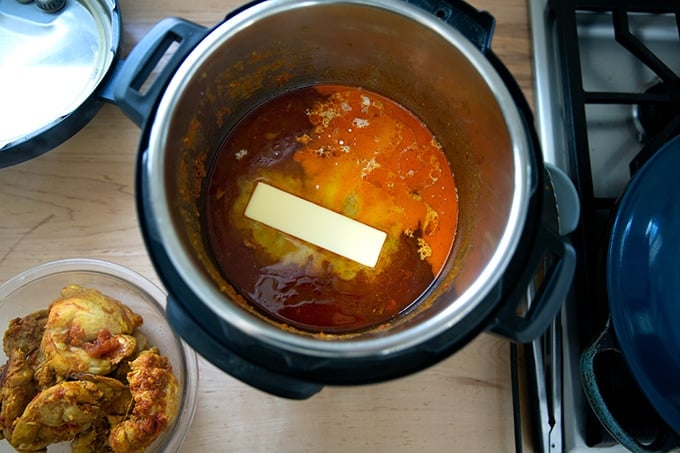
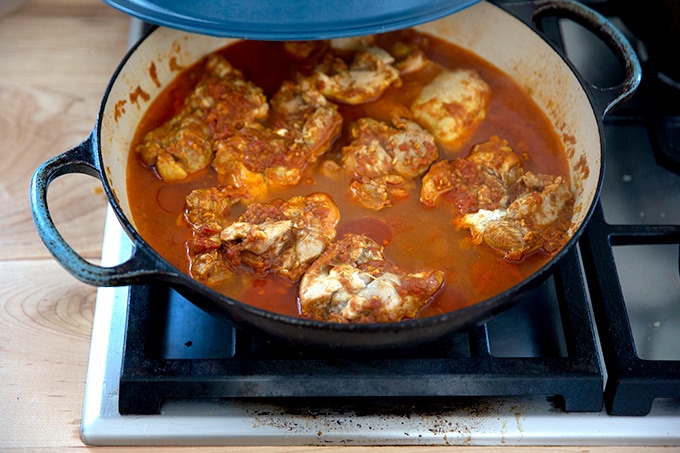
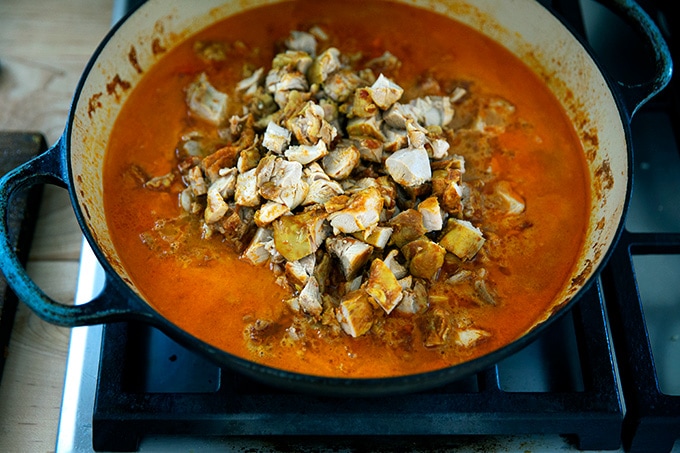
Let the valve release naturally for 10 minutes; then uncover and remove the chicken.
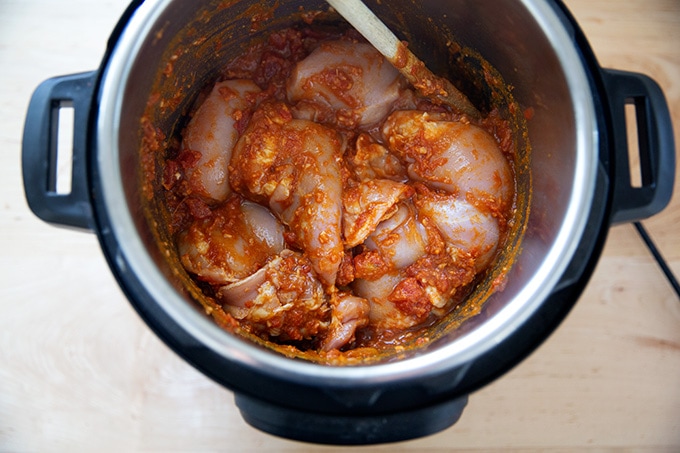
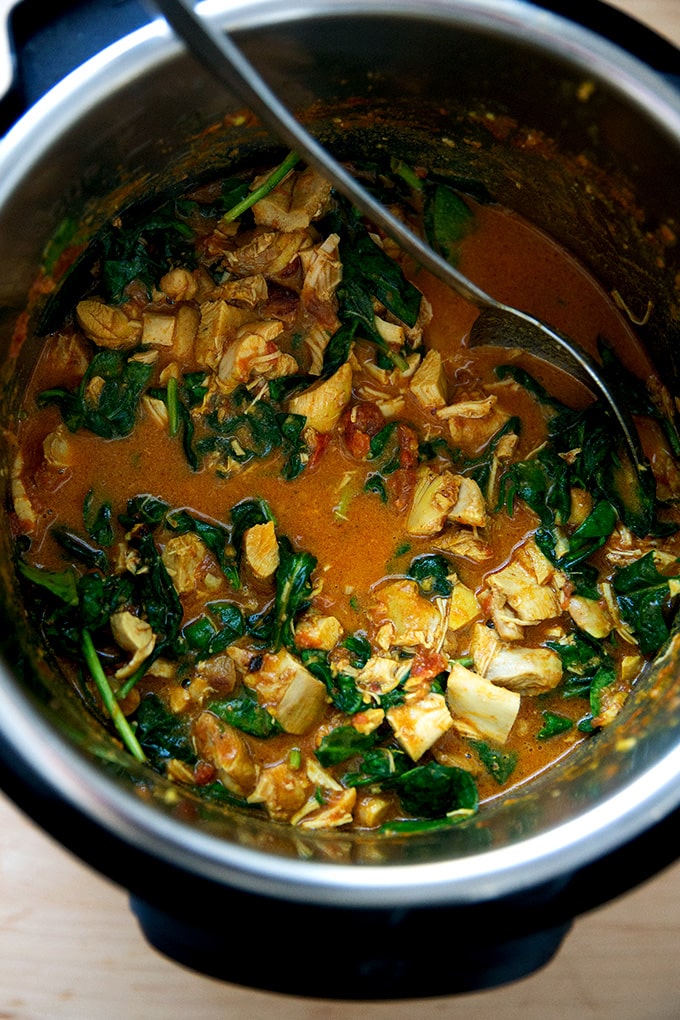
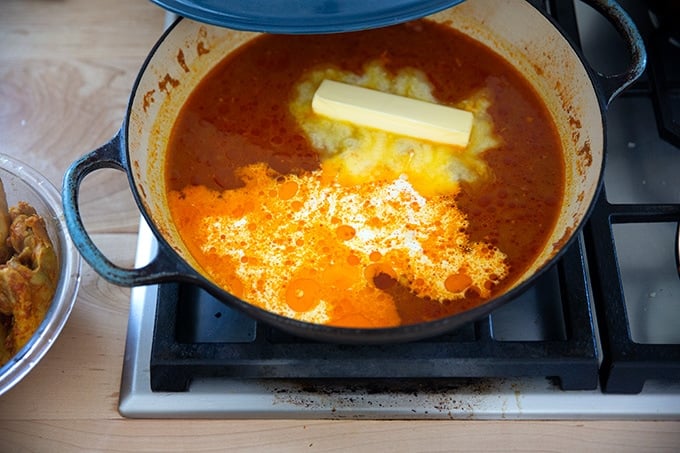
Add a stick of butter and 1/4 cup heavy cream to the pot.
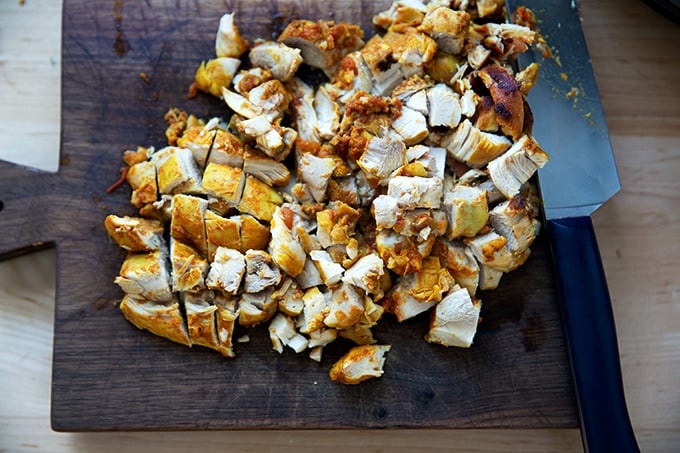
While the butter melts, chop up the chicken.
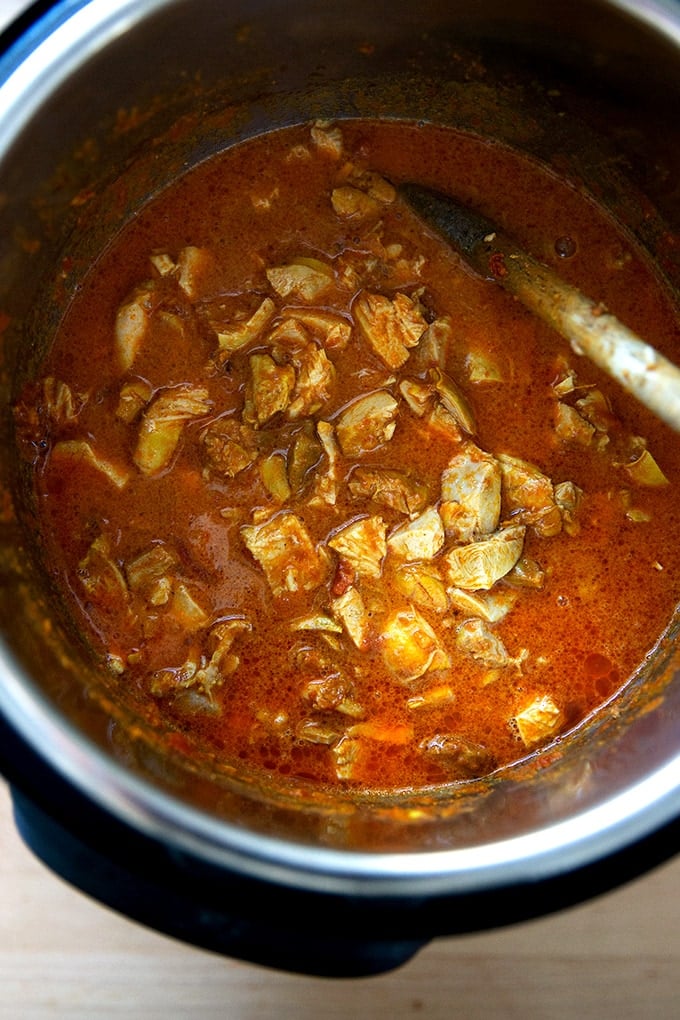
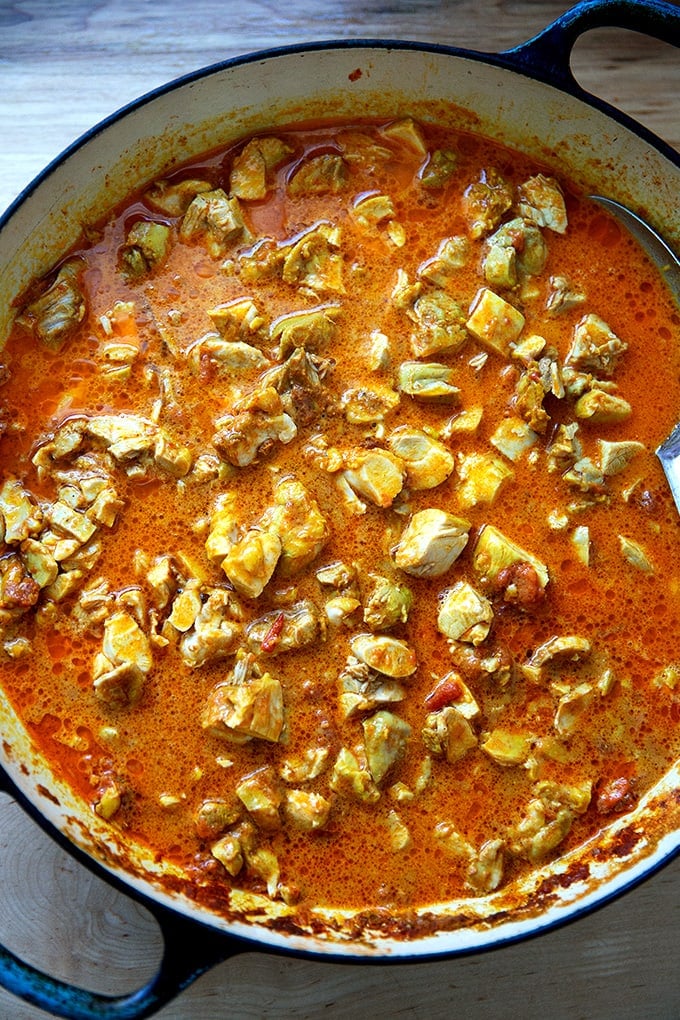
Add it to the pot. Stir to combine. Taste and adjust as needed with more salt if necessary. You can stop right here or…
… add a heap of spinach. You can cover the pot to speed along the wilting process.
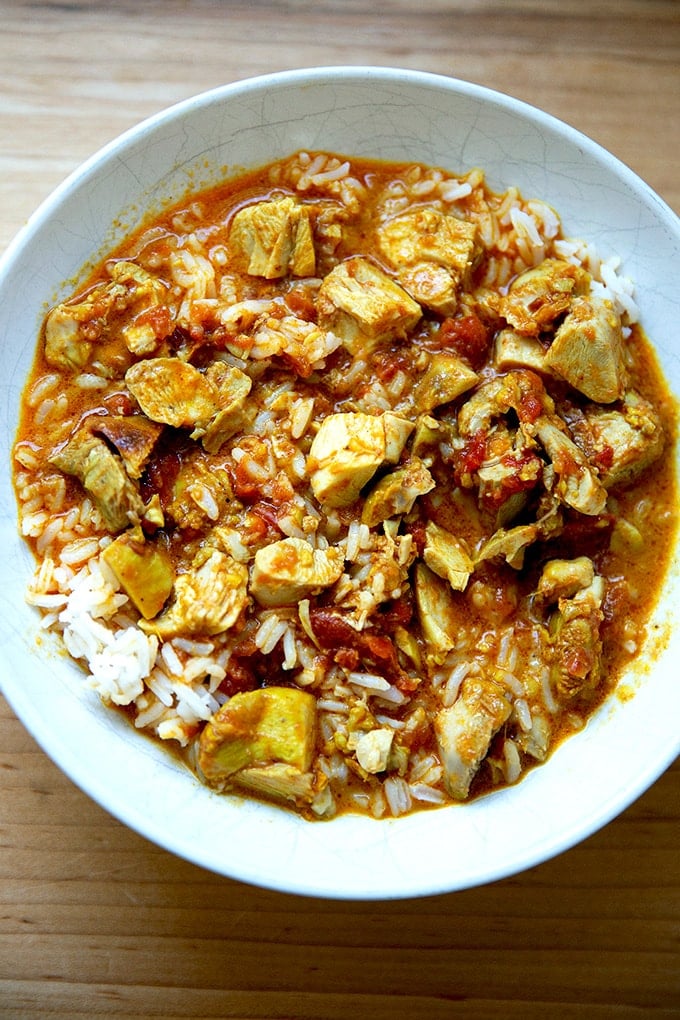
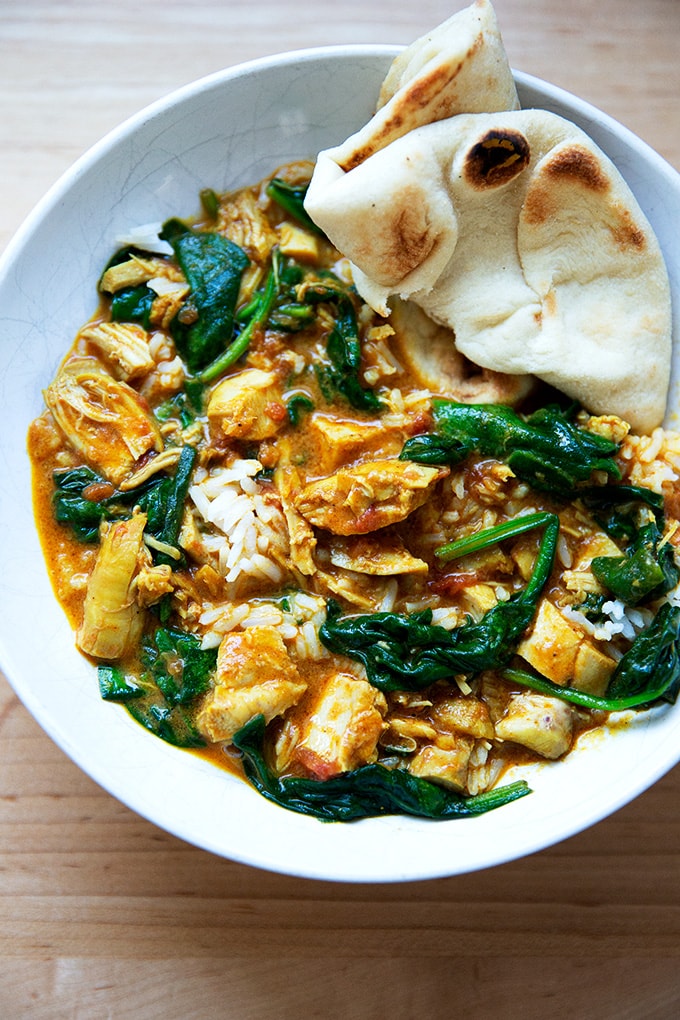
I’ve been serving this with basmati rice …

… and sometimes naan , too.
This recipe will yield 2 quarts, which you can refrigerate or freeze for a later date.
How to Make Stovetop Butter Chicken, Step by Step
The stovetop version comes together in the same manner. Start by stirring together the sauce ingredients: crushed tomatoes, minced garlic and ginger, curry powder, and salt.
Add the chicken and stir to coat. This is 8 boneless, skinless chicken thighs, about 3.25 lbs. Cover the pot and bring to a simmer over medium-high heat. Once the mixture is simmering, lower the heat to medium-low. Cook covered for 40 minutes.
Uncover. Remove the chicken.
Then add a stick of butter and 1/4 cup heavy cream to the pot.
Add the chopped chicken back to the pan.
Stir to combine. You can add spinach here if you like.
Serve with rice and/or naan.
How to Make Butter Chickpeas, Instant Pot or Stovetop
To make butter chickpeas, simply swap in 4.5 cups cooked chickpeas — this slow cooker recipe has been my method of choice recently but I love this stovetop method as well — or 3 drained 15-oz cans. Follow either of the methods outlined in the recipe box adding 1/2 cup water. Urvashi notes you can use coconut oil and milk in place of the butter and cream if you’re looking to make the recipe dairy-free.
Description
I adapted this recipe from Urvashi Pitre’s recipe and you can find many more authentic Indian recipes on Urvashi’s blog, Two Sleevers .
Notes:
I love these Colavita crushed tomatoes .
I purée the garlic and ginger together in the food processor to get a very fine mince.
If you wish to use boneless skinless breasts, go for it. I haven’t experimented, so I can’t advise on the exact timing, but I would imagine you should shorten the cooking time to ensure the breasts don’t dry out.
To swap in chickpeas, use 4.5 cups cooked chickpeas or 3 drained 15-oz cans, rinsed. Add 1/2 cup water to the pot.
I have not tried, but Urvashi says you can swap in coconut oil and milk for the butter and cream if you wish to make this dairy-free.
This is the Instant Pot I am using here. And this is the braiser I am using stovetop.
14 to 15 oz. crushed tomatoes
2 tablespoons curry powder
1 tablespoon of minced garlic
1 tablespoon of minced ginger
2 teaspoons kosher salt (I use Diamond Crystal brand)
8 boneless, skinless chicken thighs, see notes above
1 stick (8 tablespoons | 4 ounces) unsalted butter
¼ cup heavy cream
4 to 8 ounces baby spinach, optional, or chopped fresh cilantro
steamed basmati rice or naan , for serving
For the Instant Pot Method:
- Place the tomatoes, curry powder, garlic, ginger, and salt in the Instant Pot. Stir to combine. Add the chicken and stir to coat.
- Cover the pot. Turn the valve to sealing. Set the pot: manual, high pressure, 10 minutes. Once the time is up, let the valve release for 10 minutes.
- Uncover the pot and remove the chicken. Add the butter and heavy cream to the pot. Chop the chicken into bite-size pieces. Once the butter has melted, return the chicken to the pot and stir to combine. Taste. Add salt to taste if necessary.
- If you are adding the spinach, add it to the pot. You can cover the pot for a few minutes to speed up the wilting process — it will take a few minutes for the leaves to wilt down. You can add the spinach in batches, too, if that’s easier for you.
For the Stovetop Method:
- Place the tomatoes, curry powder, garlic, ginger, and salt in a large, wide pot or braiser. Stir to combine. Add the chicken and stir to coat.
- Cover the pot and bring to a simmer over high heat. Once the mixture is simmering — open the lid to see — lower the heat to medium-low and cook covered for 40 minutes.
- Uncover the pot and remove the chicken. Add the butter and heavy cream to the pot. Chop the chicken into bite-size pieces. Once the butter has melted, return the chicken to the pot and stir to combine. Taste. Add salt to taste if necessary.
- If you are adding the spinach, add it to the pot. You can cover the pot for a few minutes to speed up the wilting process — it will take a few minutes for the leaves to wilt down. You can add the spinach in batches, too, if that’s easier for you.
To Make Butter Chickpeas
- Use 4.5 cups cooked chickpeas or 3 drained 15-oz cans, rinsed. Add 1/2 cup water to the pot.
- Follow either cooking method above. To finish, simply add the butter and cream right to the pot — no need to remove the chickpeas first.
- Prep Time: 5 minutes
- Cook Time: 40 minutes
- Category: Dinner
- Method: Instant Pot, Stovetop
- Cuisine: Indian, American
Description
I adapted this recipe from Urvashi Pitre’s recipe and you can find many more authentic Indian recipes on Urvashi’s blog, Two Sleevers .
Notes:
I love these Colavita crushed tomatoes .
I purée the garlic and ginger together in the food processor to get a very fine mince.
If you wish to use boneless skinless breasts, go for it. I haven’t experimented, so I can’t advise on the exact timing, but I would imagine you should shorten the cooking time to ensure the breasts don’t dry out.
To swap in chickpeas, use 4.5 cups cooked chickpeas or 3 drained 15-oz cans, rinsed. Add 1/2 cup water to the pot.
I have not tried, but Urvashi says you can swap in coconut oil and milk for the butter and cream if you wish to make this dairy-free.
This is the Instant Pot I am using here. And this is the braiser I am using stovetop.
14 to 15 oz. crushed tomatoes
2 tablespoons curry powder
1 tablespoon of minced garlic
1 tablespoon of minced ginger
2 teaspoons kosher salt (I use Diamond Crystal brand)
8 boneless, skinless chicken thighs, see notes above
1 stick (8 tablespoons | 4 ounces) unsalted butter
¼ cup heavy cream
4 to 8 ounces baby spinach, optional, or chopped fresh cilantro
steamed basmati rice or naan , for serving
For the Instant Pot Method:
- Place the tomatoes, curry powder, garlic, ginger, and salt in the Instant Pot. Stir to combine. Add the chicken and stir to coat.
- Cover the pot. Turn the valve to sealing. Set the pot: manual, high pressure, 10 minutes. Once the time is up, let the valve release for 10 minutes.
- Uncover the pot and remove the chicken. Add the butter and heavy cream to the pot. Chop the chicken into bite-size pieces. Once the butter has melted, return the chicken to the pot and stir to combine. Taste. Add salt to taste if necessary.
- If you are adding the spinach, add it to the pot. You can cover the pot for a few minutes to speed up the wilting process — it will take a few minutes for the leaves to wilt down. You can add the spinach in batches, too, if that’s easier for you.
For the Stovetop Method:
- Place the tomatoes, curry powder, garlic, ginger, and salt in a large, wide pot or braiser. Stir to combine. Add the chicken and stir to coat.
- Cover the pot and bring to a simmer over high heat. Once the mixture is simmering — open the lid to see — lower the heat to medium-low and cook covered for 40 minutes.
- Uncover the pot and remove the chicken. Add the butter and heavy cream to the pot. Chop the chicken into bite-size pieces. Once the butter has melted, return the chicken to the pot and stir to combine. Taste. Add salt to taste if necessary.
- If you are adding the spinach, add it to the pot. You can cover the pot for a few minutes to speed up the wilting process — it will take a few minutes for the leaves to wilt down. You can add the spinach in batches, too, if that’s easier for you.
To Make Butter Chickpeas
- Use 4.5 cups cooked chickpeas or 3 drained 15-oz cans, rinsed. Add 1/2 cup water to the pot.
- Follow either cooking method above. To finish, simply add the butter and cream right to the pot — no need to remove the chickpeas first.
- Prep Time: 5 minutes
- Cook Time: 40 minutes
- Category: Dinner
- Method: Stovetop, Instant Pot
- Cuisine: American, Indian
Find it online : https://alexandracooks.com/2022/03/06/instant-pot-or-not-butter-chicken-or-chickpeas/
If you can make focaccia — and you know you can! — you can make excellent Sicilian-style pizza at home. It’s shockingly easy. Read on to learn the game-changing secret that allows the focaccia-like crust to stabilize and ensures the toppings do not overcook. 🍕🍕🍕
While the definition of Sicilian-style pizza as we know it today is debatable, the indisputable original Sicilian pizza is something called sfincione , a focaccia-like dough topped with onions, bread crumbs, and caciocavallo cheese. In Sicily, it’s traditionally served on New Year’s Eve.
If you go to a Sicilian-style pizzeria today, you’ll find slices that resemble sfincione with their focaccia-like foundation, but the toppings will vary as much as they would in any slice shop.
Unlike other styles of pan pizzas — I’m looking at you, Detroit — Sicilian-style pizza is incredibly easy to make at home: if you can make focaccia, either yeasted or sourdough , you can make excellent Sicilian-style pizza at home.
Find step-by-step instructions below but before you proceed, read these game-changing tips for success:
4 Tips for Sicilian-Style Pizza Success
- Butter your baking pan before adding the olive oil. With some pans, using butter in addition to olive oil is imperative to prevent sticking. Moreover, butter adds flavor and promotes browning.
- Take care with your final dimpling. Dimple throughout the center of the dough not the perimeter to ensure an even parbake. I learned this from Peter Reinhart’s Perfect Pan Pizza .
- Parbake your crust: This is game-changing! Parbaking allows the focaccia-like crust to stabilize, which will ensure the crust does not taste doughy or gummy. Furthermore, it will prevent the toppings from overcooking.
- Invest in a Lloyd pan : Lloyd pans conduct heat better than standard half sheet pans and, as a result, produce a superior, crisper crust. I love the 16×12-inch Lloyd “Grandma” pan .
How to make Sicilian Pizza, Step by Step
Gather your ingredients: bread flour, salt, instant yeast ( SAF is my preference), and lukewarm water:
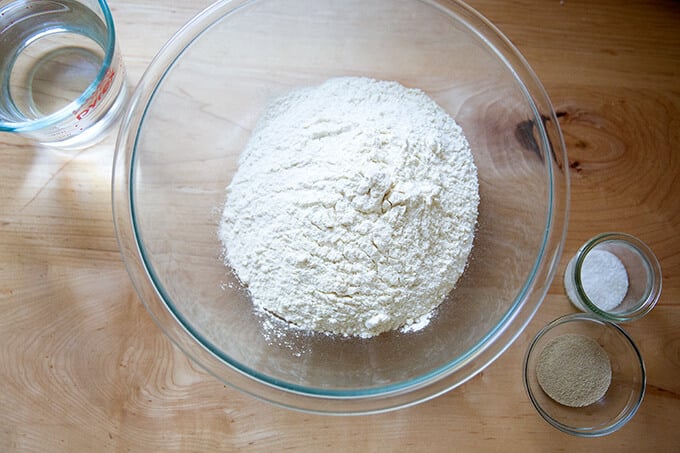
Whisk together the flour, salt, and yeast first:
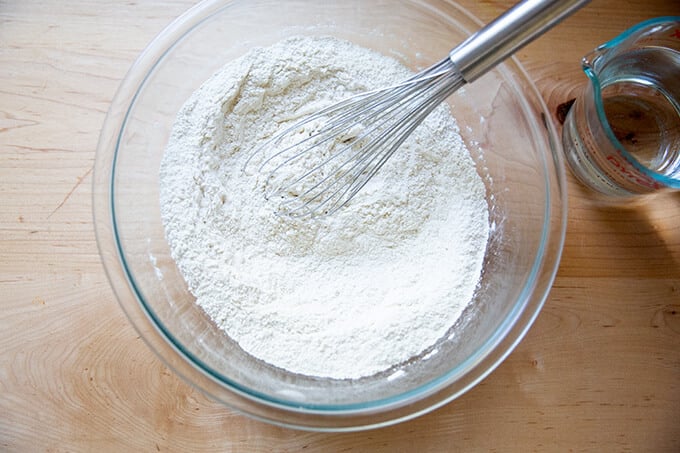
Add the water:
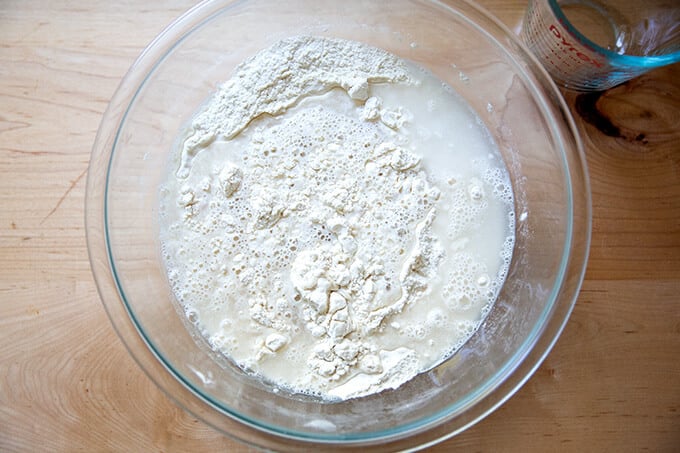
Use a spatula to stir the two together.
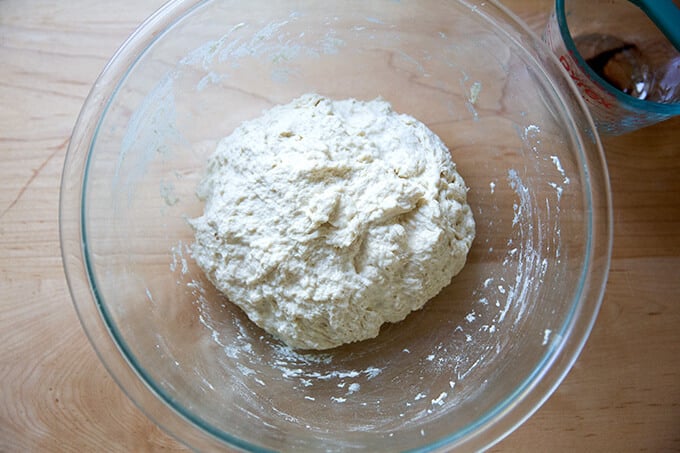
Slick the dough with olive oil:
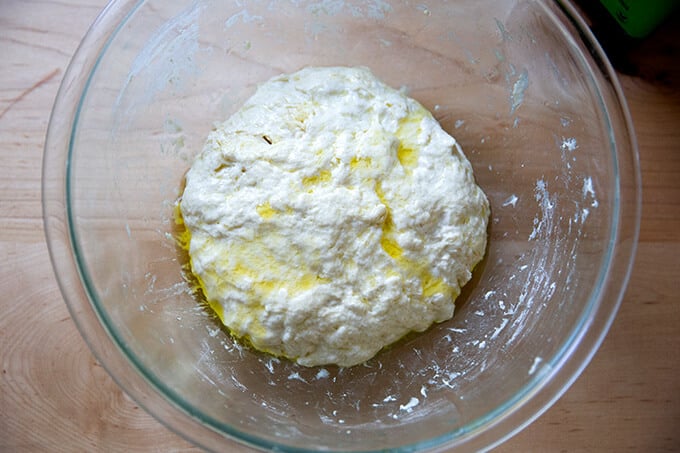
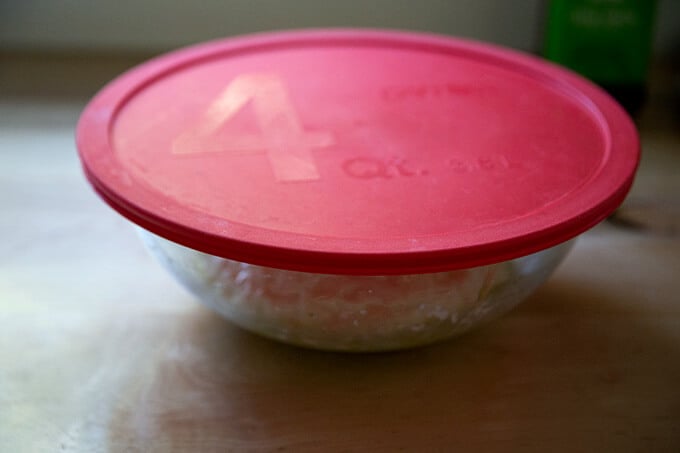
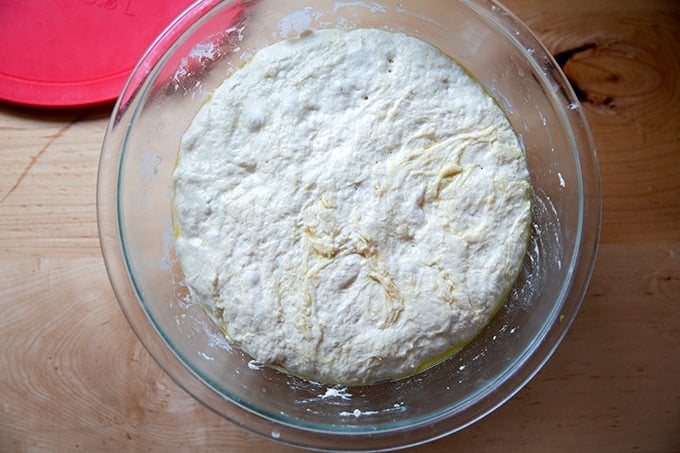
Then cover the bowl (with a lid or plastic wrap or something to make it airtight). Stick the bowl in the fridge immediately; leave it there to rise for 18 hours or longer—two to three days will give you an even lighter crust.
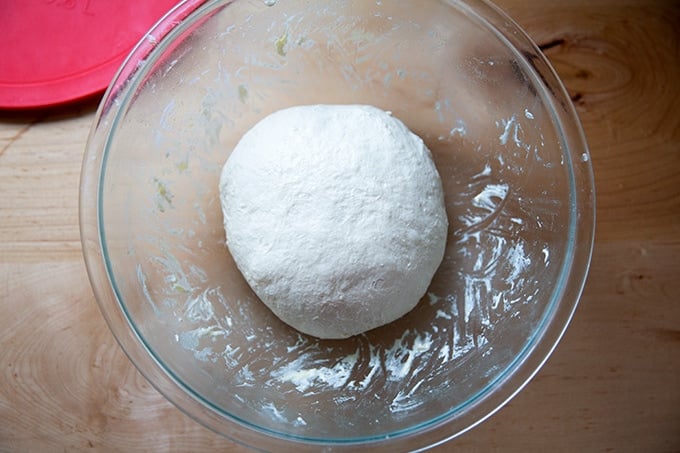
Uncover the bowl, then…
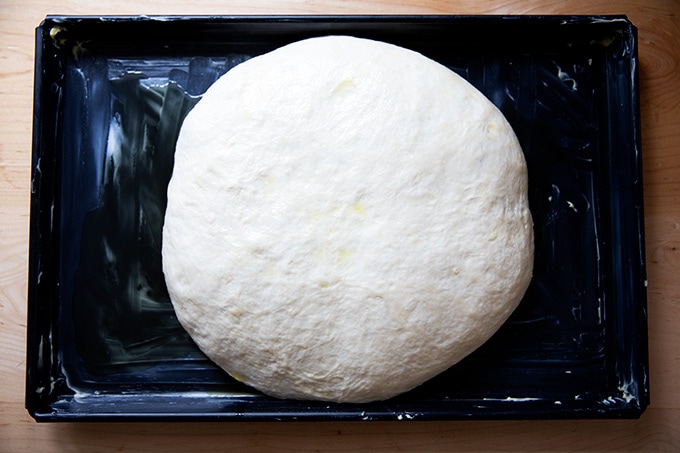
… deflate the dough. Using oiled hands grab a portion of the dough and stretch it up and toward the center. Turn the bowl slightly and repeat until you have created a rough ball.
Prepare your pan for baking with both butter and olive oil. I love this Lloyd Sicilian-Style Pizza Pan .
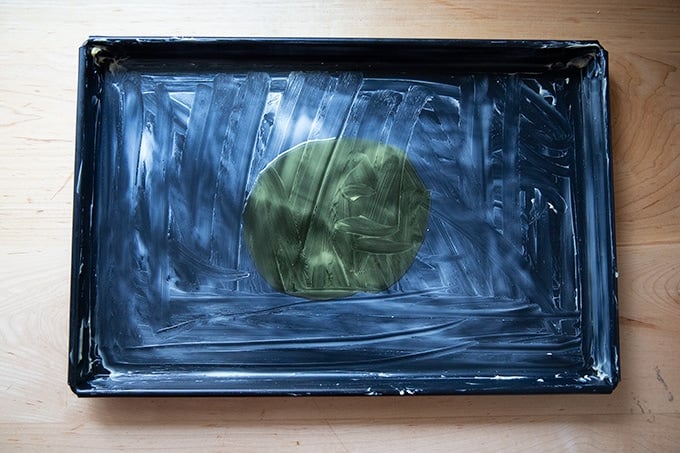
Transfer your dough ball to the pool of olive oil and turn it to coat.
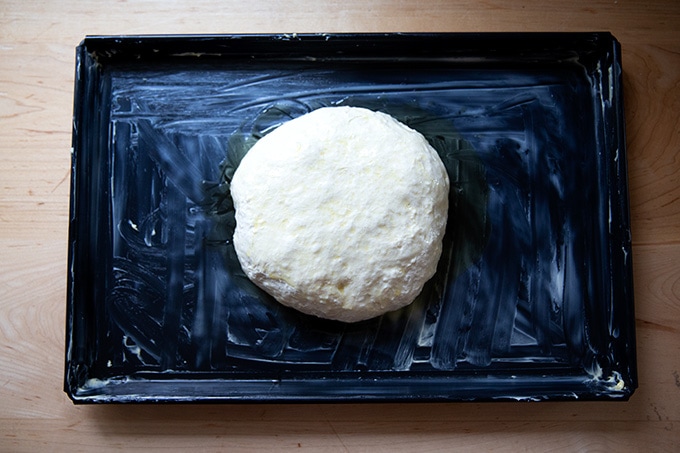
Let sit for 2.5 to 3 hours or until it has poofed considerably.
Dimple and stretch the dough to fit the pan. As soon as the dough resists, stop and let it rest for another 30 minutes.
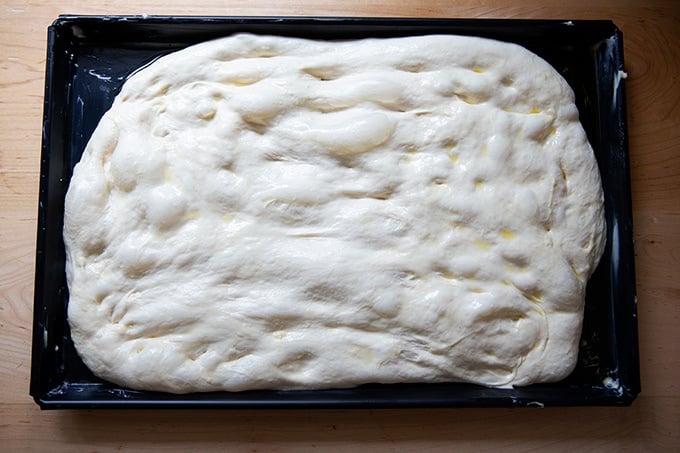
Then stretch it again to fit the pan. At this point, the dough can hang out in the pan for several hours. Cover it with plastic wrap to ensure the dough does not dry out if you plan on doing so. Dimple one last time throughout the center of the dough before transferring it to the oven to parbake it.
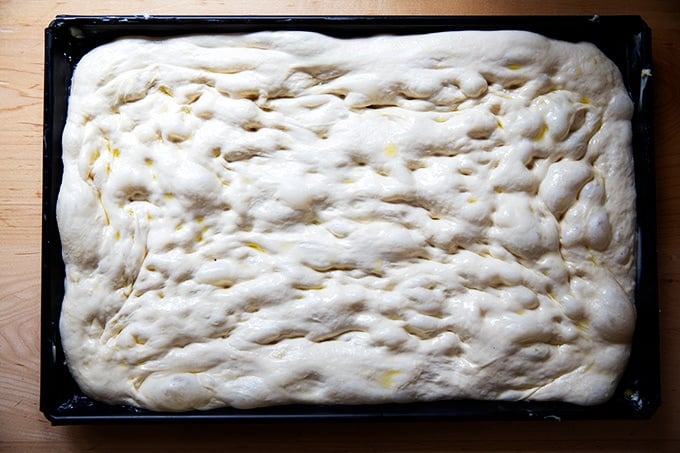
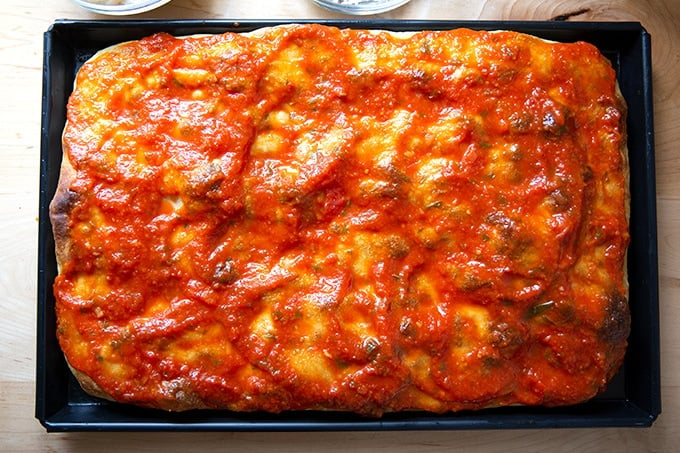
Parbake the dough for 11-12 minutes at 500ºF on a preheated Baking steel or pizza stone.
Then, top as you wish. I’m using my go-to homemade tomato sauce here.
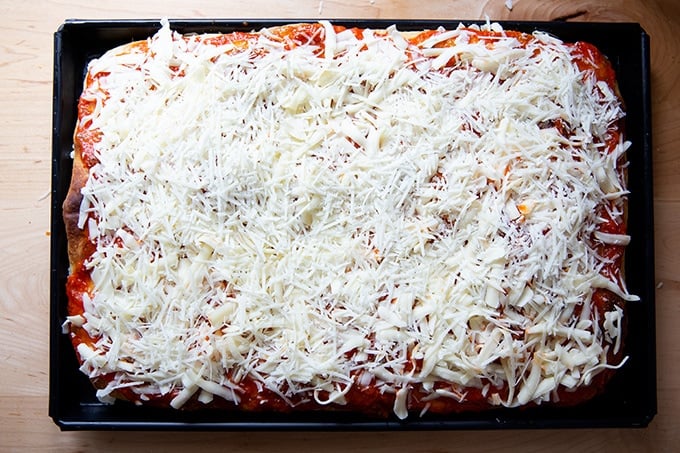
Top with cheese:
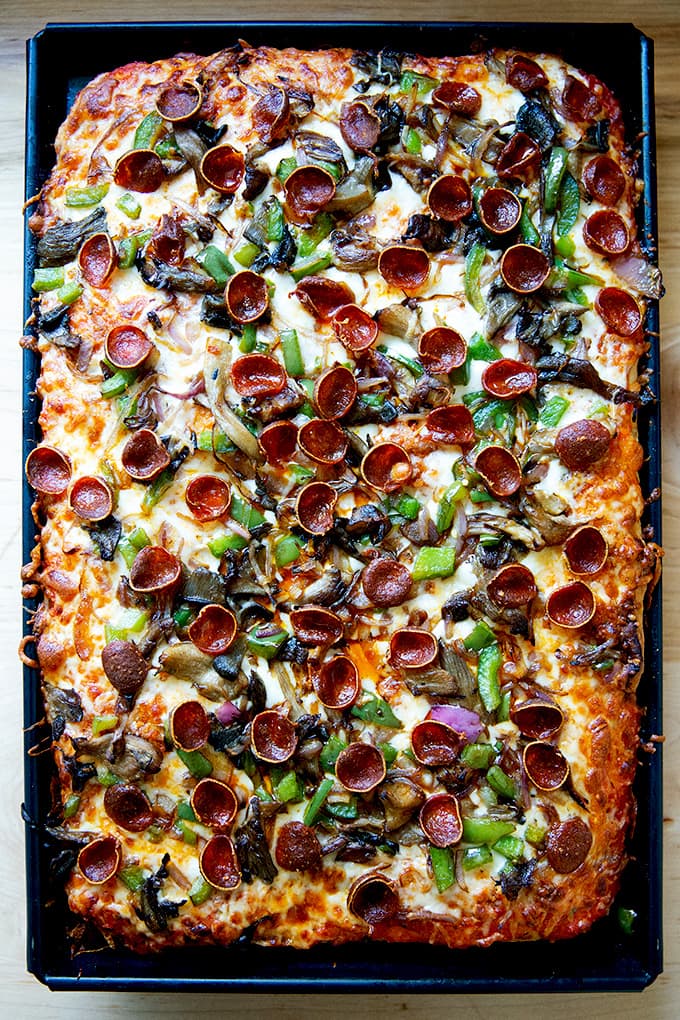
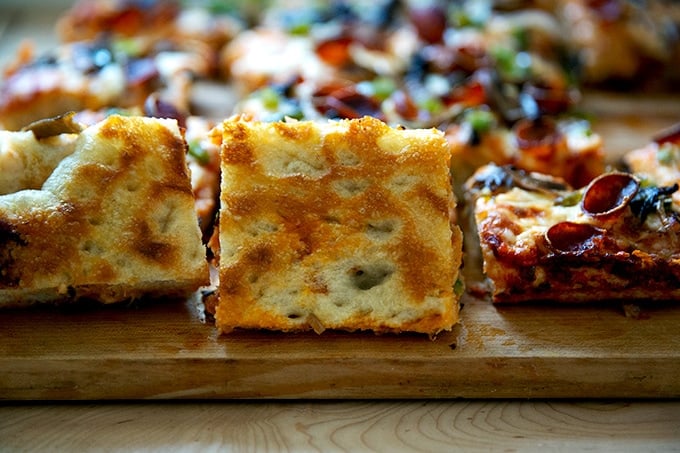
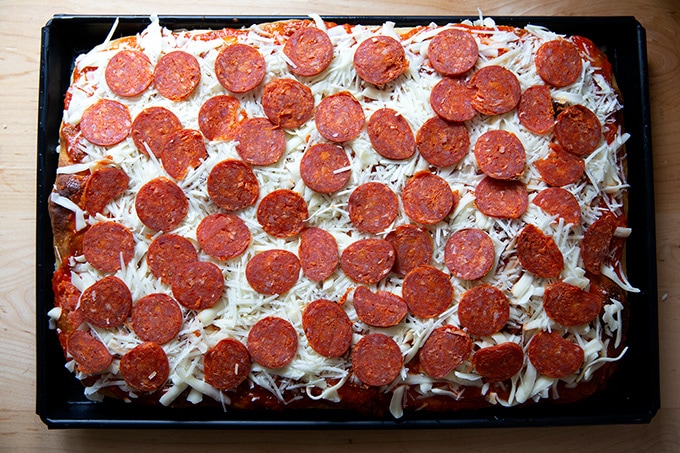
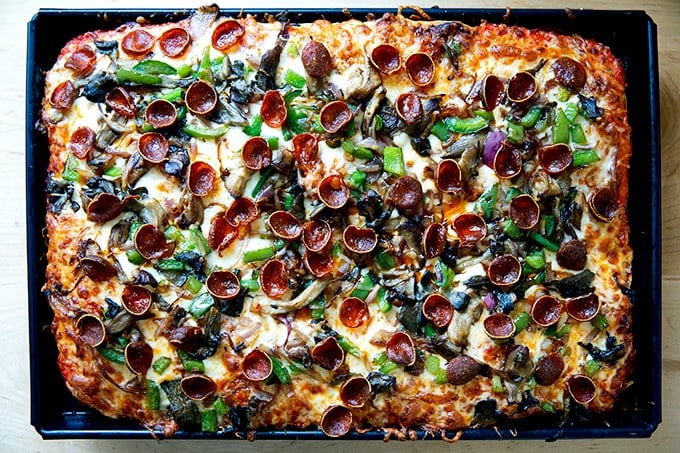
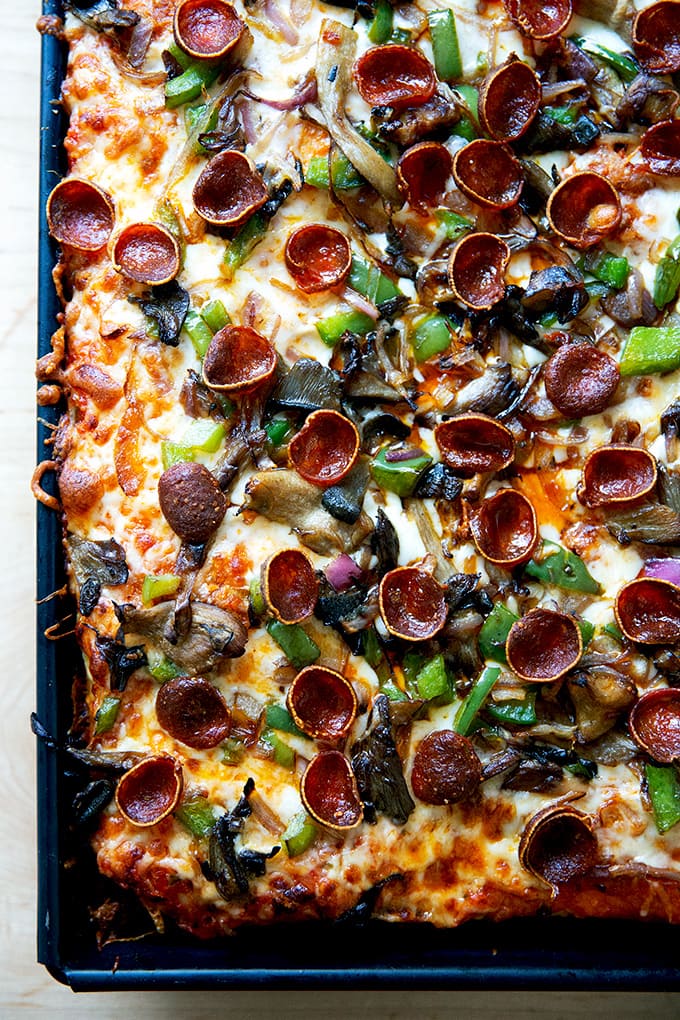
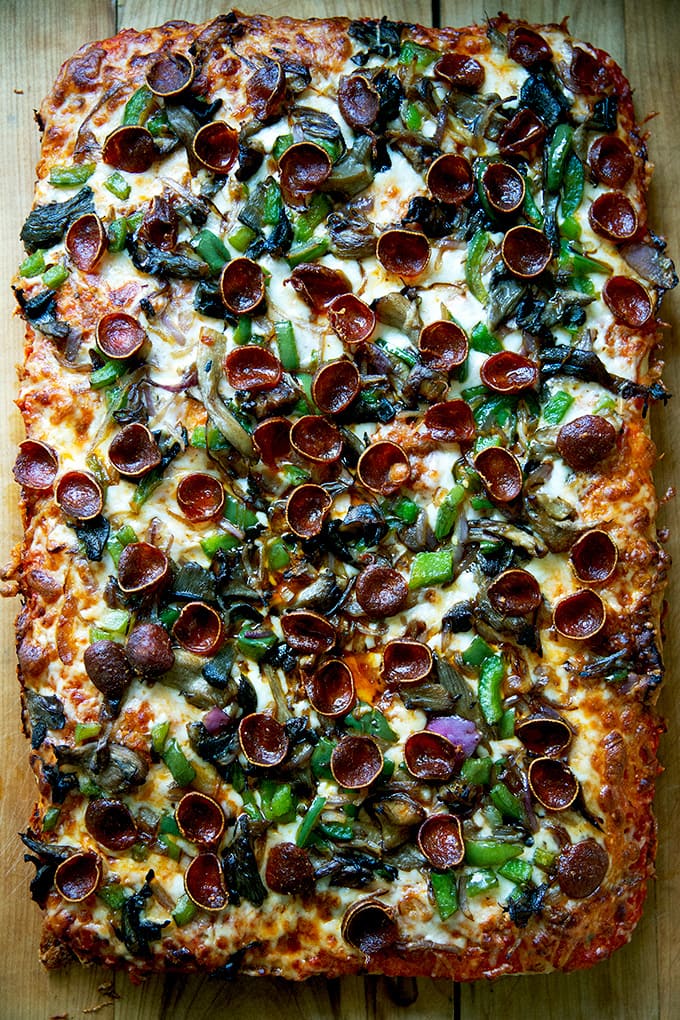
Then add pepperoni or sautéed vegetables or sausage or whatever you wish:
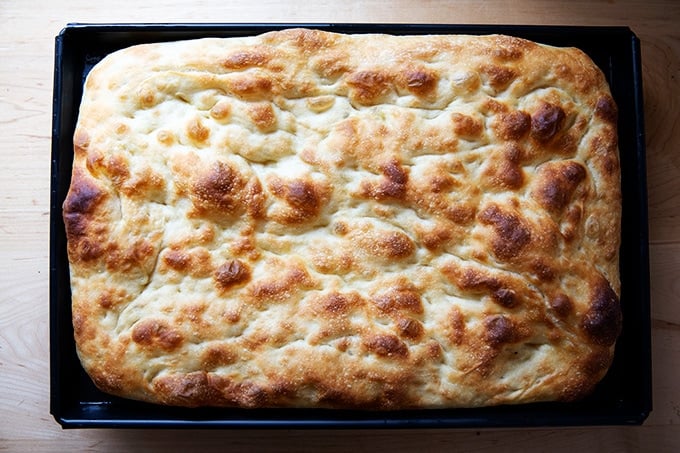
Transfer to the oven for another 10 minutes. Remove from oven and let rest in the pan for another 5 minutes before transferring the pizza to a board to rest.
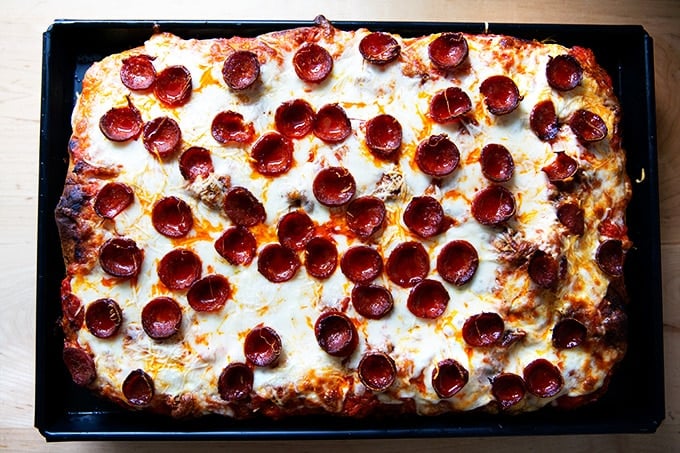
Shower with pepper flakes, if you wish.
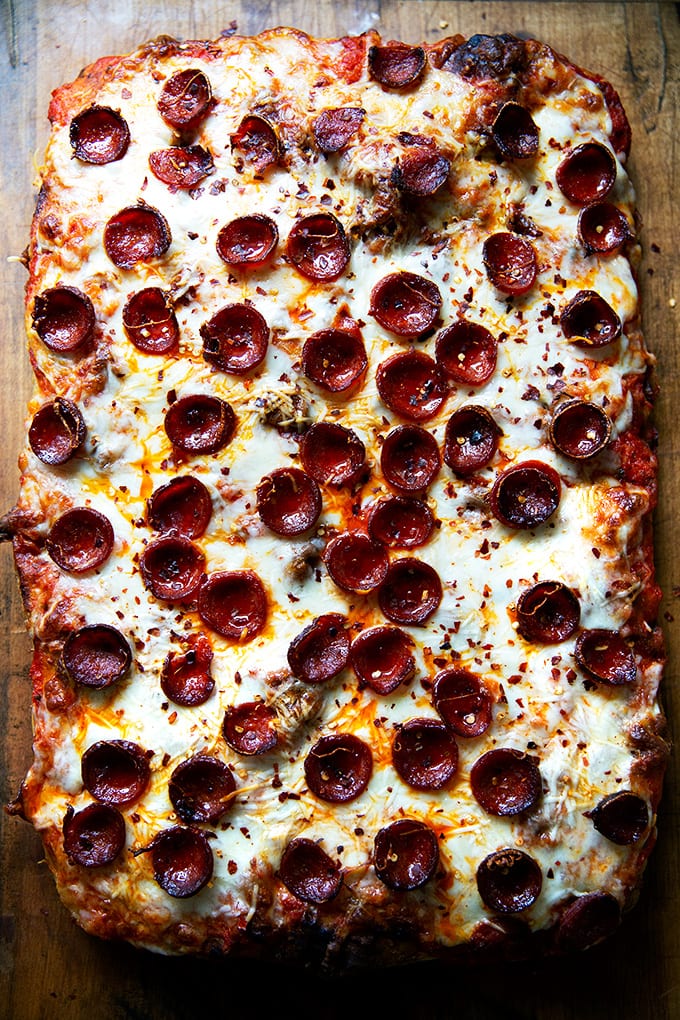
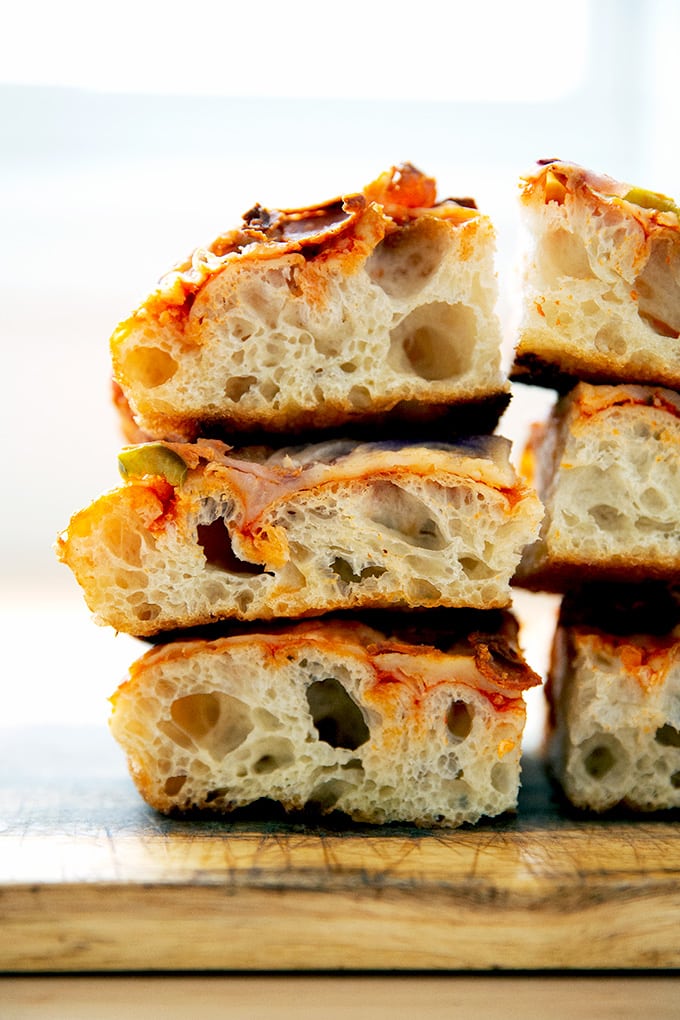
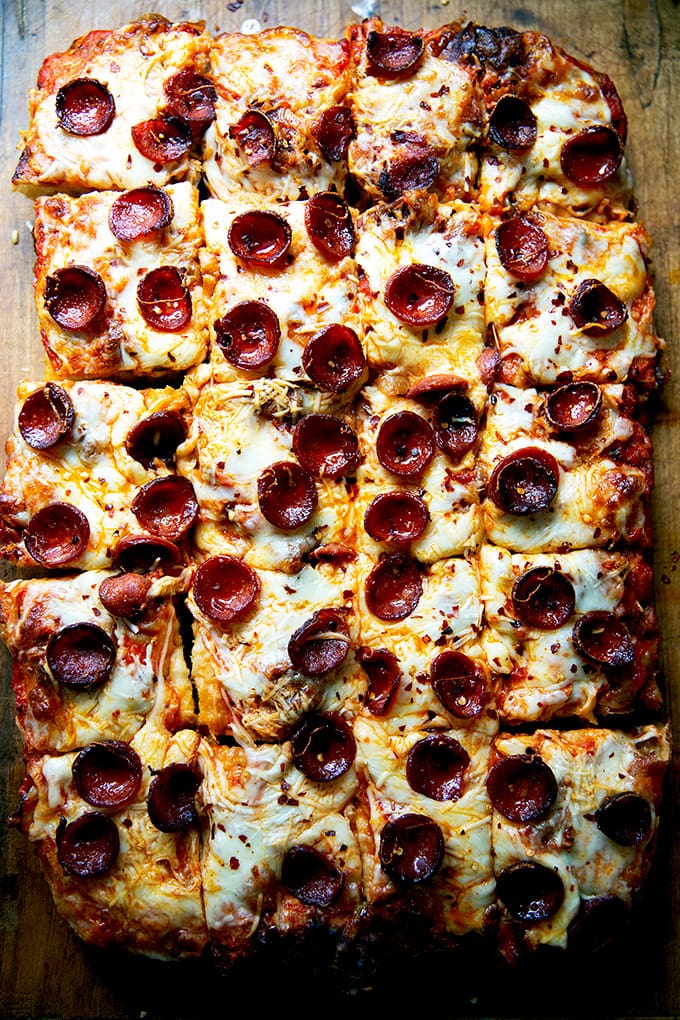
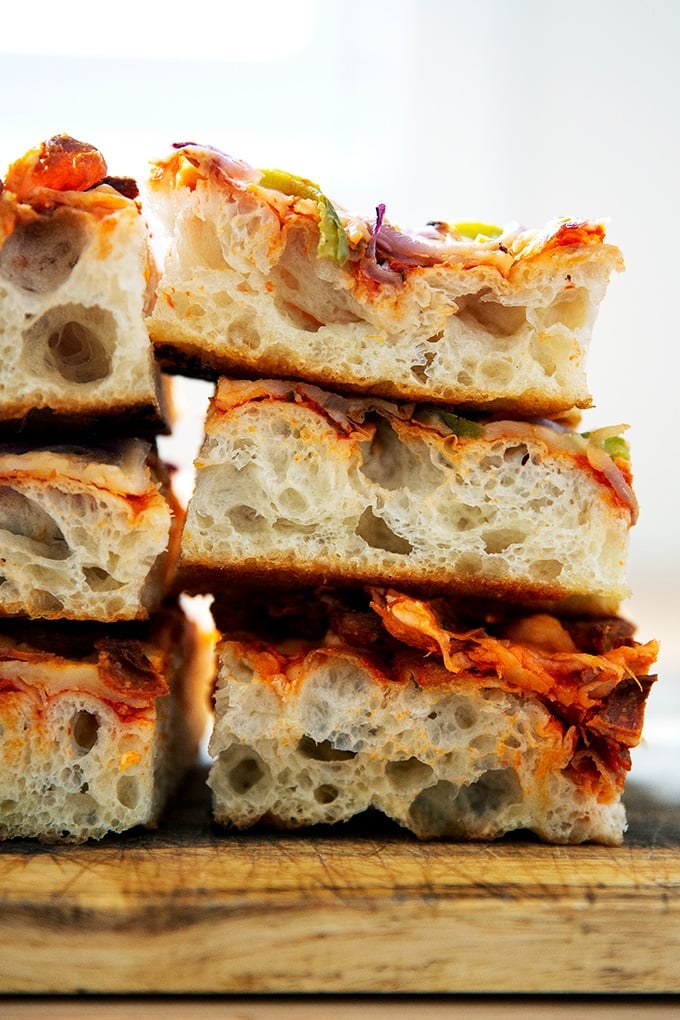
Cut into squares and serve.
Here’s the sautéed vegetable + pepperoni one:

Description
If you can make focaccia — and you know you can! — you can make excellent Sicilian-style pizza at home. It’s shockingly easy. The key to success is to parbake the crust. Below you will find a yeasted dough recipe but if would like to make a sourdough version, follow the recipe for this simple sourdough focaccia bread recipe through step 5; then proceed with the recipe.
Attention Pizza Fans: My pizza cookbook,Pizza Night, is here!
Notes:
- As always, for best results, use a digital scale to measure the flour and water.
- As with the focaccia recipe , a long ferment is best. I often let the dough sit in the fridge for 2 days before proceeding.
- You’ll need a 12″ x 18″ sheet pan for this recipe. Lloyd makes a Sicilian-style pizza pan , which I love — it’s 12×16 inches, but it works great here. If you have a Lloyd Detroit-style pan and would prefer to use that here, see the notes below the recipe for scaling the dough recipe to fit that size pan.
- I love SAF instant yeast . I buy it in bulk, transfer it to a quart storage container , and store it in my fridge for months. You can store it in the freezer also.
- If you are using active-dry yeast , simply sprinkle the yeast over the lukewarm water and let it stand for 15 minutes or until it gets foamy; then proceed with the recipe.
- Flour: You can use all-purpose or bread flour here with great results. If you live in a humid environment, I would suggest using bread flour. If you are in Canada or the UK, also consider using bread flour or consider holding back some of the water. Reference the video for how the texture of the bread should look; then add water back as needed.
- Cheese: I know the idea of using grated cheese for some of you may be off-putting, but there are a few brands I like, and it saves some time using them: Trader Joe’s sells a Quattro Formaggi blend that’s great, and Tillamook sells a large-grate mozzarella that I also really love.
For the dough:
- 4 cups ( 512 g ) bread flour, see notes above
- 2 teaspoons ( 12 g ) kosher salt
- 2 teaspoons ( 8 g ) instant yeast, see notes above if using active dry
- 2 cups ( 455 g ) lukewarm water, made by combining 1/2 cup boiling water with 1 1/2 cups cold water
- olive oil
For the pizza:
- butter
- 2 tablespoons olive oil
- 12 ounces of grated cheese, such as whole milk mozzarella or a mix of Monterey Jack, Cheddar, and Mozzarella, see notes above
- 1 cup (+ a few spoonfuls) tomato sauce, such as this one or this one , or your favorite jarred sauce
For a veggie pizza:
- 3 tablespoons olive oil, divided
- 8 ounces mushrooms, sliced
- 1 green (or other) bell pepper, diced
- 1/2 red onion, thinly sliced
For a pepperoni pizza:
- 6 ounces pepperoni, I love Vermont Smoke & Cure, sliced as thinly as possible — if you want the pizza to be really loaded with pepperoni, you’ll need more like 12 ounces
- crushed red pepper flakes
For a pickled jalapeño & pepperoni pizza:
- 1 cup pickled jalapeños
- 6 ounces pepperoni, thinly sliced
- hot honey , optional
To make the dough:
- Make the dough: In a large bowl, whisk together the flour, salt, and instant yeast. Add the water. Using a rubber spatula, mix until the liquid is absorbed and the ingredients form a sticky dough ball. Rub the surface of the dough lightly with olive oil. If your bowl has a lid, cover the bowl. Alternatively, transfer the dough to a vessel with a lid or cover the bowl tightly with plastic wrap to ensure the dough doesn’t dry out in the fridge.
- Transfer dough to the fridge for at least 18 hours but ideally longer: 24 to 48 hours. Longer is fine, too: I’ve kept the dough in the fridge for 3 days before proceeding.
Prepare the pan for baking:
- Grease a 12″ x 18″ sheet pan with butter. Pour 2 tablespoons of olive oil into the center of the pan. (Note: This greasing step may seem excessive, but with some pans, it is imperative to do so to prevent sticking. Moreover, it adds flavor and helps brown the bottom crust perfectly.)
Prepare the pizza for baking:
- Remove the dough from the fridge and use lightly oiled hands to release it from the sides of the bowl. Then, again with oiled hands, grab an edge of dough and pull up and to the center. Turn the bowl slightly and repeat until you’ve shaped the dough into a rough ball.
- Place the dough ball in the pan and turn to coat. (Note: You do not need to cover the dough here. The coating of oil should be sufficient to prevent the dough from drying out.) Let rest for 3 hours. With lightly oiled hands, stretch the dough to fit the pan — tent your hands, and use your fingers to dimple and stretch. You will likely not be able to get the dough to stretch all the way to the edges. When the dough resists, let it rest again for 30 minutes; then stretch it again using the same technique.
- At this point, the dough can hang out in the pan for a couple of hours (if your kitchen is on the cool side). I’ve baked it 30 minutes after this point, and I’ve baked it two hours later. If the dough is going to hang out for a while, cover it with a sheet of plastic wrap.
Bake and Top the Pizza:
- If you have a Baking Steel or pizza stone, place it on a rack in the middle or lower third of your oven, and heat your oven to 500ºF.
- Using oiled hand, dimple the dough one last time with the exception of the perimeter — this is important. It will help the dough bake more evenly.
- Transfer pan to the oven and place on heated Baking Steel or pizza stone for about 10 to 11 minutes or until evenly golden.
- Remove pan from oven and lower the oven to 475ºF. (Note: my oven doesn’t change temperature so quickly, so I actually turn the oven off during this period. Just before I return the pan to the oven, I turn the oven back on to 475ºF. Also: You can do this parbake hours ahead of time or even a day ahead of time. )
- Spread the sauce evenly over the dough. Top with the grated cheese. Then top as you wish: For the veggie pizza: In a large skillet over high heat, heat 2 tablespoons of the olive oil. When it shimmers, add the mushrooms and let cook undisturbed for about a minute. Season with salt; then stir. Cook for 3 to 5 minutes or until the mushrooms are beginning to brown. Transfer to a bowl. Add the remaining tablespoon of oil to the skillet; then add the peppers and mushrooms. Cook for 1 to 3 minutes, or until slightly softened. Season with salt; then transfer to the bowl with the mushrooms. Toss to combine. Taste and adjust with salt as needed. Spread this mixture over the cheese. Add some sliced pepperoni if you wish. For the pepperoni pizza: Arrange the sliced pepperoni over the cheese. For the pepperoni + pickled jalapeño pizza: Arrange the sliced pepperoni and pickled jalapeños over the cheese.
- Transfer pan to the oven and bake for 10 to 12 minutes or until the cheese is melted and just beginning to brown in spots.
- Remove the pan from the oven and let the pizza rest for 5 minutes in the pan. If you are making a pepperoni pizza and are using the crushed red pepper flakes, sprinkle some of the pepper flakes over the top. If you are using the hot honey for the pickled jalapeño pizza, drizzle some over the top.
- Run a knife or spatula around the pan’s edges. Then, carefully remove the entire pizza from the pan, transferring it to a cutting board. I like to use a serrated knife to cut this pizza. You can cut the pizza into however many pieces you wish. I’ve been doing 20 squares.
Notes
To Scale the Dough for aLloyd Detroit-Style Pan, Use These Proportions (and please use ascale!):
- 277 g flour (2 cups + 2 tablespoons)
- 8 g salt (1.5 teaspoons)
- 6 g yeast (1.5 teaspoons)
- 245 g water (1 cup + 1 tablespoon)
- Note: My calculations lead me to think that a Detroit-style pan needs about 532 grams of dough. So another way to do it would be to make the recipe as written, use 532 grams of it for the Detroit-Style pan and use the remainder for something else — pizza, mini rolls, etc.
To Scale the Dough for a Lloyd Sicilian-Style Pan , Use These Proportions (and please use a scale !):
488 g (3 3/4 cups) flour
11 g (2 teaspoons) salt
8 g (2 teaspoons) yeast
432 g (1.75 cups + 2 tablespoons) water
Prep Time: 24 hours
Cook Time: 20 minutes
Category: Pizza
Method: oven
Cuisine: American, Sicilian
