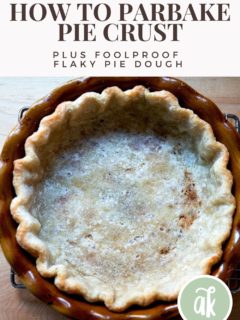
Below you will find guidance for both making pie dough and parbaking or blind baking it. This trusted method will ensure your crusts do not shrink in the oven and will prevent your finished pies from having soggy bottoms .
For many years, I shied away from parbaking my pie crusts. I never found the bottoms terribly soggy when I didn’t parbake, and I hated the process: from dealing with pie weights to chilling to baking, I found the process time-consuming, and, moreover, I always found the crust of my finished pies to be overbaked.
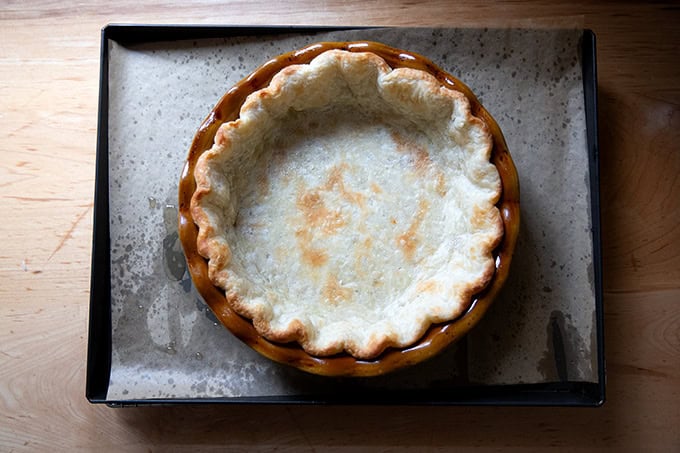
Several years ago, however, I saw a photo in The Book on Pie depicting a correctly baked parbaked pie crust. It looked barely toasted, mostly blonde with the faintest hint of brown; the edges were lightly golden. The suggested baking method called for an initial 15-20 minutes with pie weights in the crust, followed by 2-3 minutes without the weights.
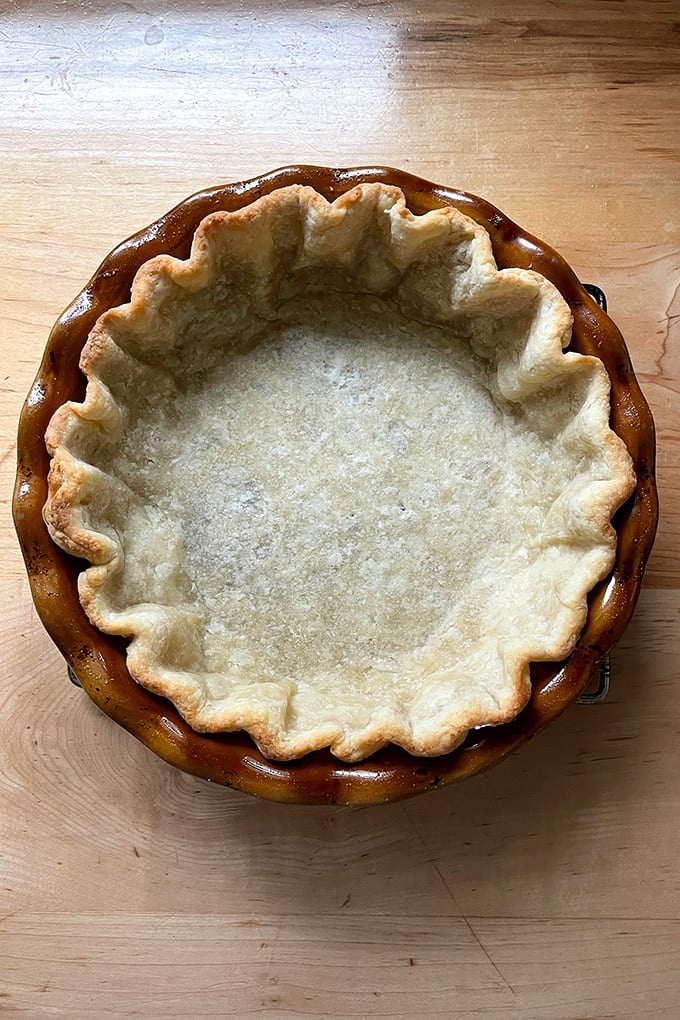
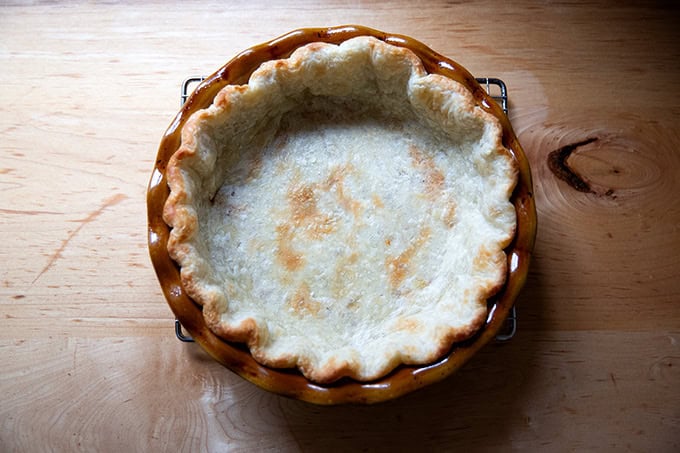
Following the method, my parbaked crust emerged from the oven with edges lightly toasted and the bottom surface mostly blonde. And the crust of the finished pie was deeply caramelized but not at all overcooked. See below:
Parbaked crust:
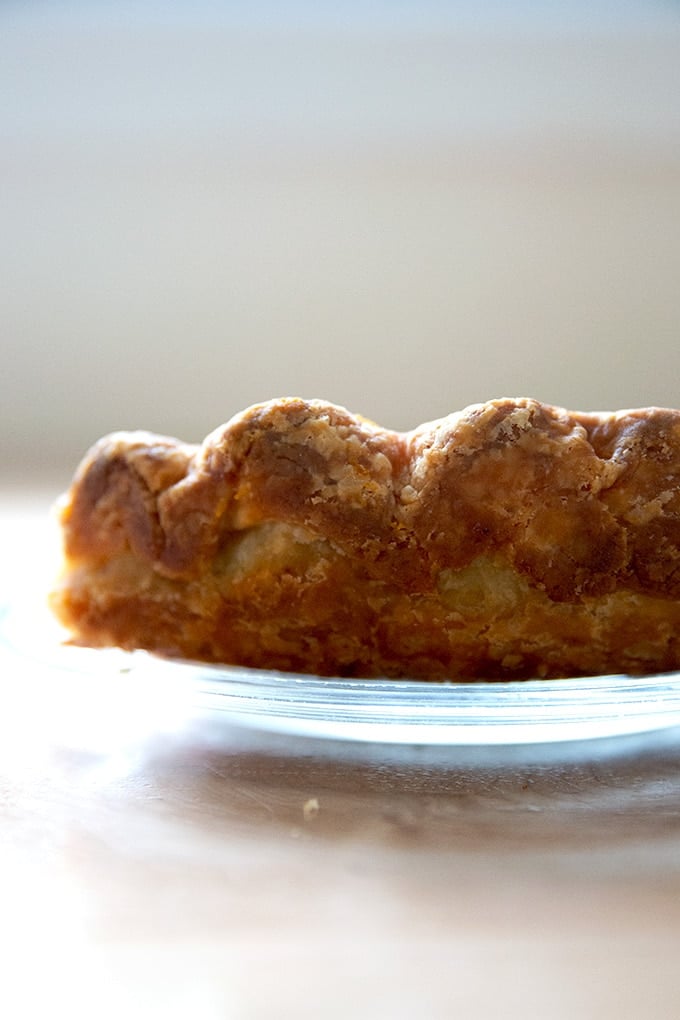
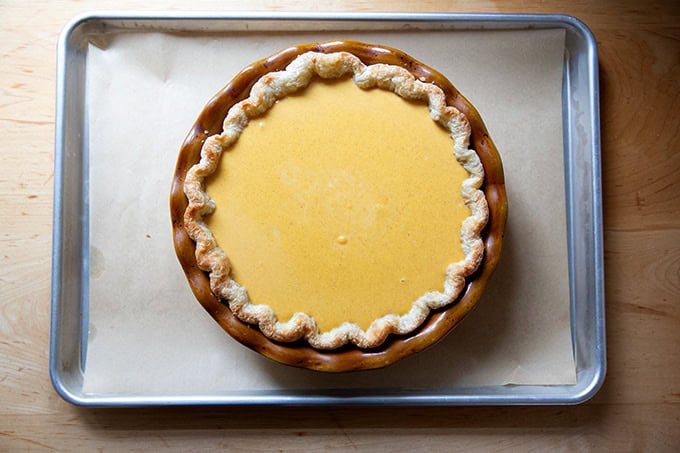
Fully baked crust:
I now find parbaking an essential step in my pie-making process. It does require some planning, but overall it is not hard, especially if you pay attention to the details, namely two things:
- Chilling your pie dough before rolling it out and before parbaking it.
- Using a sufficient amount of pie weights.
Let’s explore each:
The Importance of Chilling Your Pie Dough
After you make your pie dough, you should let it rest in the fridge for at least 30 minutes or better, 12 to 24 hours, before you roll it out. Why? For two reasons:
- Chilling the dough after mixing makes it easier to roll out. This is because chilling allows the natural protein stands (i.e. the gluten) that form when flour is hydrated to soften and relax, making the dough easier to roll out.
- A rested dough will shrink less in the oven due, again, to the gluten having had the chance to relax.
You Need More Pie Weights Than You Think
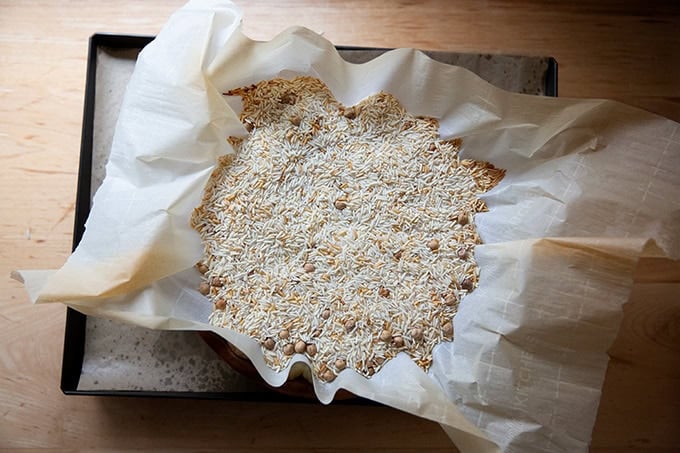
When you fill your parchment-lined pie shell with weights (or dried rice or beans, which you can save and reuse), be sure to fill it to the very top. I use 3.5 pounds of dried rice/beans per shell, and I pile them high above the rim of the dough.

How to Parbake Pie Dough, Step by Step
Remove your chilled round of pie dough from the fridge. (See recipe box for pie dough recipe.)
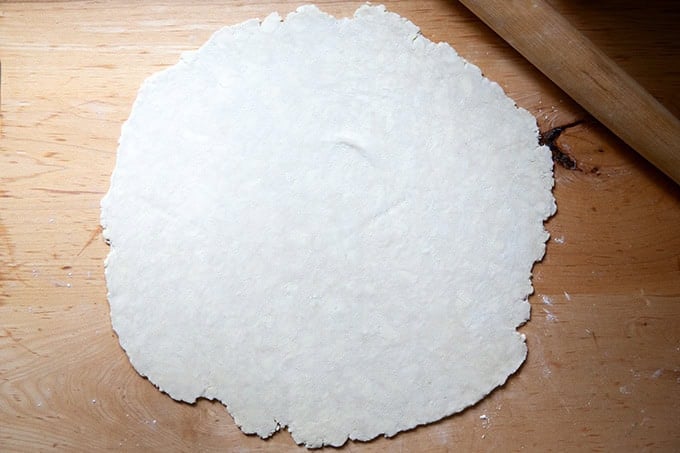
Roll it out on a lightly floured work surface into roughly a 15-inch round:
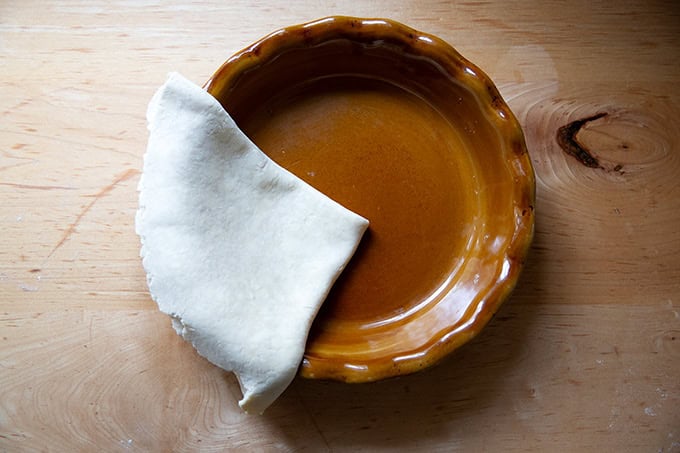
Fold in half, then half again, and transfer it to a pie plate:
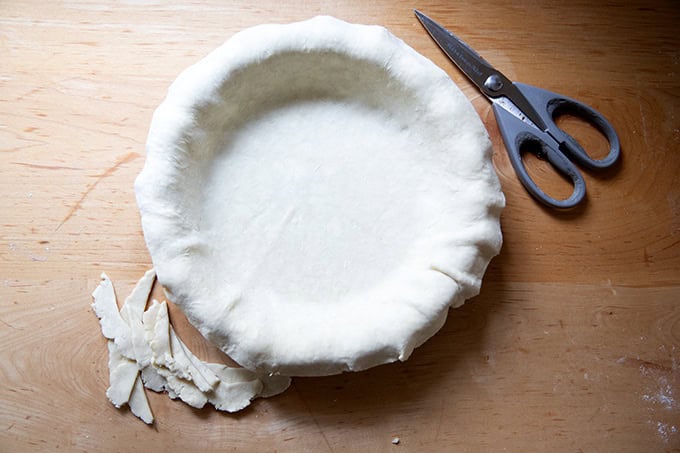
Unfold the pie dough and trim the over-hanging dough, leaving roughly a 1/2 inch of dough extending beyond the edge.
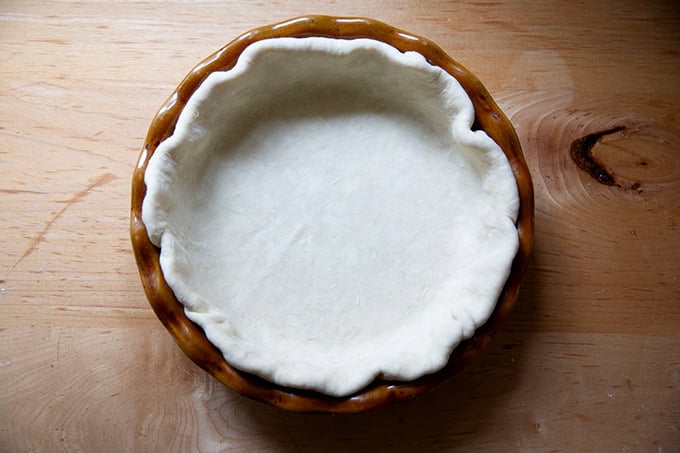
Tuck the overhanging dough behind itself into the pie plate:
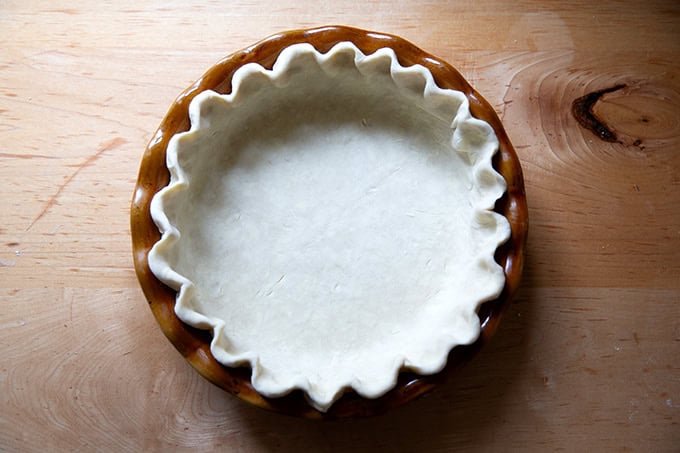
Then pinch the dough using both hands to make a pleated edge. Chill for 30 minutes.
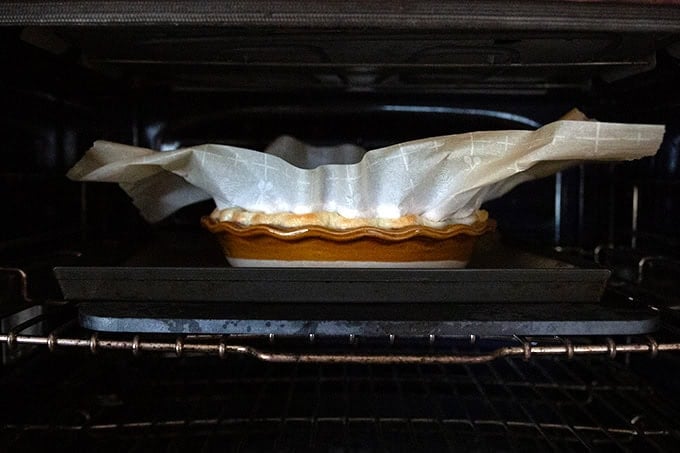
Lay a sheet of parchment paper across the dough and fill it with dried beans or rice: be generous with the beans/rice! I fill mine so that the beans and rice extend at least a half inch above the rim of the crust.
Transfer to the oven and bake for roughly 20 minutes, relying on the visual cues: remove the pan when you see light browning at the edges:
Lift the entire parchment paper sling out of the parbaked crust…
… then return the pan to the oven …
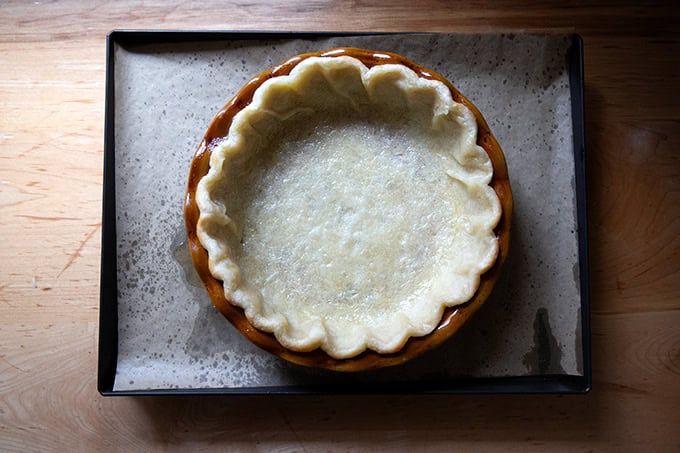
… for another 2-3 minutes:
Transfer to a cooling rack:
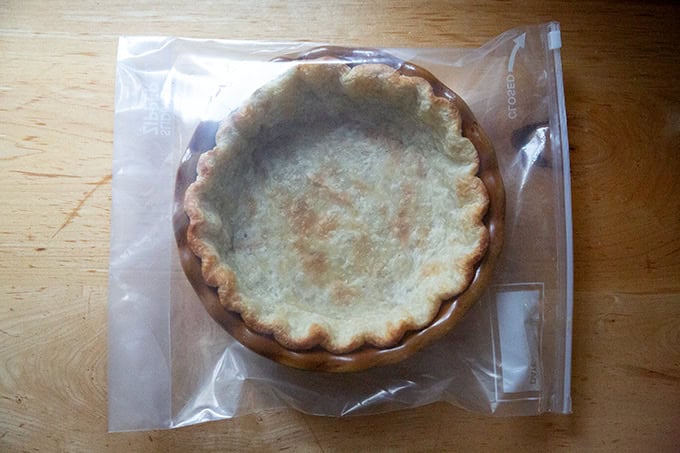
Let cool completely before storing. See storage notes in recipe box. I find these 2-gallon bags to be so handy for storing parbaked crusts and other large items.
When you are ready to bake, simply fill your parbaked shell with the filling and bake as directed. This is this butternut squash pie filling :
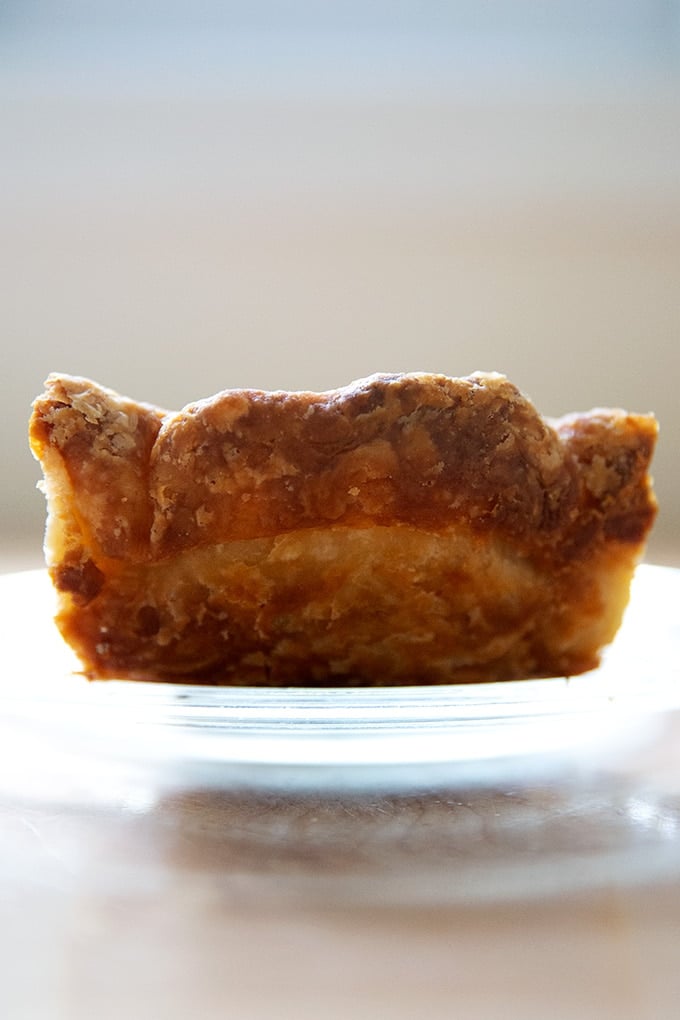
Can you see how flaky the crust is?

Description
Below you will find guidance for both making pie dough and parbaking or blind baking it. This trusted method will ensure your crusts do not shrink in the oven and will prevent your finished pies from having soggy bottoms .
Here are a few recipes that benefit from a parbaked crust:
- Bourbon Pecan Pie
- Roasted Butternut Squash Pie (i.e. The Best Pumpkin Pie)
- Salted Maple Pie
Notes:
Plan ahead: Ideally, make your dough 12 to 24 hours before you plan to roll it out. Doing so allows the flour to fully hydrate and allows the gluten to relax. This makes rolling the dough out more easily and also helps minimize shrinking in the oven.
To make a double batch : do not load your food processor with double quantities. Make the dough in separate batches — no need to wash the food processor in between batches.
To make a half batch , see quantities in the notes section below.
Favorite Pie Plate: I swear by my ceramic Emile Henry 9-inch Pie Plate .
Do not bake pies directly on the rack — butter will seep out and when it hits the oven floor (or Baking Steel), it will make a smoky mess. Instead, place your pies on sheet pans and use parchment paper, if you wish, for easy clean up.
Dough Storage: Dough can be made up to three days in advance and stored in the fridge or made weeks in advance and stored in the freezer. To thaw, place dough in the fridge overnight before baking.
Once you roll out your dough and fit it into your pie plate, don’t freeze it — the crust will not bake properly directly from the freezer.
Parbaked Crust Storage: Once you parbake your pie shells, let them cool completely; then store in an airtight vessel or bag — a 2-gallon zip-top bag works well. Store at room temperature for up to 3 days or freeze for up to 3 months.
Pie-Making Schedule: This is a great schedule to follow if you are making pies for Thanksgiving or any holiday: Tuesday (or 2 days before you plan to serve your pies): Make the dough and chill it. Wednesday: Parbake the crust. Thursday: Fill and bake the pie.
2½ cups ( 320g ) all-purpose flour
2 tablespoons ( 25 g ) sugar
½ teaspoon ( 3 g ) kosher salt
16 tablespoons ( 227g ) unsalted or salted butter, cut into small pieces and chilled
½ cup + 2 tablespoons ( 142g ) ice water
For baking and storing:
- pie weights or dried beans/rice — I always use dried beans/rice. You need more than you think — over 3 lbs. per pie. You can use them forever and ever. I store mine in this OXO vessel .
- parchment paper — I like the large size of Reynolds for parbaking.
- Jumbo ziptop bags — the 2-gallon size is particularly helpful
- In the bowl of a food processor , pulse the flour, sugar, and salt together. Add the chilled, cubed butter. Pulse at 1-second intervals until butter is the size of peas — should be about ten 1-second pulses. Add the ice water and pulse again about 10 times until the mixture is crumbly but holds together when pinched. ( To make without a food processor: In a large bowl, whisk flour, sugar, and salt together. Add the butter to the flour mixture, and using the back of a fork or a pastry cutter, incorporate it until it is in small pieces. Add ice water and continue to stir with a fork until mixture is crumbly but holds together when pinched.)
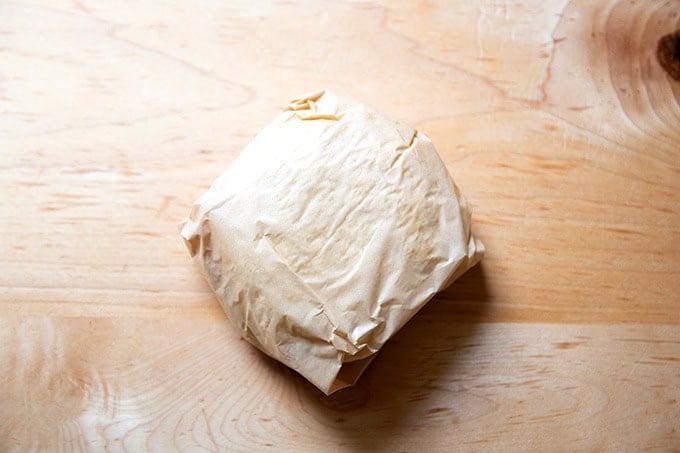
- Lay two clean tea towels on a work surface. Dump half of the crumbly dough mixture (roughly 350 grams) into the center of each. Grab the four corners of the towel together and twist to create a beggar’s purse, pressing the dough into a round. Use your hands to pack and flatten the round. Wrap in plastic wrap or parchment paper, place in ziplock or other airtight bag/vessel, and stash in the fridge for at least 30 minutes, but ideally 12 to 24 hours or for as long as 3 days. You also can store it in the freezer for as long as 3 months.
- To parbake or blind bake the pie crust: Heat your oven to 425ºF. If you have a Baking Steel or pizza stone, place it on a rack in the lower third of your oven. ( Steels and stones retain heat well, and they encourage proper and even browning on the bottoms of pie. They also help keep the oven temperature’s even as you open and close the door to check on your pie. ) On a lightly floured work surface, roll out one of the chilled rounds of pie dough, flipping the round over every few strokes, until you have a circle roughly 15 inches in diameter. Note: If you are using very chilled dough, you may find it helpful to pound it gently with your rolling pin before beginning the rolling.
- Transfer the round to a pie plate. Trim any excessive overhanging pie dough — there should be roughly one inch of dough overhanging the edge. Save the scraps in an airtight container in the fridge. Tuck the overhanging dough behind itself; then use your fingers to crimp the edge into a fluted pattern — video guidance here . If time permits, chill the shell for 30 minutes. Lay a sheet of parchment across the pie plate and pour pie weights or dried beans into the center until they reach the top of the pie crust. Use your hands to press the weights down and fit them into the edges of the fluted crust.
- Transfer the filled pie crust to a parchment-lined sheet pan and transfer to the oven for 15-20 minutes or until the edges are just beginning to color — do rely on the visual cues here. It sometimes takes my crusts a little longer to take on that light color at the edges.
- Remove the pan from the oven and carefully remove the pie weights or dried beans (which you can use again and again — let them cool completely; then transfer to a storage bag). Return the pan to the oven. For a parbaked crust, bake the shell for another 2 to 3 minutes — it should take on only the slightest bit of more color all around. For a blind-baked crust , return the shell to the oven for another 10 to 12 minutes or until the crust is evenly golden brown.
- Once you parbake or blind bake your pie shells, let them cool completely; then store them in an airtight vessel or bag — a 2-gallon zip-top bag works well. Store at room temperature for up to 3 days or in the freezer for up to 3 months. From here, proceed with whichever pie recipe you are making. I use this pie crust for every pie I make. See notes above.
Notes
Half Recipe Quantities:
1 1/4 cups (160 g) all-purpose flour
1 tablespoon sugar
1/4 teaspoon table or kosher salt
8 tablespoons (114 g) cold, cubed butter, salted or unsalted
1/4 C. + 1 T. (71 g) ice water
Prep Time: 1 hour
Cook Time: 25 minutes
Category: Dessert
Method: Oven, Food Processor
Cuisine: American, French
Below you will find guidance for both making pie dough and parbaking or blind baking it. This trusted method will ensure your crusts do not shrink in the oven and will prevent your finished pies from having soggy bottoms .
For many years, I shied away from parbaking my pie crusts. I never found the bottoms terribly soggy when I didn’t parbake, and I hated the process: from dealing with pie weights to chilling to baking, I found the process time-consuming, and, moreover, I always found the crust of my finished pies to be overbaked.
Several years ago, however, I saw a photo in The Book on Pie depicting a correctly baked parbaked pie crust. It looked barely toasted, mostly blonde with the faintest hint of brown; the edges were lightly golden. The suggested baking method called for an initial 15-20 minutes with pie weights in the crust, followed by 2-3 minutes without the weights.
Following the method, my parbaked crust emerged from the oven with edges lightly toasted and the bottom surface mostly blonde. And the crust of the finished pie was deeply caramelized but not at all overcooked. See below:
Parbaked crust:
Fully baked crust:
I now find parbaking an essential step in my pie-making process. It does require some planning, but overall it is not hard, especially if you pay attention to the details, namely two things:
- Chilling your pie dough before rolling it out and before parbaking it.
- Using a sufficient amount of pie weights.
Let’s explore each:
The Importance of Chilling Your Pie Dough
After you make your pie dough, you should let it rest in the fridge for at least 30 minutes or better, 12 to 24 hours, before you roll it out. Why? For two reasons:
- Chilling the dough after mixing makes it easier to roll out. This is because chilling allows the natural protein stands (i.e. the gluten) that form when flour is hydrated to soften and relax, making the dough easier to roll out.
- A rested dough will shrink less in the oven due, again, to the gluten having had the chance to relax.
You Need More Pie Weights Than You Think
When you fill your parchment-lined pie shell with weights (or dried rice or beans, which you can save and reuse), be sure to fill it to the very top. I use 3.5 pounds of dried rice/beans per shell, and I pile them high above the rim of the dough.
How to Parbake Pie Dough, Step by Step
Remove your chilled round of pie dough from the fridge. (See recipe box for pie dough recipe.)
Roll it out on a lightly floured work surface into roughly a 15-inch round:
Fold in half, then half again, and transfer it to a pie plate:
Unfold the pie dough and trim the over-hanging dough, leaving roughly a 1/2 inch of dough extending beyond the edge.
Tuck the overhanging dough behind itself into the pie plate:
Then pinch the dough using both hands to make a pleated edge. Chill for 30 minutes.
Lay a sheet of parchment paper across the dough and fill it with dried beans or rice: be generous with the beans/rice! I fill mine so that the beans and rice extend at least a half inch above the rim of the crust.
Transfer to the oven and bake for roughly 20 minutes, relying on the visual cues: remove the pan when you see light browning at the edges:
Lift the entire parchment paper sling out of the parbaked crust…
… then return the pan to the oven …
… for another 2-3 minutes:
Transfer to a cooling rack:
Let cool completely before storing. See storage notes in recipe box. I find these 2-gallon bags to be so handy for storing parbaked crusts and other large items.
When you are ready to bake, simply fill your parbaked shell with the filling and bake as directed. This is this butternut squash pie filling :
Can you see how flaky the crust is?
Description
Below you will find guidance for both making pie dough and parbaking or blind baking it. This trusted method will ensure your crusts do not shrink in the oven and will prevent your finished pies from having soggy bottoms .
Here are a few recipes that benefit from a parbaked crust:
- Bourbon Pecan Pie
- Roasted Butternut Squash Pie (i.e. The Best Pumpkin Pie)
- Salted Maple Pie
Notes:
Plan ahead: Ideally, make your dough 12 to 24 hours before you plan to roll it out. Doing so allows the flour to fully hydrate and allows the gluten to relax. This makes rolling the dough out more easily and also helps minimize shrinking in the oven.
To make a double batch : do not load your food processor with double quantities. Make the dough in separate batches — no need to wash the food processor in between batches.
To make a half batch , see quantities in the notes section below.
Favorite Pie Plate: I swear by my ceramic Emile Henry 9-inch Pie Plate .
Do not bake pies directly on the rack — butter will seep out and when it hits the oven floor (or Baking Steel), it will make a smoky mess. Instead, place your pies on sheet pans and use parchment paper, if you wish, for easy clean up.
Dough Storage: Dough can be made up to three days in advance and stored in the fridge or made weeks in advance and stored in the freezer. To thaw, place dough in the fridge overnight before baking.
Once you roll out your dough and fit it into your pie plate, don’t freeze it — the crust will not bake properly directly from the freezer.
Parbaked Crust Storage: Once you parbake your pie shells, let them cool completely; then store in an airtight vessel or bag — a 2-gallon zip-top bag works well. Store at room temperature for up to 3 days or freeze for up to 3 months.
Pie-Making Schedule: This is a great schedule to follow if you are making pies for Thanksgiving or any holiday: Tuesday (or 2 days before you plan to serve your pies): Make the dough and chill it. Wednesday: Parbake the crust. Thursday: Fill and bake the pie.
2½ cups ( 320g ) all-purpose flour
2 tablespoons ( 25 g ) sugar
½ teaspoon ( 3 g ) kosher salt
16 tablespoons ( 227g ) unsalted or salted butter, cut into small pieces and chilled
½ cup + 2 tablespoons ( 142g ) ice water
For baking and storing:
- pie weights or dried beans/rice — I always use dried beans/rice. You need more than you think — over 3 lbs. per pie. You can use them forever and ever. I store mine in this OXO vessel .
- parchment paper — I like the large size of Reynolds for parbaking.
- Jumbo ziptop bags — the 2-gallon size is particularly helpful
- In the bowl of a food processor , pulse the flour, sugar, and salt together. Add the chilled, cubed butter. Pulse at 1-second intervals until butter is the size of peas — should be about ten 1-second pulses. Add the ice water and pulse again about 10 times until the mixture is crumbly but holds together when pinched. ( To make without a food processor: In a large bowl, whisk flour, sugar, and salt together. Add the butter to the flour mixture, and using the back of a fork or a pastry cutter, incorporate it until it is in small pieces. Add ice water and continue to stir with a fork until mixture is crumbly but holds together when pinched.)
- Lay two clean tea towels on a work surface. Dump half of the crumbly dough mixture (roughly 350 grams) into the center of each. Grab the four corners of the towel together and twist to create a beggar’s purse, pressing the dough into a round. Use your hands to pack and flatten the round. Wrap in plastic wrap or parchment paper, place in ziplock or other airtight bag/vessel, and stash in the fridge for at least 30 minutes, but ideally 12 to 24 hours or for as long as 3 days. You also can store it in the freezer for as long as 3 months.
- To parbake or blind bake the pie crust: Heat your oven to 425ºF. If you have a Baking Steel or pizza stone, place it on a rack in the lower third of your oven. ( Steels and stones retain heat well, and they encourage proper and even browning on the bottoms of pie. They also help keep the oven temperature’s even as you open and close the door to check on your pie. ) On a lightly floured work surface, roll out one of the chilled rounds of pie dough, flipping the round over every few strokes, until you have a circle roughly 15 inches in diameter. Note: If you are using very chilled dough, you may find it helpful to pound it gently with your rolling pin before beginning the rolling.
- Transfer the round to a pie plate. Trim any excessive overhanging pie dough — there should be roughly one inch of dough overhanging the edge. Save the scraps in an airtight container in the fridge. Tuck the overhanging dough behind itself; then use your fingers to crimp the edge into a fluted pattern — video guidance here . If time permits, chill the shell for 30 minutes. Lay a sheet of parchment across the pie plate and pour pie weights or dried beans into the center until they reach the top of the pie crust. Use your hands to press the weights down and fit them into the edges of the fluted crust.
- Transfer the filled pie crust to a parchment-lined sheet pan and transfer to the oven for 15-20 minutes or until the edges are just beginning to color — do rely on the visual cues here. It sometimes takes my crusts a little longer to take on that light color at the edges.
- Remove the pan from the oven and carefully remove the pie weights or dried beans (which you can use again and again — let them cool completely; then transfer to a storage bag). Return the pan to the oven. For a parbaked crust, bake the shell for another 2 to 3 minutes — it should take on only the slightest bit of more color all around. For a blind-baked crust , return the shell to the oven for another 10 to 12 minutes or until the crust is evenly golden brown.
- Once you parbake or blind bake your pie shells, let them cool completely; then store them in an airtight vessel or bag — a 2-gallon zip-top bag works well. Store at room temperature for up to 3 days or in the freezer for up to 3 months. From here, proceed with whichever pie recipe you are making. I use this pie crust for every pie I make. See notes above.
Notes
Half Recipe Quantities:
1 1/4 cups (160 g) all-purpose flour
1 tablespoon sugar
1/4 teaspoon table or kosher salt
8 tablespoons (114 g) cold, cubed butter, salted or unsalted
1/4 C. + 1 T. (71 g) ice water
Prep Time: 1 hour
Cook Time: 25 minutes
Category: Dessert
Method: Oven, Food Processor
Cuisine: American, French
Find it online : https://alexandracooks.com/2021/11/07/how-to-parbake-and-blind-bake-pie-crust-foolproof-flaky-pie-dough/
Freezable Stuffing with Kale and Caramelized Onions
Friends! Somehow Thanksgiving is two weeks away. I have only just started really thinking about the menu, which will mostly be the same as last year and the year before that, but there will be, as always, something new, too: another pie or a new turkey-roasting method — I’m eyeing this butter cape technique — or maybe I’ll bring back my great Aunt Phyllis’s candied yams (which would thrill my sister to no end) or perhaps it’s time to try a new festive punch, one bobbing with cranberries and diced apples and sprigs of rosemary.
The possibilities are endless, and I cannot wait. Earlier this week I made a batch of my favorite red wine cranberry sauce , which filled the house with smells of cinnamon and orange, warming me to my core, reminding me of visits to my grandparent’s house, where, no matter the time of year, my grandmother had a pot of mulling spices simmering on the stovetop.
It also made me wonder why I only make cranberry sauce twice a year? I suppose cranberry availability factors in here, but this sauce is such a good one — warmly spiced and perfectly sweet and tart. I served it aside roast chicken and delicata squash, and it complemented both so nicely.
We’re heading to Philadelphia this year to spend Thanksgiving with my sister’s family and my parents as well. It will be the largest Thanksgiving gathering we’ve had in several years, and well, to repeat, I just cannot wait: to see all of the little cousins together, to belly laugh with my family, to crank out pies and stuffing, and perhaps that butter-caped bird.
Wishing you all health and happiness as we head into the holiday season. I am so thankful for you and the community I feel every time I type a word into this space. Sending lots of love.
Below you will find all of my favorite recipes for Thanksgiving. There are printable timelines at the very bottom. Good luck. Gobble Gobble.
- What to drink? Punch, of course.
- Holiday Bread No-knead, no excuse.
- Classic Bread Stuffing My favorite part of the meal every year.
- Potato Gratin Alice Waters’s Best.
- Mashed Potatoes Creamy, Dreamy, Herby & Utterly Delicious
- Sweet Potato Casserole
- ALL the Sauces Make-ahead gravy, cranberry, mustard, and more.
- Simple Salad Palate cleanser.
- Other Sides If you’re up for it.
- Dessert Pie Pie Pie Pie Pie Pie Pie Pie.
- Vegetarian Entrée? This one steals the show.
- Turkey Dry-brined.
- Schedule Get organized! Downloadable and printable timelines included!
PS: 25+ Thanksgiving Side Dishes
Philadelphia Fish House Punch
If you’ve never made a “house” punch, I highly recommend it, and I highly recommend this one: Philadelphia Fish House Punch , a mix of brandy, cognac, rum, fresh lemon juice, and simple syrup.
Since discovering this recipe eight years ago, there has not been a Thanksgiving, New Year’s Eve, or Easter for which I have not made it. Its reception, without fail, is wild, and for this, I look forward to making it more than just about anything during the holiday season.


Punch bowl!
Dust off your punch bowl! Freeze your ice ring! And start juicing those lemons!
This recipe calls for 1.5 cups of freshly squeezed lemon juice. Lemons can be juiced several days in advance; stash the juice in the fridge till Thanksgiving Day. Be sure to make your ice ring at least a day in advance.
Note: If the communal nature of a punch bowl still feels not quite right, you can simply make the punch and pour it into pitchers or some other drink dispenser.
PS: My Favorite Holiday Preparation Trick
Holiday Bread
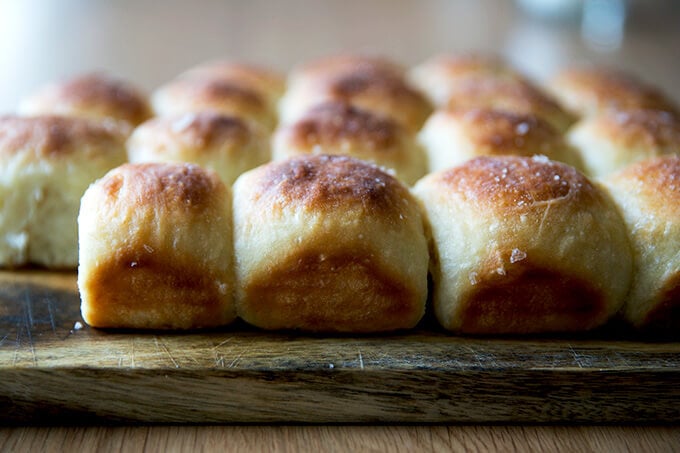
While any bread is welcome at the holiday table, there is something particularly festive about a roll, especially for Thanksgiving. Both of the recipes below are no-knead, and each dough can be made ahead of time and stashed in the fridge until you are ready to bake. Video guidance is provided for each of these recipes.
On the left: No-knead Buttermilk Pull-Apart Rolls : slightly sweet, soft and squishy, these pull-apart rolls resemble Parker House rolls in both taste and texture. On the Right : No-Knead Thyme Dinner Rolls : buttery and crisp on the exterior and soft and tender on the interior. I love the flavor thyme imparts, but rosemary or sage or a combination of the three would be nice here. You can also omit the herbs entirely.
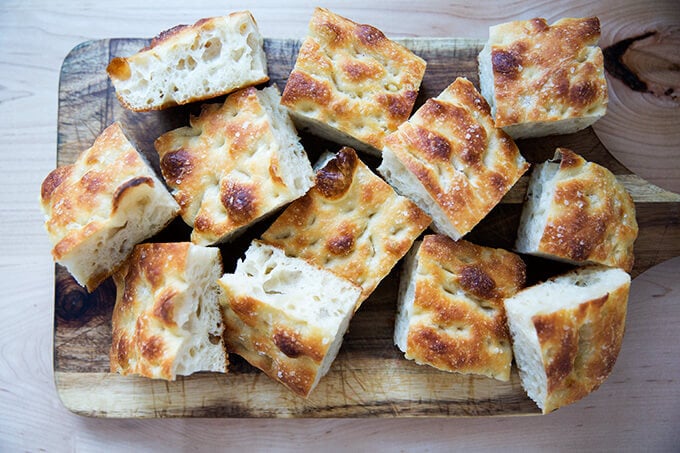
If making rolls is a page-turner for you, you could make a batch of this no-fuss focaccia . The beauty of this recipe is that it’s best made the day before and tucked in the fridge — on Thanksgiving morning, you would just let it rise at room temperature for 3 to 4 hours. You can bake it when the turkey is out of the oven.
Favorite Stuffing
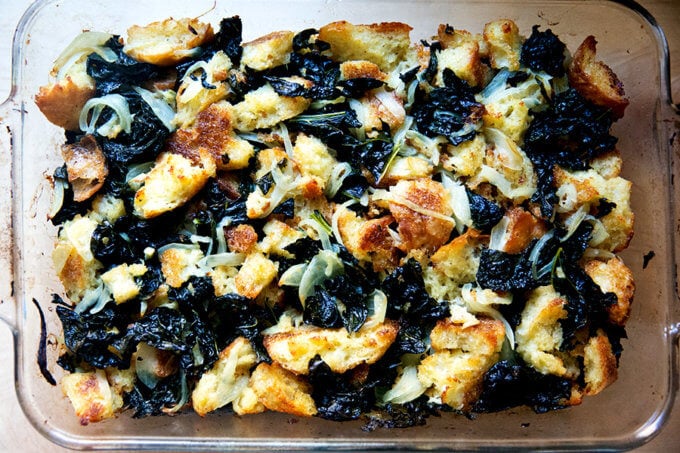
Freezable Stuffing with Kale and Caramelized Onions
This kale and caramelized onion stuffing is a variation of the one in my cookbook, Bread Toast Crumbs . After 45 minutes in the oven, it emerges with a crisp golden exterior and a creamy center, flavorful enough to eat on its own, but welcoming to many a relish, sauce, gravy, or anything else the Thanksgiving plate has to offer.
Know you can customize the seasonings and add-ins to your liking. Also: you can make it ahead and freeze it. See instructions in the post for how to freeze it .
I love the kale and caramelized onion version, but if you’re looking for a very classic stuffing , made with onions and celery, seasoned with Bell’s Seasoning, find that here :
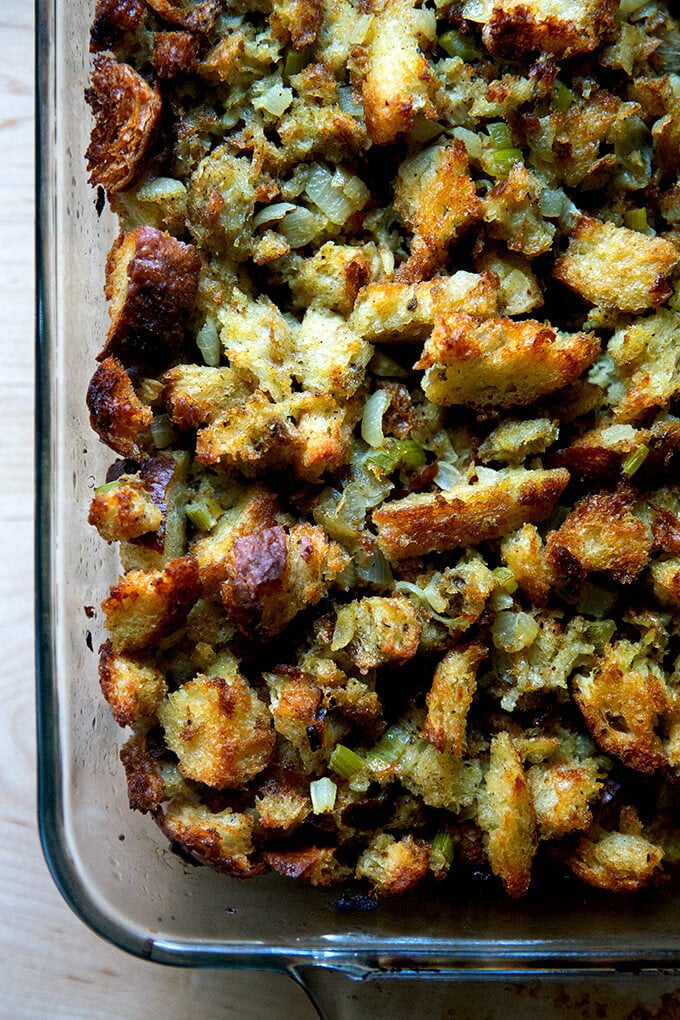
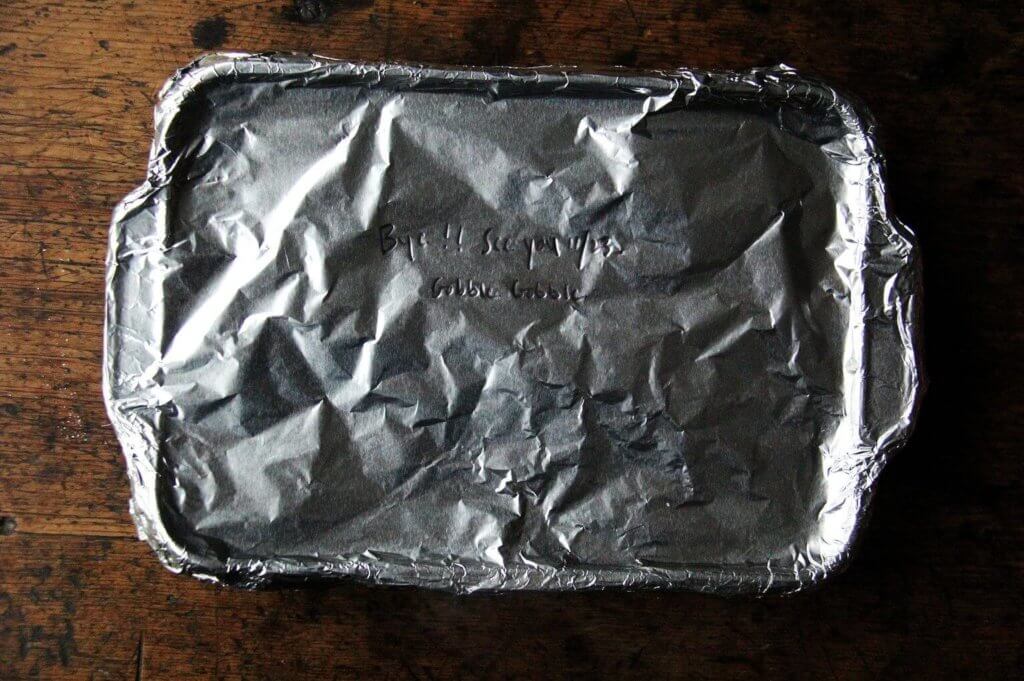
This stuffing freezes well!
Alice Waters’s Potato Gratin
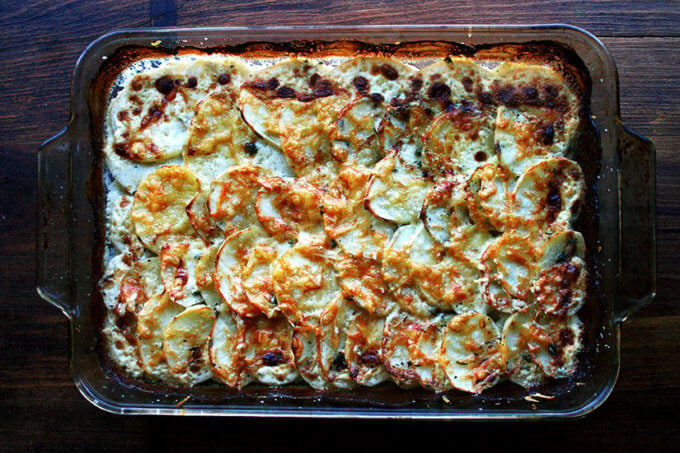
Alice Waters’s potato gratin is a dish my mother has served at nearly every big holiday gathering for as long as I can remember. It often steals the show no matter what it’s beside, turkey or otherwise.
It comes from Chez Panisse Vegetables , which offers a number of enticing combinations — potato with turnips or celery root or leeks or sweet potato — but we always use potatoes exclusively and keep the seasonings simple too: salt, pepper, thyme, and just a dash of freshly grated nutmeg. Submerged in a mixture of equal parts heavy cream and chicken stock, topped with a mixture of Gruyère and parmesan cheeses, these potatoes emerge irresistibly crispy on top and creamy underneath.
One bite of this gratin every year confirms: I could totally skip the turkey.
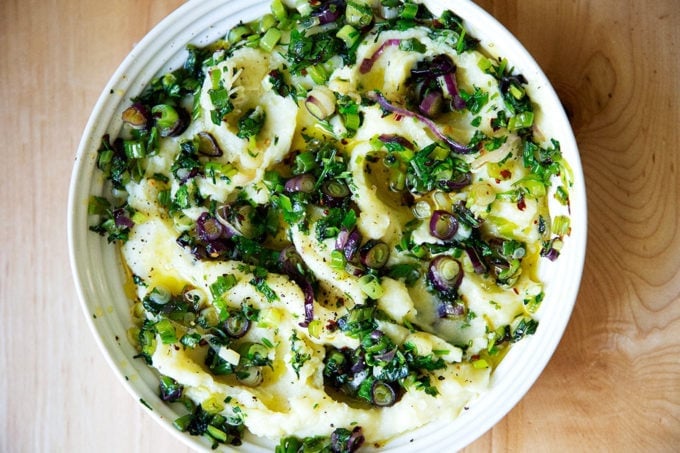
Mashed Potatoes
If you are unfamiliar with Sally Schneider’s mashed potato recipe , let me tell you a little bit about it. True to many of Sally’s recipes, this one calls for very few enrichments, relying on big flavor ingredients and techniques instead.
In this recipe she uses buttermilk because it has a natural creaminess yet is far lower in fat than milk or cream. She also uses some of the reserved potato-cooking liquid to thin the mash as needed. And finally, only after the potatoes have absorbed the liquid, Sally adds a single tablespoon of butter. By adding the butter at the end, she says, “the butter stays on the surface of the potatoes, its flavor readily discernible, imparting a truly rich finish.”
Every time I make these potatoes I am astonished there is no cream and very little butter — they taste far richer than they actually are.
In this buttermilk mashed potato recipe , you’ll find a few variations, including roasted garlic, which I love, and also spicy-scallion, which is my favorite: not only are these potatoes visually very appealing, they’re also just so darn tasty, creamy and tangy thanks to the buttermilk, and bright and spicy thanks to the herb-and-chili infused olive oil.
4 Holiday Sauces
All of the sauces below can be made in advance. Bring cranberry sauces and mustard sauce to room temperature several hours before serving, and bring the gravy to a gentle simmer before serving.
CranberrySauces
On the left: Sally Schneider’s Red Wine Cranberry Sauce (an old favorite, also delicious when made with Port). On the right : No-Cook Cranberry Relish (sweet, tart, orange-scented, and delicious).
Gravy & Mustard Sauce
On the left: Simple, Make-Ahead Gravy . What is especially nice about having gravy made before the bird is even roasted is the mental assurance that as soon as the bird is done, you can (after it rests) serve it without too much of a last-minute scramble. On the right : My Grandmother’s Mustard Sauce: We rarely make a ham for Thanksgiving, but if we do, we make my grandmother’s mustard sauce, affectionately known as the ham sauce !
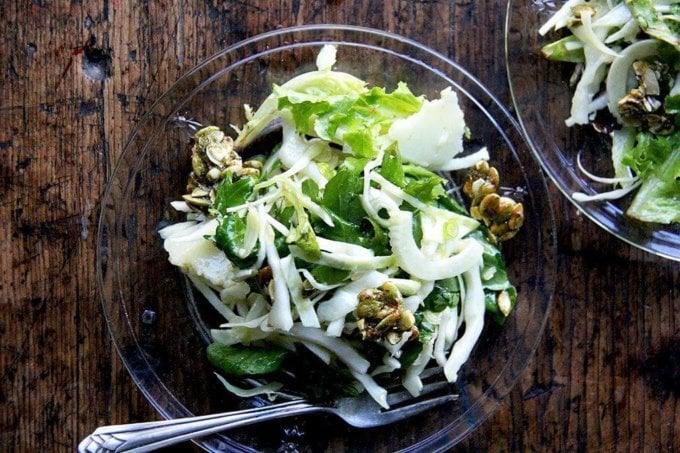
Simple Salad
I love a simple green salad on Thanksgiving. I often make something like the fall salad pictured below . Another option: good, crisp greens tossed with a shallot vinaigrette. (I highly recommend making a large-batch of shallot vinaigrette , which can be made at least a week in advance and which is so nice to have on hand, holiday season or otherwise.)
Other Sides
If you like the idea of a heartier side dish or if you’ve been enlisted to bring a side dish to your Thanksgiving gathering, there are four ideas and here are 25 More Thanksgiving Side Dishes .
Thanksgiving Desserts
Foolproof, Food Processor Pie Dough
One of the best ways you can get a jump start on your Thanksgiving preparations is to make your pie dough in advance. The recipe in the video above and in the recipe here, which includes instructions on how to parbake your pie dough yields two rounds. If you want to double it, I recommend measuring all of the ingredients and making two consecutive batches (no need to clean the food processor in between) as opposed to trying to make a double batch all at once. I use this recipe for all of my pies, tarts, galettes, etc.
Every Thanksgiving I make Ronnie Hollingsworth’s Most Excellent Squash Pie , which comes from Kristin Kimball’s, The Dirty Life , in which she writes: “Pumpkin shmumpkin, winter squash has more flavor and better texture.”
I couldn’t agree more. I also always make David Lebovitz’s no corn syrup bourbon pecan pie and some sort of apple tart, either this apple frangipane galette or this French apple tart . Sister Pie’s salted maple pie has become a recent favorite.
Vegetarian Thanksgiving?
Butternut Squash Lasagna
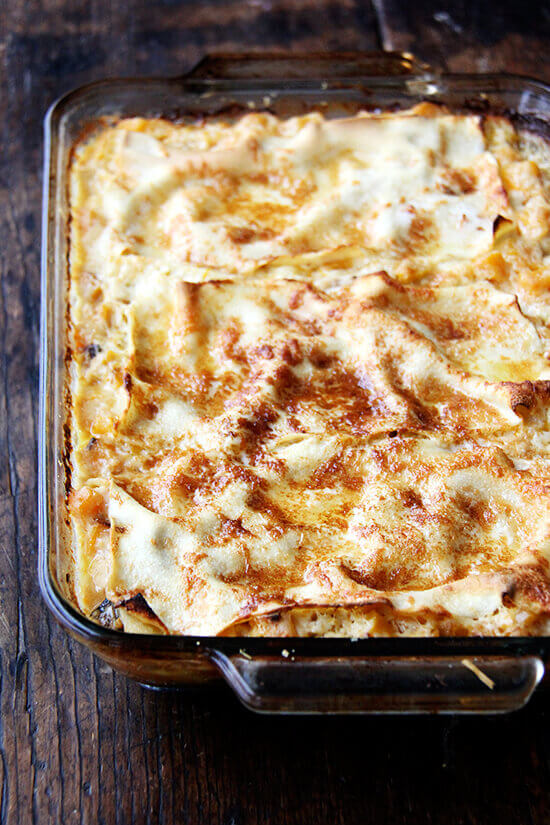
One snowy Thanksgiving in Vermont , this butternut squash lasagna, brought to the feast by a vegetarian friend of my aunt’s, stole the show. This is the kind of dish you will want to make all winter long, one you’ll want stashed in your freezer, ready to take to a friend in need, the crowd-pleasing recipe you’ll turn to for your next holiday party, one proven to please both carnivores and vegetarians alike.
The recipe comes from Gourme t magazine: Butternut Squash Lasagna
.
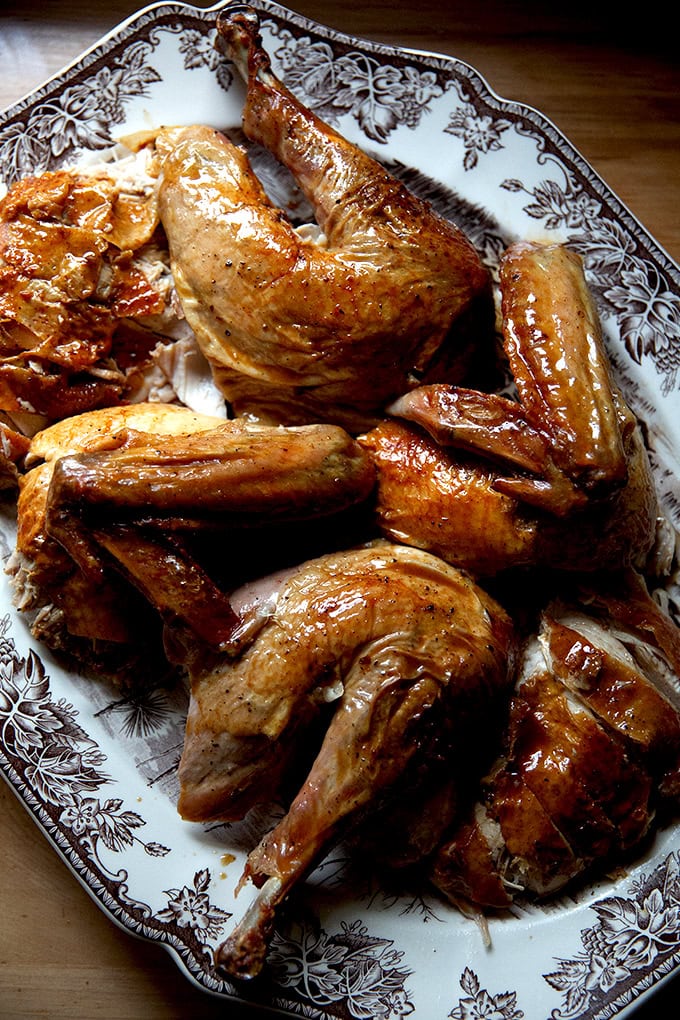
And last but not least… the turkey!
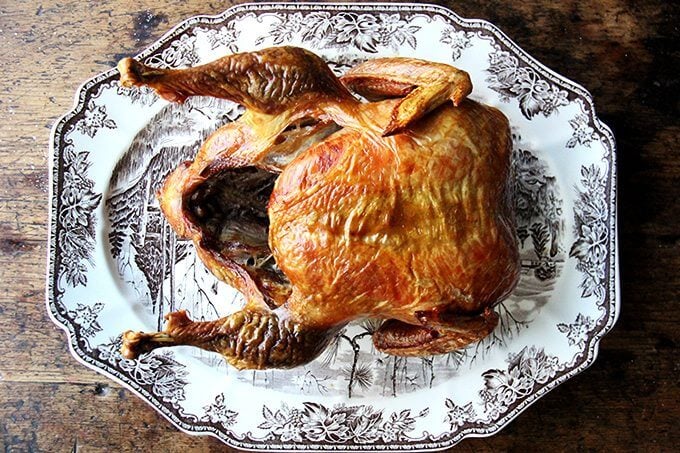
Here is the simple method I use for dry-brining a turkey: I use salt alone (as opposed to salt and sugar) and I use 1 teaspoon of kosher salt per pound. Rub the turkey all over with the salt, place it in a giant plastic turkey bag, and transfer it to the fridge for 48 hours.
On Thanksgiving morning, pat the turkey dry, set it on a rack in a roasting pan, brush it with melted butter, season all over with salt (lightly), and pepper; then transfer the pan to the oven and roast it till it looks done, which will vary depending on the size of your bird.
If you’re not feeling turkey, you could make a ham ! Don’t forget the ham sauce .
How To Dry Brine and Roast A Turkey
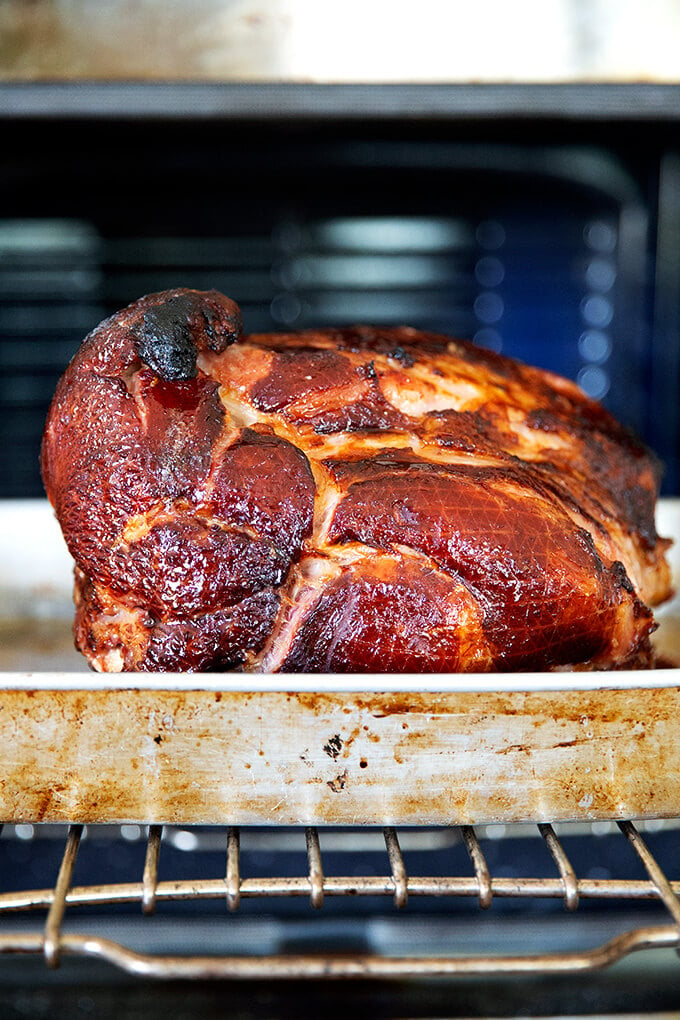
Simple Baked Ham Recipe with Brown Sugar Glaze
Countdown to Thanksgiving Schedule
Here’s a relatively detailed Countdown to Thanksgiving timeline. If you’d prefer to create your own, here it is in a Google Doc — you can create a copy of it, which you can edit/add notes to. There are printable timelines below as well.
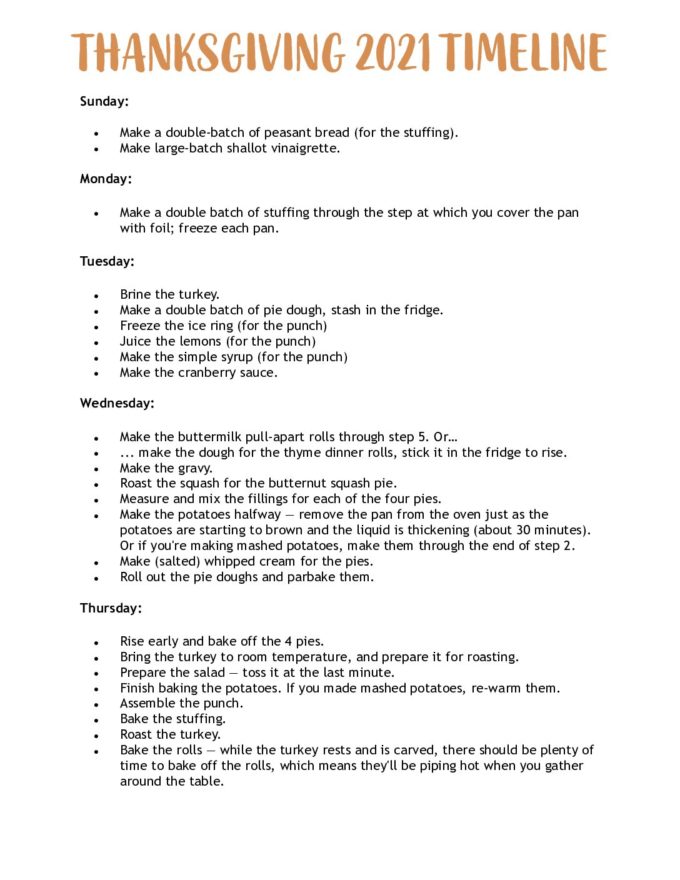
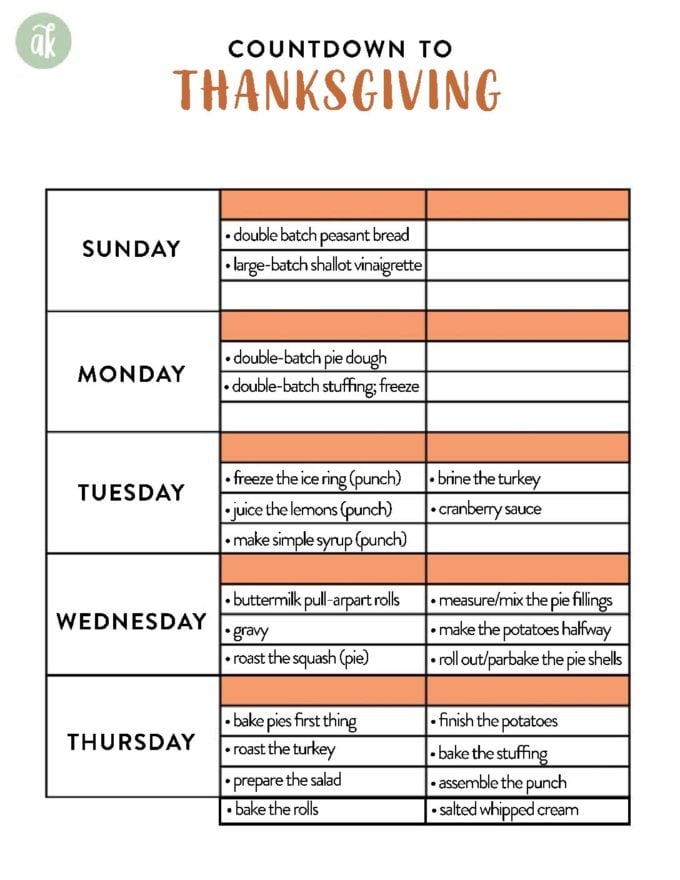
Sunday:
- Make a double-batch of peasant bread (4 loaves, 2 of which will go into a double batch of stuffing ).
- Make large-batch shallot vinaigrette .
Monday:
- Make a double batch of stuffing through the step at which you cover the pan with foil; freeze each pan.
Tuesday:
- Brine the turkey .
- Make a double batch of pie dough , stash in the fridge.
- Freeze the ice ring (for the punch )
- Juice the lemons (for the punch )
- Make the simple syrup (for the punch )
- Make the cranberry sauce .
Wednesday:
- Make the buttermilk pull-apart rolls through step 5; cover the pan and stick it in the fridge overnight. Or…
- … make the dough for the thyme dinner rolls , stick it in the fridge to rise overnight.
- Make the gravy.
- Roast the squash for the butternut squash pie .
- Measure and mix the fillings for each of the pies ( pecan , butternut , salted maple , apple )
- Make the potatoes 3/4 of the way — remove the pan from the oven after 35 minutes — just as the potatoes are starting to brown and the liquid is thickening. Or if you’re making mashed potatoes, make them through the end of step 2.
- Make (salted) whipped cream for the pies.
- Roll out the pies and parbake them.
Thursday:
- Rise early and bake off the 4 pies.
- Bring the turkey to room temperature, and prepare it for roasting.
- Prepare the salad — toss it at the last minute.
- Finish baking the potatoes. If you made mashed potatoes, you can re-warm them using a double boiler or in a crock pot or Instant pot on the warm setting.
- Assemble the punch.
- Bake the stuffing.
- Roast the turkey.
- Bake the rolls — while the turkey rests and is carved, there should be plenty of time to bake off the rolls, which means they’ll be piping hot when you gather around the table.
The below printable timelines mostly reflect the above schedule. Print your copies here: Add your own notes and to-do’s. Good luck! Gobble Gobble.
Printable Timeline
(Click on the images below to print.)
Description
Adapted from Sally Schneider’s A New Way to Cook
I almost always use Tawny Port these days in place of red wine because I always have a bottle of it open. Use what you like. I absolutely love this sauce — I don’t know why I make it only twice a year. It’s great with roasted squash and other vegetables, turkey, of course, but also roast chicken and other meats — it’s just a great, spiced, sweet-tart condiment to have on hand this time of year.
- 2/3 cup sugar
- 3/4 cup dry red wine or Port (an inexpensive Tawny Port)
- 1/2 cinnamon stick ( 1 1/2 inches)
- 1 package fresh or frozen cranberries (about 12 oz .)
- 1 tablespoon slivered tangerine, clementine or orange zest, or more to taste
In a saucepan over moderate heat, combine the sugar, red wine and cinnamon stick; bring to a boil. Reduce the heat and simmer for about 4 minutes, stirring occasionally, until the sugar is dissolved and the wine is reduced slightly. Add the cranberries and zest. Simmer for 10 minutes, or until the cranberries are soft and the sauce has thickened. Serve at room temperature or chilled.
- Prep Time: 5 minutes
- Cook Time: 15 minutes
- Category: Sauce
- Method: Stovetop
- Cuisine: American
