Detroit-style pizza is not unlike a cheesed- and sauced-focaccia. It is heavenly and is great for feeding a crowd. Read on to learn the secret to baking a Detroit-style pizza with a light and airy crust with an irresistible cheese frico crust.

My introduction to Detroit-style pizza came by way of Matt and Emily Hyland, the couple behind Pizza Loves Emily, whose New Haven-style pizzas are near and dear to my heart, and whose Emmy Squared slices follow close behind.
At the height of the lockdown, longing to eat something from beyond my 5-mile radius, I splurged on a trio of pizzas from Emmy Squared via GoldBelly. When the world opened up, I experienced their delicious pan pizzas, topped variously with everything from pickled jalapeños and banana peppers to Calabrian chilies and smoked gouda, at their Brooklyn brick-and-mortar.
These experiences left me determined to make Detroit-style pizza at home. Guess what, Friends? Homemade Detroit-style pizza is as dreamy as imagined. Can I tell you the best part? You can complete so much of the prep — from mixing the dough to parbaking it — days in advance. Read on to learn how to make excellent Detroit-style pizza at home with a light and airy crust and an irresistible cheese frico crust.
PS: How to Make Homemade Sicilian-Style Pizza
Detroit-Style Pizza: A Few Notes and Rules
Of all the pizza styles out there, Detroit-style is perhaps governed by the most rules. Let’s explore them:
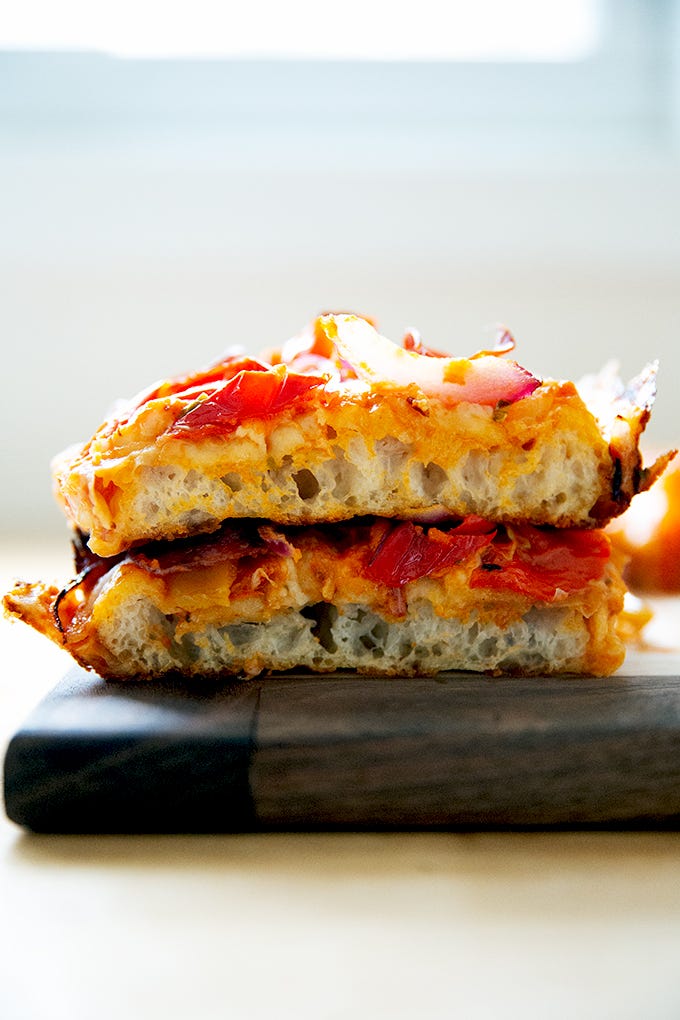
- The dough of Detroit-Style pizza, DSP for short, should be high hydration, and the baked crust should be light and airy, similar to focaccia. Traditional DSP is not parbaked.
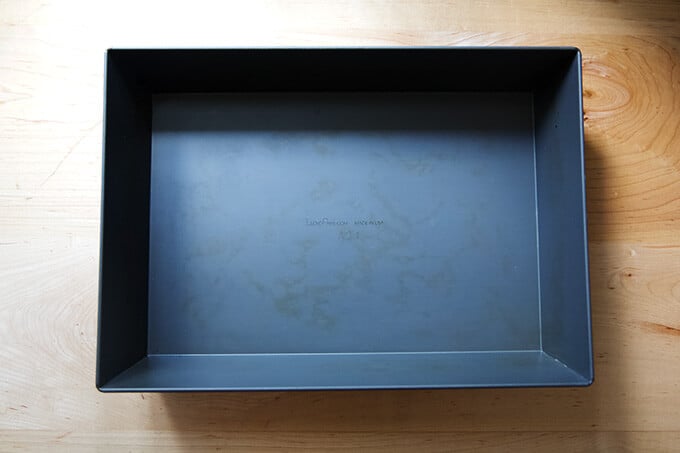
- The story of Detroit’s Buddy’s Pizza , the “original” Detroit-style pizza, is that the owner used his mom’s Sicilian pizza recipe, but placed the dough in rectangular blue steel pans — these were “scrap” pans from the nearby auto plants. Lloyd Pans is a company that makes, among many things, Detroit-style pizzas pans — they arrive already seasoned, and they truly make a beautiful crust.
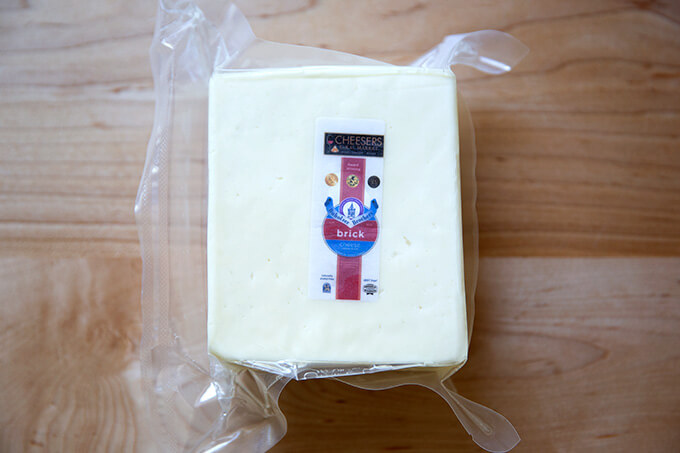
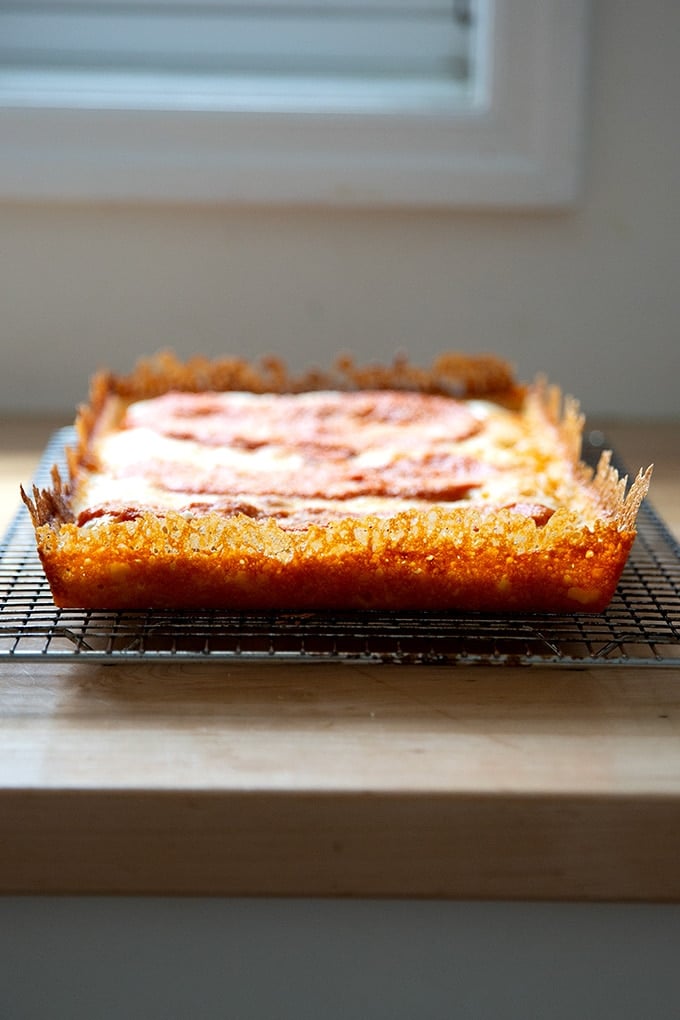
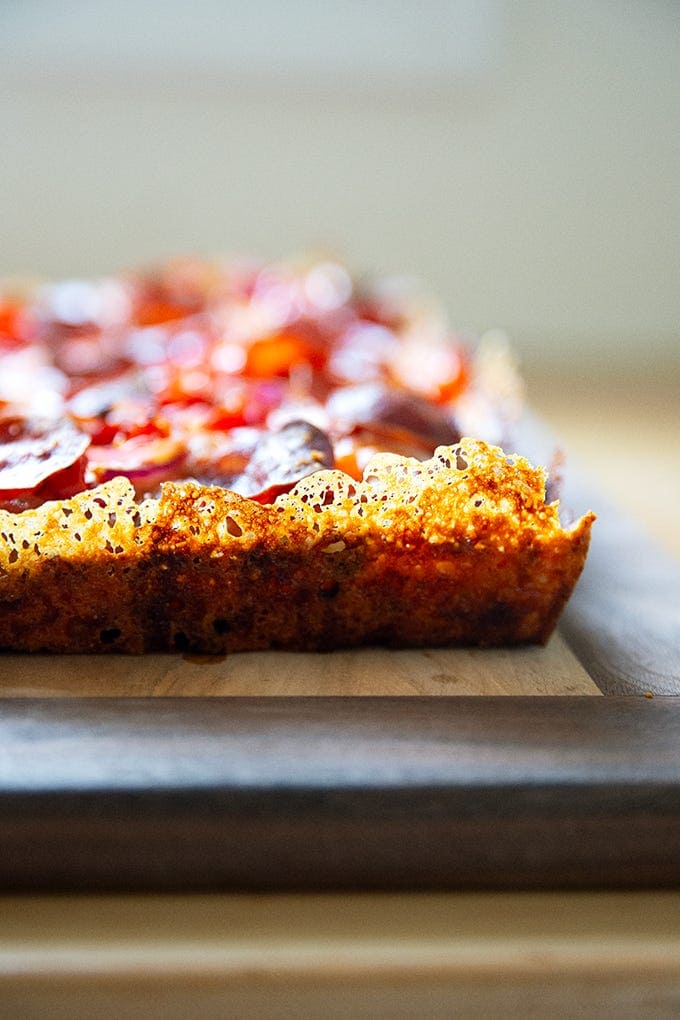
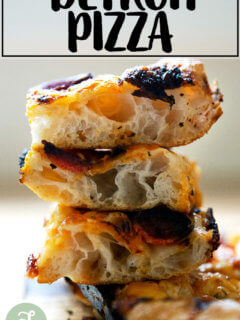
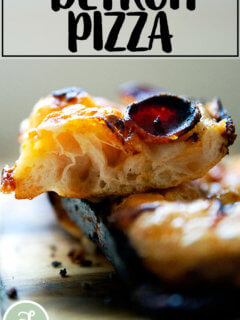
- The cheese , Wisconsin Brick Cheese , which is derived from white American cheddar but has a higher fat content, is traditional. In DSP, cheese goes on the dough before the sauce and is spread edge-to-edge. This method allows the cheese’s fat to pool at the pan’s edges and fry the dough, creating a cheese frico crust (see below).
- The sauce , a cooked tomato sauce , is applied last, often in dollops or two or three “racing” stripes. DSP is not super saucy.
Wisconsin Brick Cheese:
2 Tips for Success
- As noted above, the crust of a DSP should be light and airy. To achieve this, plan ahead, and allow your dough to cold proof, which will make for a lighter, airier dough. I get the best results when I bulk ferment at room temperature for 10 to 12 hours; then transfer the dough to the fridge for 24 to 48 hours. The longer the dough ferments, the more gas bubbles are produced, and when those gas bubbles hit the hot oven, they expand, creating a light, porous crust.
- Break from tradition and parbake your crust. Read on to learn why.
Why Parbake Your Crust?
For two reasons:
- If you have struggled to get your bottom crust to cook completely before your toppings burn, parbaking is the solution.
- If you’re looking to create a dramatic cheese frico crust, the parbake is essential. During the parbake, the dough will shrink from the sides of the pan ever so slightly, creating a space for cheese to wedge itself into and ultimately build into a tall, lacy cheese crust.
How to Make Detroit-Style Pizza, Step by Step
Gather your ingredients: bread flour, salt, cold water, and instant yeast, SAF is my preference. (Find instructions for using a sourdough starter in the recipe box.)

Whisk together the flour, salt, and instant yeast:
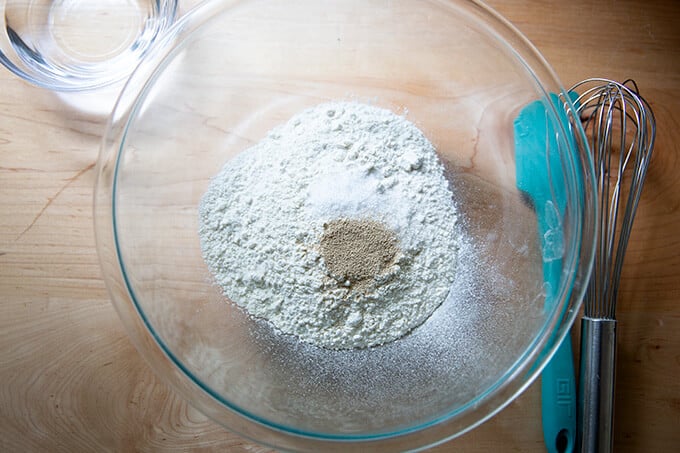
Add cold water.
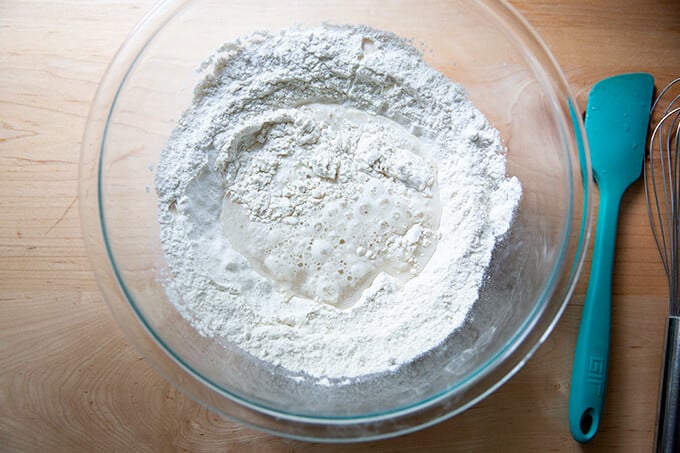
And stir to form a sticky dough ball. Cover the dough with a teaspoon of olive oil. Cover with an airtight lid or plastic wrap and let sit at room temperature overnight or for 10 to 12 hours.
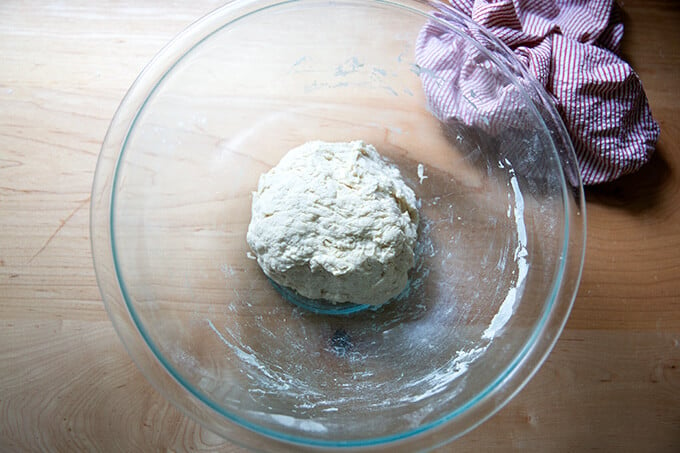
The following morning, remove the lid.
Deflate the dough. I like to use a flexible dough scraper for this. At this point you can transfer the dough to the fridge and let it rest for as long as week. I find 2-3 days to be the sweet spot.
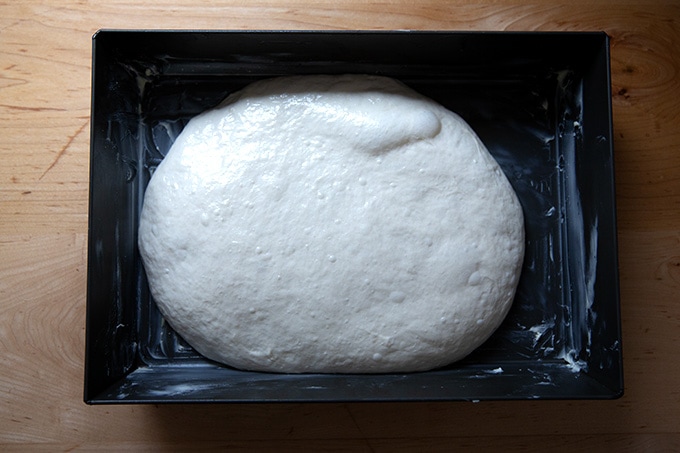
Or you can proceed: place it in your prepared pan: a buttered Detroit-style pizza pan with 1 teaspoon of oil in the center:
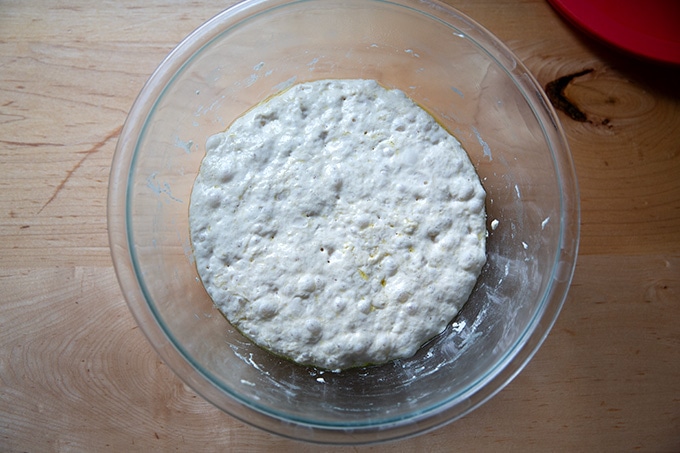
Let the dough rise for 3 to 4 hours.
Then dimple and stretch the dough to the edges.
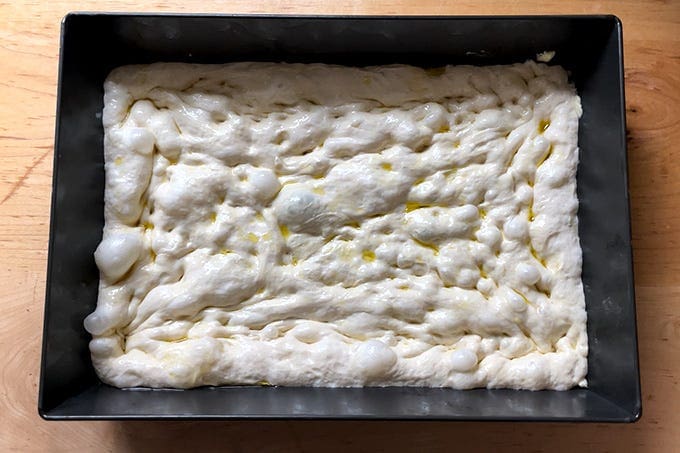
Let it rise for another hour, then parbake it for 8 minutes at 500ºF:
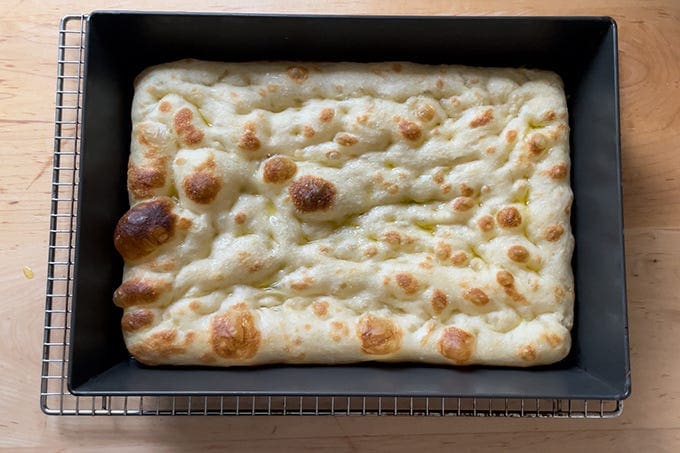
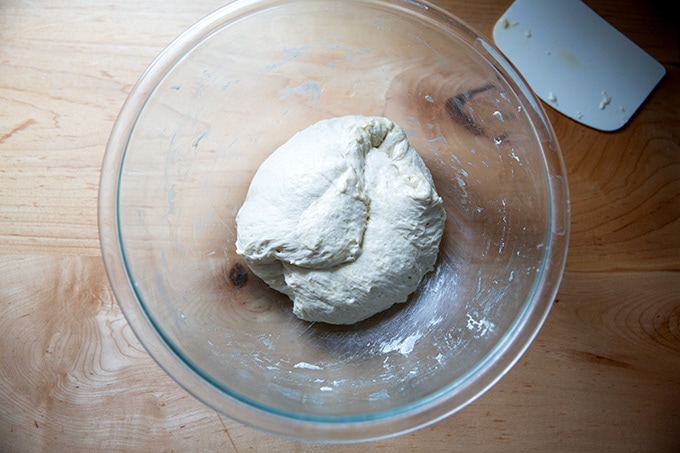
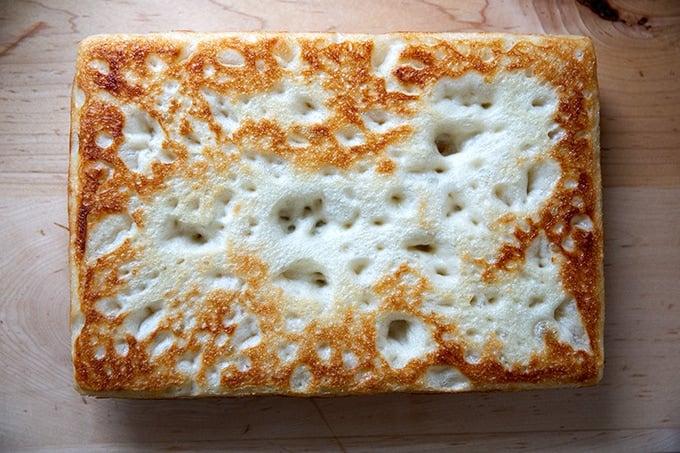
Remove the parbaked crust from the pan and let it cool upside down on the rack:
Meanwhile, gather your toppings:
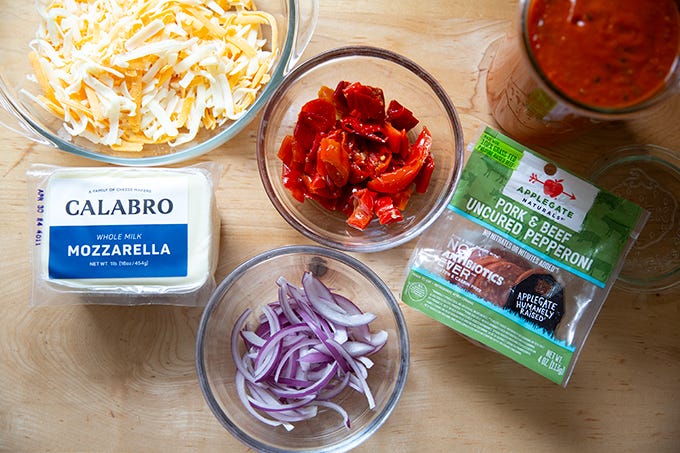
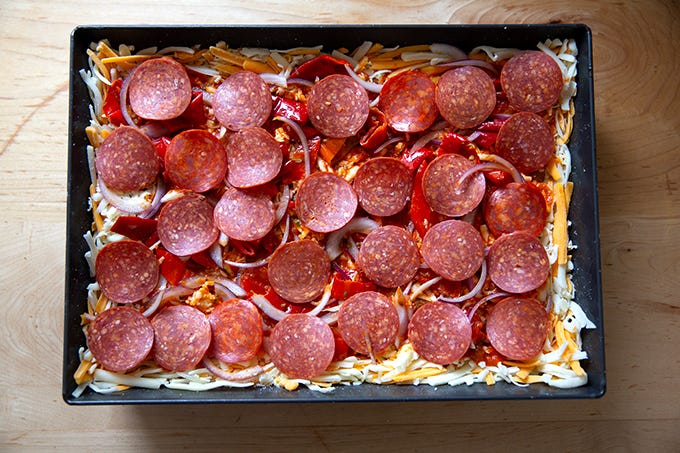
Return the parbaked crust to the pan, then top it as desired:
Return to the oven at 475ºF and bake for 10 minutes.
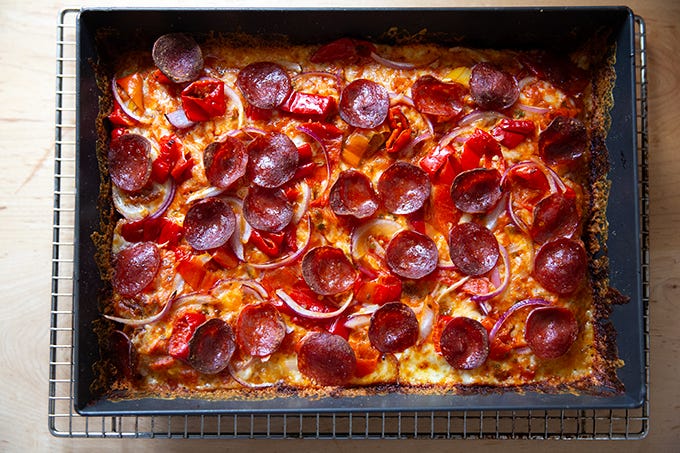
Let cool for 5 minutes in pan, then transfer to a board to cut and serve.
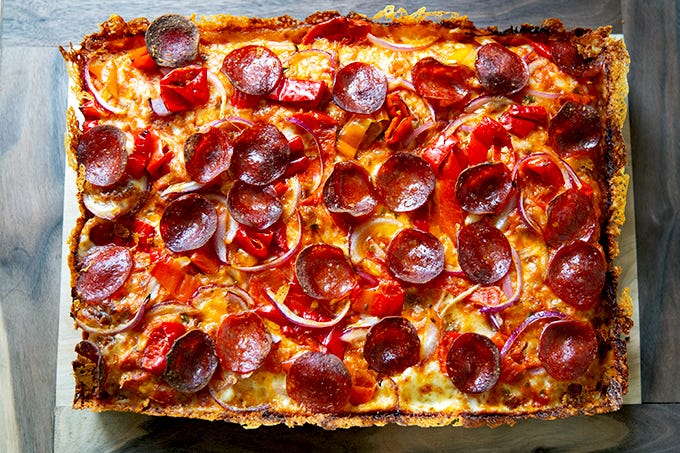
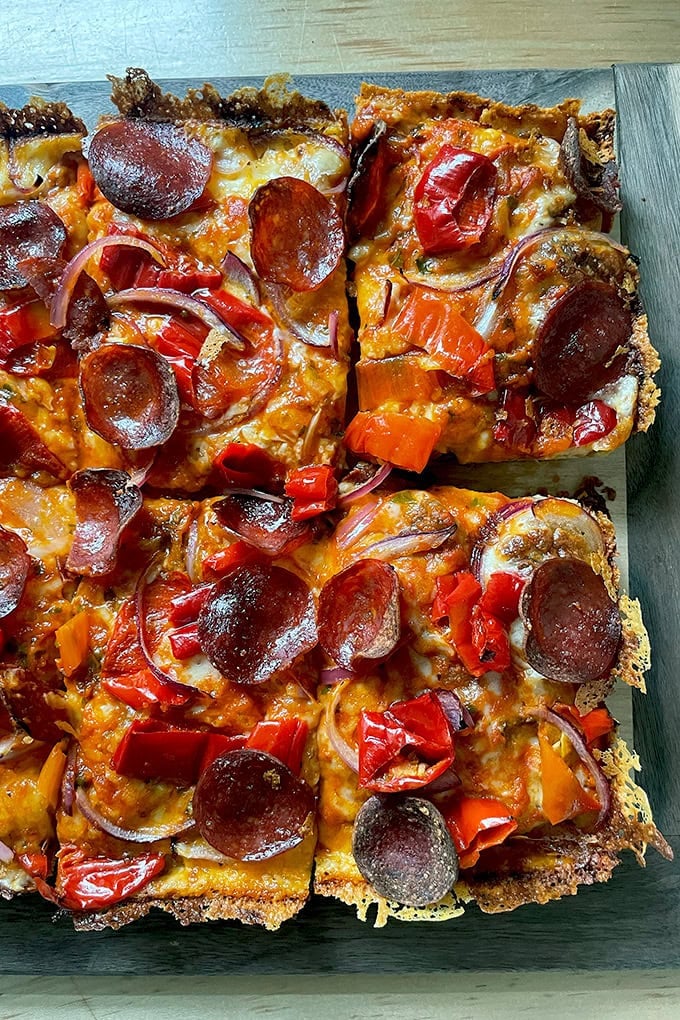
Frico crust:
Crumb shot:
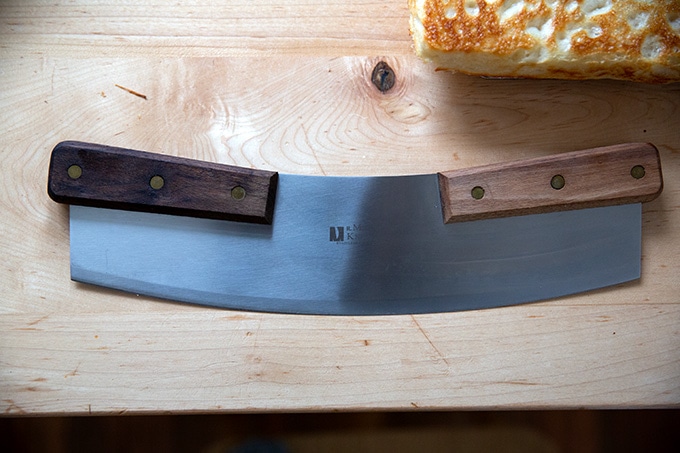
In closing, this is a nice tool to add to your arsenal of pizza-making gear: a mezzaluna. I love this one :
Description
Detroit-style pizza is not unlike a cheesed- and sauced-focaccia. It is heavenly and is great for feeding a crowd. Read on to learn the secret to baking a Detroit-style pizza with a light and airy crust with an irresistible cheese frico crust.
Attention Pizza Fans: My pizza cookbook is here! Get your copy: Pizza Night.
UPDATE 2/10/2023: I have updated the original yeast-leavened recipe by increasing the hydration and adding a parbake. Find the original recipe here .
Notes:
As always, for best results, please use a digital scale to measure everything. Volume cups simply are not accurate.
Flour: I have had success using all-purpose flour, but if you can get your hands on bread flour, that is ideal, especially if you live in Canada or abroad. Moreover, if you live in Canada or abroad, you may need to reduce the water amount. Consider holding back some of the water (25 grams or so) during the mixing process to ensure you don’t end up with a soupy mess. You can always add it back in slowly if the dough is too dry.
Cheese: Wisconsin Brick cheese is traditional but it can be hard to come by if you live in the Northeast. A mix of whole milk mozzarella and Cheddar or Monterey Jack works great for the interior surface. I love using Calabro for the interior.
Pre-shredded Cheese: The starches in pre-shredded cheese prevent the cheese from clumping and melting too quickly. They are essential for creating a dramatic cheese frico crust on the perimeter.
Sauce: I love a vodka sauce on pizza, such as this one or this one . This is my favorite fresh tomato sauce recipe . Of course, use your favorite tomato sauce here. I love all of the Rao’s brand sauces.
Pan: I hate to encourage spending money on yet another piece of equipment, but a Lloyd Detroit-Style pizza pan does make a difference. I love my 9×13-inch USA pan, but a Lloyd Pan truly creates a crisper, more golden bottom. Furthermore, if you have a Baking Steel or pizza stone, baking the pizza on it will encourage even better browning, and if you don’t have a Lloyd pan, I suggest using the Baking Steel, which will help crisp up the bottom.
Timeline: Plan ahead. I like to mix the dough in the evening, let it rise overnight, then bake it the following day.
The toppings : The pickled jalapeño and pepperoni pizza below is inspired by “The Colony” served at several of the Matt and Emily Hyland pizza restaurants, the recipe for which also can be found in their book, EMILY: The Cookbook .
For the yeast-leavened pizza dough:
- 288 grams ( 2.25 cups ) bread flour
- 6 grams ( 1.5 teaspoons ) kosher salt
- 2 grams ( 1/2 teaspoon ) instant yeast, SAF is my preference
- 240 grams (about 1 cup ) cold water
For the sourdough pizza dough:
- 255 grams ( 1.75 cups + 1 tablespoon ) bread flour
- 6 grams ( 1.5 teaspoons ) kosher salt
- 100 grams ( 1/2 cup ) active, bubbly sourdough starter
- 185 grams ( 3/4 cup ) water
For each pizza:
- 1 tablespoon ( 14 g ) softened butter
- 1 teaspoon ( 5 g ) olive oil
- 6 ounces pre-shredded Cheddar (for the cheese frico crust)
- 4 ounces pre-shredded low-moisture, whole-milk mozzarella (for the cheese frico crust)
- 6 ounces hand-grated low-moisture, whole-milk mozzarella for the interior surface (Calabro is my favorite)
- 2 ounces thinly sliced pepperoni, I love Applegate
- 1/2 cup thinly sliced red onion
- 1/4 cup pickled jalapeños or other pickled peppers (such as Mama Lil’s), or to taste, optional
- 1/2 cup tomato sauce, such as this one or this one , or your favorite jarred sauce
- light drizzle honey, optional
To make the yeast-leavened pizza dough:
- In a large bowl, whisk together the flour, salt, and instant yeast. Add the water. Using a rubber spatula, mix until the water is absorbed and the ingredients form a sticky dough ball. Cover the bowl, let the dough rest for 30 minutes, then stretch and fold it: using a wet hand, grab an edge of the dough and stretch it up and in. Repeat this 8 to 10 times, grabbing a different edge each time, ultimately shaping the dough into a ball. Slick the dough with a teaspoon of olive oil. Cover the bowl with an airtight lid. Let rise overnight or for 10 to 12 hours at room temperature.
- Using lightly oiled hands or a flexible bowl scraper, deflate the dough by releasing it from the sides of the bowl and pulling it towards the center. Shape it into a rough ball. At this point, you can transfer the dough to the fridge for up to a week. I find the sweet spot to be 2-3 days. Alternatively, you can skip to preparing the pan.
To make the sourdough pizza dough:
- Place the water in a large bowl. Add the starter and stir with a spatula to combine. Add the salt and stir again; then add the flour. Mix again until the flour is mostly incorporated. Use your hands if necessary to briefly knead in the last bits of flour. Cover vessel with a tea towel or cloth bowl cover and let stand for 30 minutes.
- After 30 minutes have passed, reach into the vessel and pull the dough up and into the center. Turn the vessel quarter turns and continue this pulling 8 to 10 times. Let the dough rest for another 30 minutes; then repeat the stretching and folding. After these two sets of stretches and folds, you should see a difference in the texture of the dough: it will be smoother, stronger, and more elastic.
- If you have a straight-sided vessel, transfer the dough to it; then cover it with a tea towel or use a lidded vessel — I love this 4-quart Pyrex bowl + lid set, and set aside to rise at room temperature (70ºF/21ºC) for 4 to 8 hours (the time will vary depending on the time of year, the strength of your starter, and the temperature of your kitchen) or until the dough has roughly doubled in volume. (A straight-sided vessel makes monitoring the bulk fermentation especially easy because it allows you to see when your dough has truly doubled.)
- Turn the dough out onto a work surface and shape into a rough ball. I like to do this without flour, but use flour as needed — the dough will be sticky. Use the pinkie-edges of your hands to pinch the dough underneath to create a ball. Skip to preparing the pan.
Prepare the pan:
- Grease a 10×14-inch pan with the tablespoon of softened butter. Pour 1 teaspoon of olive oil into the center. Place the dough ball in the pan and turn to coat. Let rest for 3 to 4 hours. With lightly oiled hands, stretch the dough to fit the pan. Let the dough rest again for 1 hour.
Parbake the dough:
- Preheat the oven to 500ºF.
- Dimple the dough one last time with lightly oiled hands taking care not to dimple the perimeter. Transfer the pan to the oven for 8 minutes.
- Remove the pan from the oven and carefully transfer the dough to a cooling rack. Let it cool upside down on the rack for 20 minutes. Do not wash the pan.
- Once the dough is cooled, you can transfer it to an airtight storage bag for 1 to 2 days at room temperature or up to 3 months in the freezer.
Top the pizza:
- Preheat the oven to 475ºF. If you do have a Baking Steel or pizza stone, place it on a rack in the middle or lower third of the oven while it preheats.
- Return the parbaked crust to its pan (bottom side down).
- Combine the two pre-shredded cheeses for the frico crust in a medium bowl. Spread this cheese around the perimeter of the dough pressing it into the sides of the pan.
- Sprinkle the hand-grated mozzarella over the interior surface of the dough.
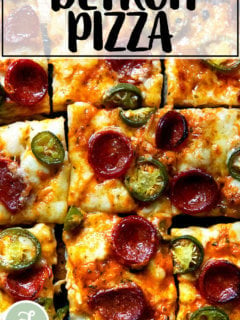
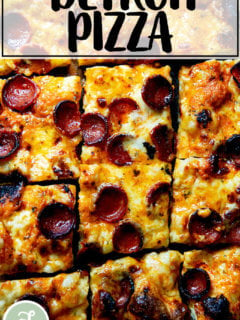
- Finish topping the pizza: spread the 1/2 cup of tomato sauce evenly over the top. Spread the pepperoni evenly over the surface, followed by the red onion. If you are using pickled jalapeños, scatter them evenly over the pizza, keeping in mind heat tolerance — they make the pizza very spicy.
Bake the pizza:
- Transfer pizza to the oven for 10 minutes or until the edges are caramelized to your liking. Remove the pan from the oven and let the pizza rest for 5 minutes in the pan. Carefully run a paring knife or spatula around the pan’s edges. Then, carefully remove the entire pizza from the pan, transferring it to a cutting board. If you are using the honey, drizzle it over top. Cut the pizza into 12 pieces and serve.
- Prep Time: 24 hours
- Cook Time: 15 minutes
- Category: Dinner
- Method: Oven
- Cuisine: American
Detroit-style pizza is not unlike a cheesed- and sauced-focaccia. It is heavenly and is great for feeding a crowd. Read on to learn the secret to baking a Detroit-style pizza with a light and airy crust with an irresistible cheese frico crust.
My introduction to Detroit-style pizza came by way of Matt and Emily Hyland, the couple behind Pizza Loves Emily, whose New Haven-style pizzas are near and dear to my heart, and whose Emmy Squared slices follow close behind.
At the height of the lockdown, longing to eat something from beyond my 5-mile radius, I splurged on a trio of pizzas from Emmy Squared via GoldBelly. When the world opened up, I experienced their delicious pan pizzas, topped variously with everything from pickled jalapeños and banana peppers to Calabrian chilies and smoked gouda, at their Brooklyn brick-and-mortar.
These experiences left me determined to make Detroit-style pizza at home. Guess what, Friends? Homemade Detroit-style pizza is as dreamy as imagined. Can I tell you the best part? You can complete so much of the prep — from mixing the dough to parbaking it — days in advance. Read on to learn how to make excellent Detroit-style pizza at home with a light and airy crust and an irresistible cheese frico crust.
PS: How to Make Homemade Sicilian-Style Pizza
Detroit-Style Pizza: A Few Notes and Rules
Of all the pizza styles out there, Detroit-style is perhaps governed by the most rules. Let’s explore them:
- The dough of Detroit-Style pizza, DSP for short, should be high hydration, and the baked crust should be light and airy, similar to focaccia. Traditional DSP is not parbaked.
- The story of Detroit’s Buddy’s Pizza , the “original” Detroit-style pizza, is that the owner used his mom’s Sicilian pizza recipe, but placed the dough in rectangular blue steel pans — these were “scrap” pans from the nearby auto plants. Lloyd Pans is a company that makes, among many things, Detroit-style pizzas pans — they arrive already seasoned, and they truly make a beautiful crust.
- The cheese , Wisconsin Brick Cheese , which is derived from white American cheddar but has a higher fat content, is traditional. In DSP, cheese goes on the dough before the sauce and is spread edge-to-edge. This method allows the cheese’s fat to pool at the pan’s edges and fry the dough, creating a cheese frico crust (see below).
- The sauce , a cooked tomato sauce , is applied last, often in dollops or two or three “racing” stripes. DSP is not super saucy.
Wisconsin Brick Cheese:
2 Tips for Success
- As noted above, the crust of a DSP should be light and airy. To achieve this, plan ahead, and allow your dough to cold proof, which will make for a lighter, airier dough. I get the best results when I bulk ferment at room temperature for 10 to 12 hours; then transfer the dough to the fridge for 24 to 48 hours. The longer the dough ferments, the more gas bubbles are produced, and when those gas bubbles hit the hot oven, they expand, creating a light, porous crust.
- Break from tradition and parbake your crust. Read on to learn why.
Why Parbake Your Crust?
For two reasons:
- If you have struggled to get your bottom crust to cook completely before your toppings burn, parbaking is the solution.
- If you’re looking to create a dramatic cheese frico crust, the parbake is essential. During the parbake, the dough will shrink from the sides of the pan ever so slightly, creating a space for cheese to wedge itself into and ultimately build into a tall, lacy cheese crust.
How to Make Detroit-Style Pizza, Step by Step
Gather your ingredients: bread flour, salt, cold water, and instant yeast, SAF is my preference. (Find instructions for using a sourdough starter in the recipe box.)
Whisk together the flour, salt, and instant yeast:
Add cold water.
And stir to form a sticky dough ball. Cover the dough with a teaspoon of olive oil. Cover with an airtight lid or plastic wrap and let sit at room temperature overnight or for 10 to 12 hours.
The following morning, remove the lid.
Deflate the dough. I like to use a flexible dough scraper for this. At this point you can transfer the dough to the fridge and let it rest for as long as week. I find 2-3 days to be the sweet spot.
Or you can proceed: place it in your prepared pan: a buttered Detroit-style pizza pan with 1 teaspoon of oil in the center:
Let the dough rise for 3 to 4 hours.
Then dimple and stretch the dough to the edges.
Let it rise for another hour, then parbake it for 8 minutes at 500ºF:
Remove the parbaked crust from the pan and let it cool upside down on the rack:
Meanwhile, gather your toppings:
Return the parbaked crust to the pan, then top it as desired:
Return to the oven at 475ºF and bake for 10 minutes.
Let cool for 5 minutes in pan, then transfer to a board to cut and serve.
Frico crust:
Crumb shot:
In closing, this is a nice tool to add to your arsenal of pizza-making gear: a mezzaluna. I love this one :
Description
Detroit-style pizza is not unlike a cheesed- and sauced-focaccia. It is heavenly and is great for feeding a crowd. Read on to learn the secret to baking a Detroit-style pizza with a light and airy crust with an irresistible cheese frico crust.
Attention Pizza Fans: My pizza cookbook is here! Get your copy: Pizza Night.
UPDATE 2/10/2023: I have updated the original yeast-leavened recipe by increasing the hydration and adding a parbake. Find the original recipe here .
Notes:
As always, for best results, please use a digital scale to measure everything. Volume cups simply are not accurate.
Flour: I have had success using all-purpose flour, but if you can get your hands on bread flour, that is ideal, especially if you live in Canada or abroad. Moreover, if you live in Canada or abroad, you may need to reduce the water amount. Consider holding back some of the water (25 grams or so) during the mixing process to ensure you don’t end up with a soupy mess. You can always add it back in slowly if the dough is too dry.
Cheese: Wisconsin Brick cheese is traditional but it can be hard to come by if you live in the Northeast. A mix of whole milk mozzarella and Cheddar or Monterey Jack works great for the interior surface. I love using Calabro for the interior.
Pre-shredded Cheese: The starches in pre-shredded cheese prevent the cheese from clumping and melting too quickly. They are essential for creating a dramatic cheese frico crust on the perimeter.
Sauce: I love a vodka sauce on pizza, such as this one or this one . This is my favorite fresh tomato sauce recipe . Of course, use your favorite tomato sauce here. I love all of the Rao’s brand sauces.
Pan: I hate to encourage spending money on yet another piece of equipment, but a Lloyd Detroit-Style pizza pan does make a difference. I love my 9×13-inch USA pan, but a Lloyd Pan truly creates a crisper, more golden bottom. Furthermore, if you have a Baking Steel or pizza stone, baking the pizza on it will encourage even better browning, and if you don’t have a Lloyd pan, I suggest using the Baking Steel, which will help crisp up the bottom.
Timeline: Plan ahead. I like to mix the dough in the evening, let it rise overnight, then bake it the following day.
The toppings : The pickled jalapeño and pepperoni pizza below is inspired by “The Colony” served at several of the Matt and Emily Hyland pizza restaurants, the recipe for which also can be found in their book, EMILY: The Cookbook .
For the yeast-leavened pizza dough:
- 288 grams ( 2.25 cups ) bread flour
- 6 grams ( 1.5 teaspoons ) kosher salt
- 2 grams ( 1/2 teaspoon ) instant yeast, SAF is my preference
- 240 grams (about 1 cup ) cold water
For the sourdough pizza dough:
- 255 grams ( 1.75 cups + 1 tablespoon ) bread flour
- 6 grams ( 1.5 teaspoons ) kosher salt
- 100 grams ( 1/2 cup ) active, bubbly sourdough starter
- 185 grams ( 3/4 cup ) water
For each pizza:
- 1 tablespoon ( 14 g ) softened butter
- 1 teaspoon ( 5 g ) olive oil
- 6 ounces pre-shredded Cheddar (for the cheese frico crust)
- 4 ounces pre-shredded low-moisture, whole-milk mozzarella (for the cheese frico crust)
- 6 ounces hand-grated low-moisture, whole-milk mozzarella for the interior surface (Calabro is my favorite)
- 2 ounces thinly sliced pepperoni, I love Applegate
- 1/2 cup thinly sliced red onion
- 1/4 cup pickled jalapeños or other pickled peppers (such as Mama Lil’s), or to taste, optional
- 1/2 cup tomato sauce, such as this one or this one , or your favorite jarred sauce
- light drizzle honey, optional
To make the yeast-leavened pizza dough:
- In a large bowl, whisk together the flour, salt, and instant yeast. Add the water. Using a rubber spatula, mix until the water is absorbed and the ingredients form a sticky dough ball. Cover the bowl, let the dough rest for 30 minutes, then stretch and fold it: using a wet hand, grab an edge of the dough and stretch it up and in. Repeat this 8 to 10 times, grabbing a different edge each time, ultimately shaping the dough into a ball. Slick the dough with a teaspoon of olive oil. Cover the bowl with an airtight lid. Let rise overnight or for 10 to 12 hours at room temperature.
- Using lightly oiled hands or a flexible bowl scraper, deflate the dough by releasing it from the sides of the bowl and pulling it towards the center. Shape it into a rough ball. At this point, you can transfer the dough to the fridge for up to a week. I find the sweet spot to be 2-3 days. Alternatively, you can skip to preparing the pan.
To make the sourdough pizza dough:
- Place the water in a large bowl. Add the starter and stir with a spatula to combine. Add the salt and stir again; then add the flour. Mix again until the flour is mostly incorporated. Use your hands if necessary to briefly knead in the last bits of flour. Cover vessel with a tea towel or cloth bowl cover and let stand for 30 minutes.
- After 30 minutes have passed, reach into the vessel and pull the dough up and into the center. Turn the vessel quarter turns and continue this pulling 8 to 10 times. Let the dough rest for another 30 minutes; then repeat the stretching and folding. After these two sets of stretches and folds, you should see a difference in the texture of the dough: it will be smoother, stronger, and more elastic.
- If you have a straight-sided vessel, transfer the dough to it; then cover it with a tea towel or use a lidded vessel — I love this 4-quart Pyrex bowl + lid set, and set aside to rise at room temperature (70ºF/21ºC) for 4 to 8 hours (the time will vary depending on the time of year, the strength of your starter, and the temperature of your kitchen) or until the dough has roughly doubled in volume. (A straight-sided vessel makes monitoring the bulk fermentation especially easy because it allows you to see when your dough has truly doubled.)
- Turn the dough out onto a work surface and shape into a rough ball. I like to do this without flour, but use flour as needed — the dough will be sticky. Use the pinkie-edges of your hands to pinch the dough underneath to create a ball. Skip to preparing the pan.
Prepare the pan:
- Grease a 10×14-inch pan with the tablespoon of softened butter. Pour 1 teaspoon of olive oil into the center. Place the dough ball in the pan and turn to coat. Let rest for 3 to 4 hours. With lightly oiled hands, stretch the dough to fit the pan. Let the dough rest again for 1 hour.
Parbake the dough:
- Preheat the oven to 500ºF.
- Dimple the dough one last time with lightly oiled hands taking care not to dimple the perimeter. Transfer the pan to the oven for 8 minutes.
- Remove the pan from the oven and carefully transfer the dough to a cooling rack. Let it cool upside down on the rack for 20 minutes. Do not wash the pan.
- Once the dough is cooled, you can transfer it to an airtight storage bag for 1 to 2 days at room temperature or up to 3 months in the freezer.
Top the pizza:
- Preheat the oven to 475ºF. If you do have a Baking Steel or pizza stone, place it on a rack in the middle or lower third of the oven while it preheats.
- Return the parbaked crust to its pan (bottom side down).
- Combine the two pre-shredded cheeses for the frico crust in a medium bowl. Spread this cheese around the perimeter of the dough pressing it into the sides of the pan.
- Sprinkle the hand-grated mozzarella over the interior surface of the dough.
- Finish topping the pizza: spread the 1/2 cup of tomato sauce evenly over the top. Spread the pepperoni evenly over the surface, followed by the red onion. If you are using pickled jalapeños, scatter them evenly over the pizza, keeping in mind heat tolerance — they make the pizza very spicy.
Bake the pizza:
- Transfer pizza to the oven for 10 minutes or until the edges are caramelized to your liking. Remove the pan from the oven and let the pizza rest for 5 minutes in the pan. Carefully run a paring knife or spatula around the pan’s edges. Then, carefully remove the entire pizza from the pan, transferring it to a cutting board. If you are using the honey, drizzle it over top. Cut the pizza into 12 pieces and serve.
- Prep Time: 24 hours
- Cook Time: 15 minutes
- Category: Dinner
- Method: Oven
- Cuisine: American
Find it online : https://alexandracooks.com/2021/08/13/detroit-style-pizza-two-ways-yeast-and-sourdough/
Taco night has evolved considerably since posting this recipe five years ago. Back then, I was grinding the chicken meat at home, grating the cheese by hand, mixing the taco spices, pickling the onions, and making the salsa. Sometimes I even made the tortillas .
I titled the post: “Simplest Chicken Tacos.”
Are you laughing? My how things have changed.
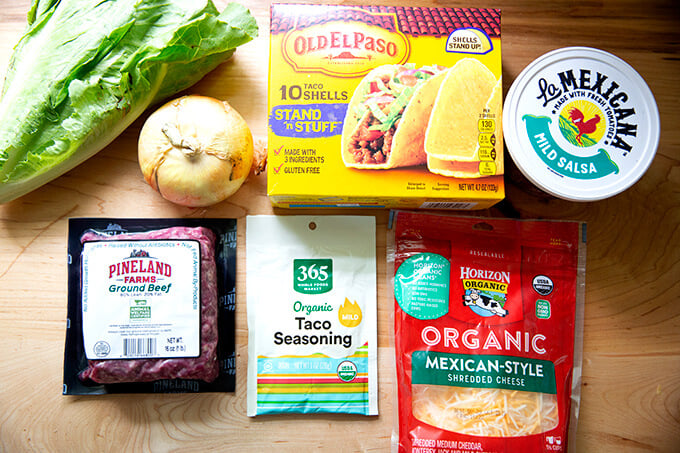
It didn’t happen overnight, but rather very gradually, one small change leading to another until I had slipped right down that slippery slope, landing at present-day taco night, where the taco shells are hard (and stand upright!) and purchased at the store along with the bag of grated “Mexican-style” cheese, the packet of taco seasoning, and the pound of ground beef.
I often buy the salsa, too: you know the fresh salsa sold in the produce aisle? That’s the one!
My prep list on taco night now amounts to dicing an onion, browning the meat, and slicing up a head of Romaine lettuce. I warm the taco shells in the toaster oven, dump the cheese and lettuce into bowls, and when the taco filling is cooked, which takes about 20 minutes total, the assembly line is ready.
I had wanted to title this post: “Taco Night 2.0”, but that would have implied some sort of culinary advancement, which is not exactly what has happened here.
But do you know what? The reception of my mostly effortless taco night has never been better. No one seems to miss the freshly ground meat, the hand-grated cheese, and the homemade taco seasoning. The tacos, in fact, have never disappeared faster.
Friends, this is not easy to admit. If you’ve been reading for a while, you know I’m a proud DIY-er: I’ve made the case for buying chickens whole and cutting them up yourself ( and then making stock with the carcass!) ; I extoll the virtues of cooking dried beans from scratch. I don’t think twice about making homemade ricotta , and I encourage you to do the same.
I like to cook. I LOVE to cook! Foods made from scratch so often taste better. Plus there’s less waste; you get more bang for your buck.
Knowing all this, if I confess to stocking packets of taco seasoning, bags of grated cheese, and tubs of salsa, what will come next? Endorsing a brand of bottled salad dressing ?
I think this is my fear. That slippery slope I mentioned earlier. The trouble is that sometimes all of this DIY pride (madness?) prevents me from actually getting dinner on the table. Since adopting a more semi-homemade approach to taco night, it happens more regularly. And no matter the day of the week, it always feels doable.
I want to be better about this, and I’ve made strides over the years, namely accepting that canned beans work just fine, that boneless, skinless chicken thighs make souvlaki night a walk in the park, that Trader Joe’s pre-cooked lentils and bruschetta sauce unite into a most magical salad , and, most recently, that a packet of taco seasoning somehow makes taco night feel like a complete and utter breeze.
Friends, have you ever let your high standards prevent you from getting to the task at hand? Are you ashamed of anything in your fridge or pantry? Please share. This is a safe space.
While the spirit is moving me, here’s my full confession:
10 Items I Never Imagined Stocking
This confession stems from the most recent taco night, when I found myself staring at all of the outsourced components — numbers 1-5 below all make appearances on taco night.
- Pre-grated cheese
- Taco seasoning packet
- Jarred tomato sauce
- Fresh salsa
- Stand-up taco shells
- “Baby” carrots
- Pre-formed burger patties (very convenient)
- Chicken in parts (very convenient)
- Cheesesticks (at this point I’m more addicted than the children)
- Sliced bread (this one’s the hardest to admit)
How to Make Truly Simple Tacos
Step one, gather your ingredients:
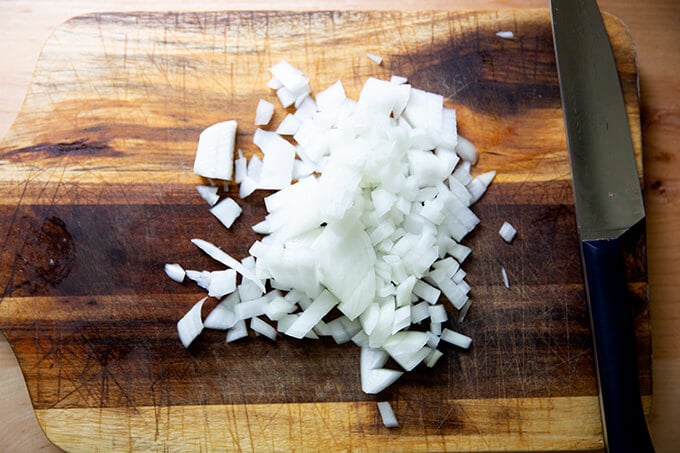
Dice an onion.
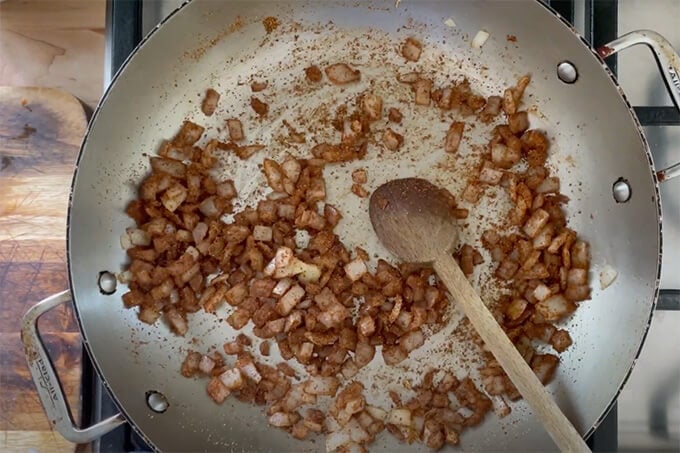
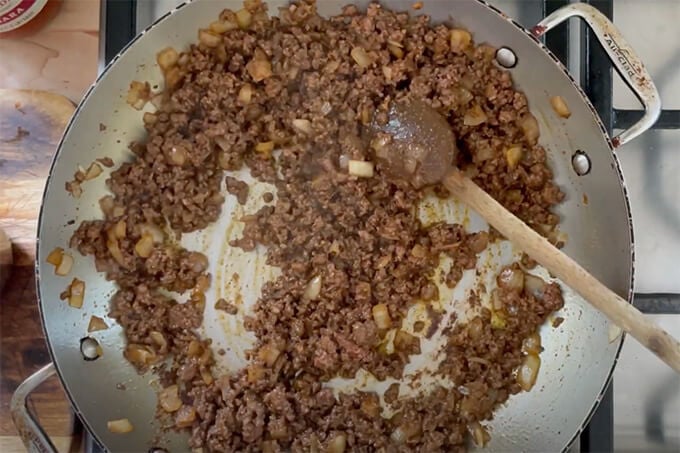
Sauté the onion for about 4 minutes; then add the packet of taco seasoning and cook for 1 minute.
.
Add the ground beef, and stir constantly until the meat is browned, 1-2 minutes.
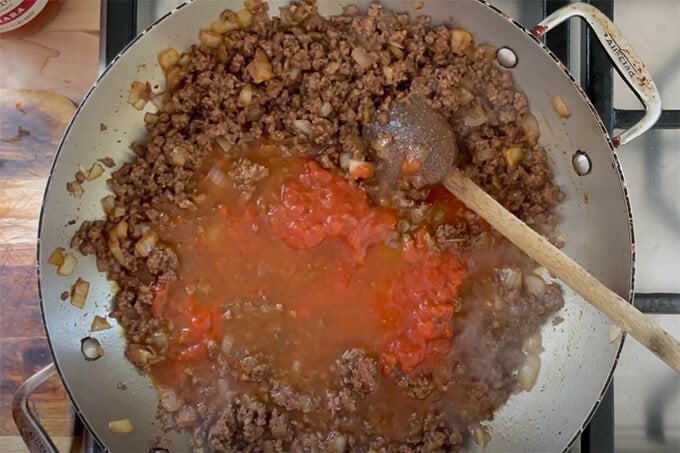
Add the tomato sauce and water.
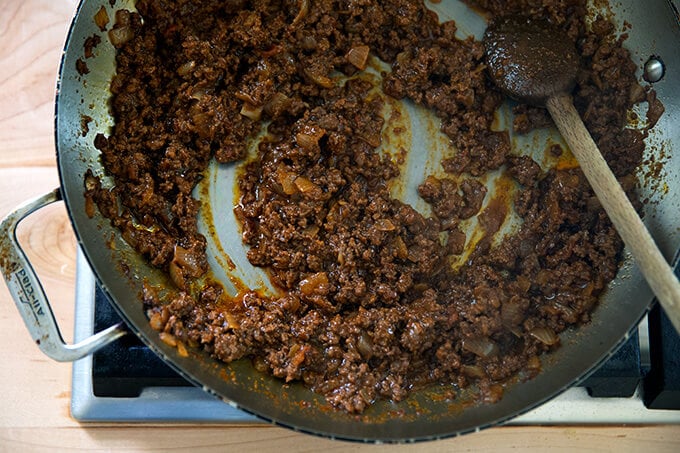
Bring the mixture to a simmer and simmer for 10 minutes or until…
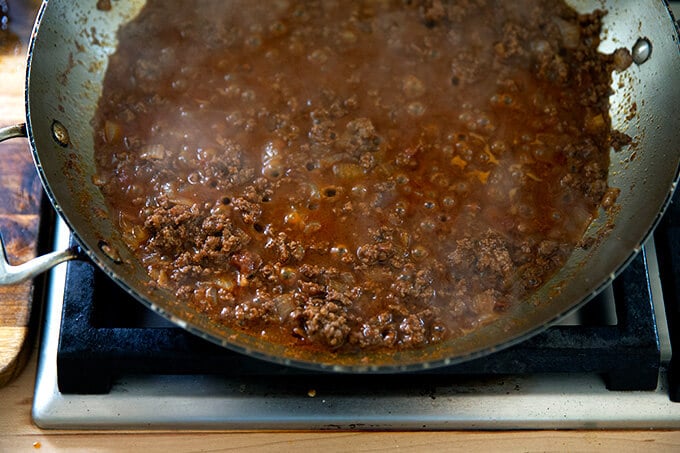
… much of the liquid has reduced down.
Cut up a head of Romaine lettuce, and …
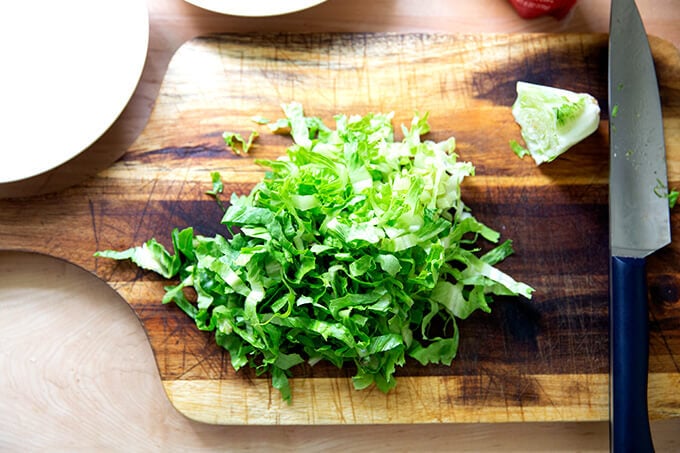
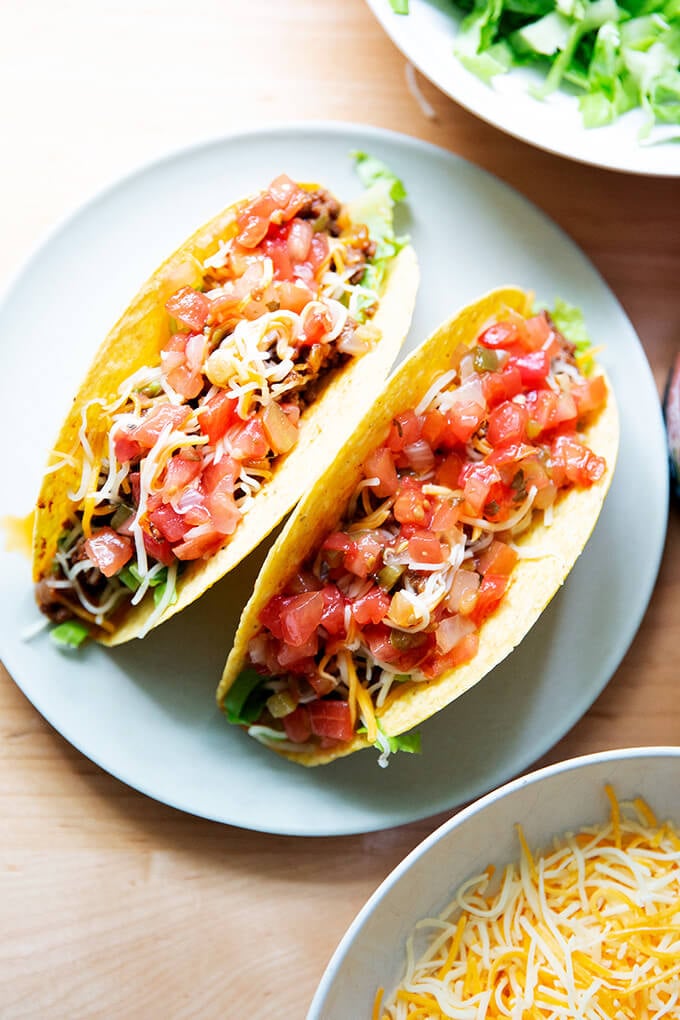
… dump it into a bowl. Dump the cheese into a bowl, too, and place your taco shells on a sheet pan. Toast them in the oven or toaster oven for 1 to 2 minutes.
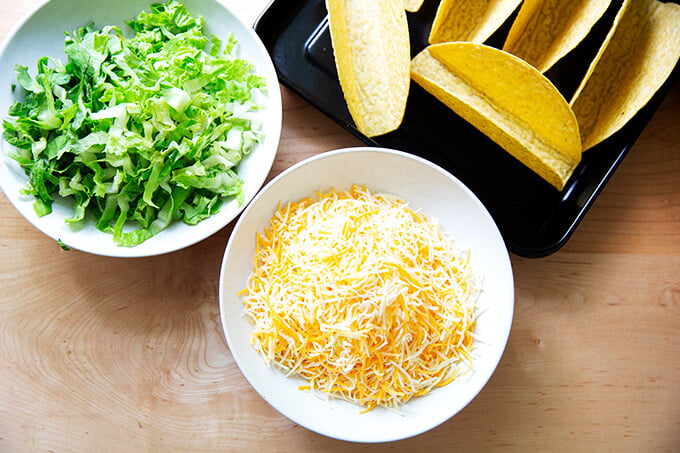
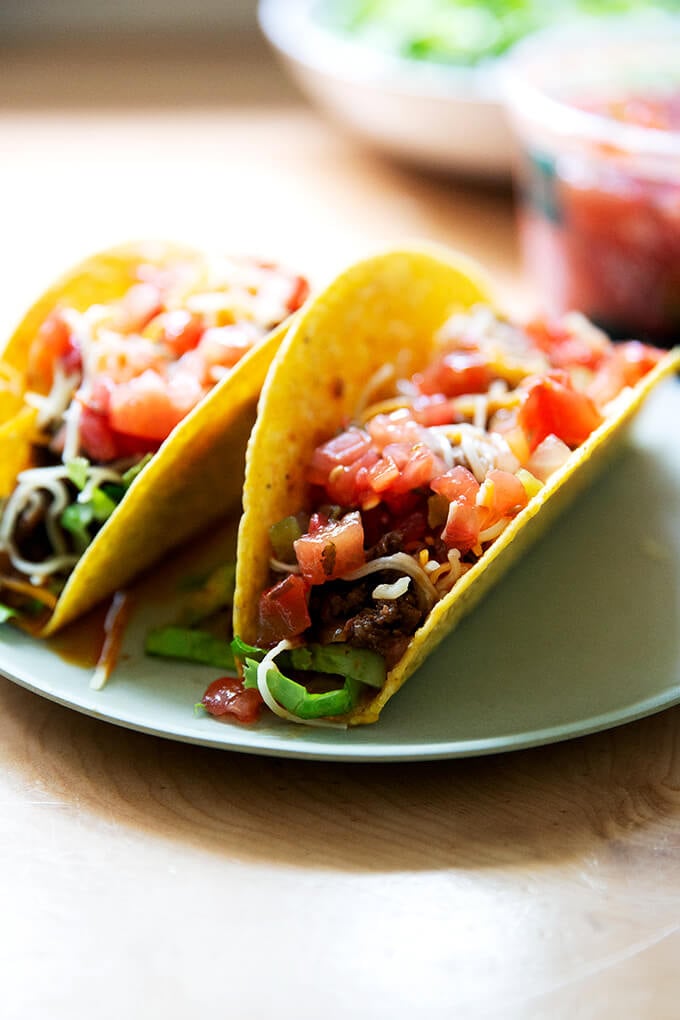
Your assembly line is ready. Assemble away! I do this order: lettuce, meat, cheese, salsa.
Description
Recipe simplified from this other mostly simple recipe for beef tacos . I most often make a double batch of this — the meat keeps for a long time in the fridge and it freezes well, too.
Notes:
- Taco Seasoning: I like the Whole Foods 365 brand, and if you have one you recommend, please share in the comments. Update: Three recommendations from commenters include The Spice House , Penzey’s , and Siete Foods . My experience with taco seasoning packets is that they tend to be saltier, so if you have a heavy hand (as I do) when seasoning meat and onions, etc., consider holding back a bit or omitting altogether.
- Ground Beef : I look for grassfed ground beef or humanely raised (for reasons I discuss here and here ) and look for 20% fat.
- Tortillas: For soft tortillas we love the Vista Hermosa brand, which I find at Whole Foods, or Caramelo , which I mail order (and which takes weeks, so if you do it, buy a lot and store them in the freezer).
for the taco filling:
- 1 tablespoon grapeseed or olive oil
- 1 small onion, finely chopped to yield about a cup
- 1 packet (1 oz | 28 g | about 3 tablespoons ) taco seasoning, see notes above
- kosher salt to taste
- 1 pound ground beef, see notes above
- 1/2 cup crushed tomatoes or tomato sauce
- 1/2 cup water
- 2 teaspoons white balsamic, cider (or other) vinegar
for serving:
- tortillas, hard shell (stand up or otherwise), soft, or whatever you like
- shredded cheddar, Monterey Jack, or a blend
- shredded Romaine lettuce
- salsa, homemade or purchased, I like the La Mexican brand sold in the produce/refrigerated aisle
- sour cream, optional
- diced avocado, optional
- Make the taco meat: Heat oil in a large skillet over medium heat until hot and shimmering but not smoking; add onion and cook, stirring occasionally, until softened, about 4 minutes. Add spice packet; cook, stirring constantly, until fragrant, about 1 minute. Add ground beef and cook, stirring often, until it is no longer pink, about 5 minutes. ( Note: you may need to use a spatula to break up the block of meat into smaller pieces before you can stir frequently. ) Add tomatoes or tomato sauce, water, and vinegar; bring to simmer.
- Reduce heat to medium-low and simmer, uncovered, stirring frequently, until liquid has reduced and thickened (mixture should not be completely dry), about 10 minutes. Taste, adjust seasonings with salt. This can be done up to 5 days (or longer actually) in advance and reheated slowly before serving.
- For taco night: If using hard tortilla shells, you can toast them in the oven or toaster oven at 350ºF for about 2 minutes. If using flour tortillas, wrap the tortillas in foil, and place in a 350ºF oven for 15 minutes or until warm. Sometimes I just toast them in the toaster. Remove from oven, and transfer to tea towel to keep warm. Place shredded cheese, lettuce, salsa, sour cream (if using), and avocado (if using) in bowls. Start assembling as you wish.
- Prep Time: 15 minutes
- Cook Time: 20 minutes
- Category: Dinner
- Method: Stovetop
- Cuisine: Mexican, American
