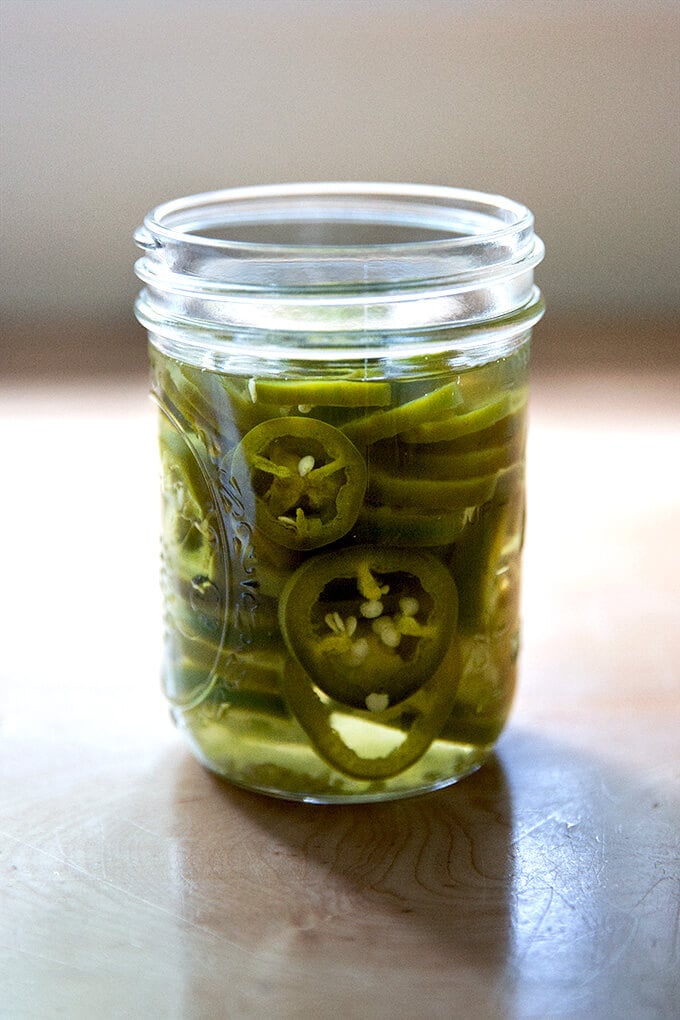
This quick-pickled jalapeños recipe is ready in 5 minutes! The homemade pickle jalapeño brine uses 4 simple ingredients: equal parts water and vinegar, plus a little salt and sugar. You’ll find these sliced jalapeños to be the perfect crunchy, tangy topping for everything from pizza to tacos. Once prepared, store in the fridge for best results.
A few weeks ago I mentioned I was on a Detroit-style pizza kick. I’m still on that kick, and I’ve just shared that recipe , but first: pickled jalapeños.
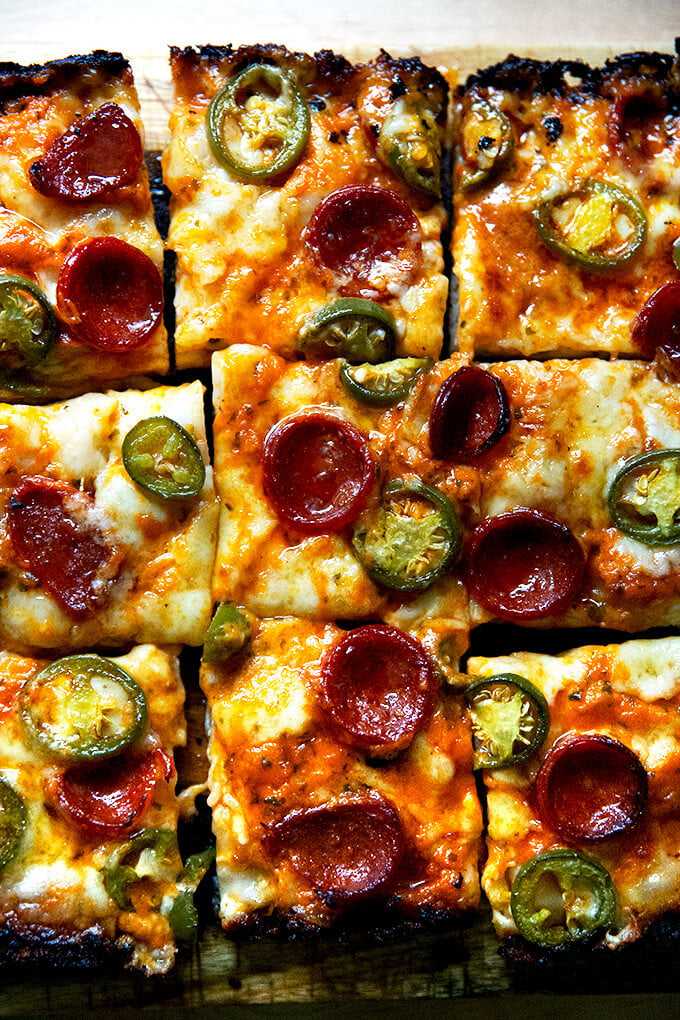
One of my favorite pizzas from Emmy Squared, a Brooklyn-based Detroit-style pizza restaurant, is The Colony, a red sauce pie topped with pepperoni, pickled jalapeños, and honey . It hits all the sweet-spicy-savory notes, and the combination, as you might imagine, is heavenly.
I’ve been making this pizza at home using pickled jalapeños from the grocery store, which work just fine, but when two jalapeños arrived in our farm share last week, I knew their fate.
If you’ve been reading for a while, you know I use one and only one pickle recipe , originating from David Lebovitz . It’s the recipe I use in this simple pickled crudité , and I’ve simplified it over the years in that I now never bother adding garlic or peppercorns or any additional seasonings, but the 4-ingredient base brine is still the same: equal parts water and vinegar plus a little salt and sugar.
It takes no time to make: heat the brine until the sugar and salt dissolve; then pour it over the vegetables. That’s it. It doubles, triples, and halves well, so you can adjust the recipe easily to whatever amount of vegetables you have on hand — often I make 4 or 6 times the recipe depending on the amount of vegetables I plan on pickling.
How to Use Pickled Jalapeños
In two words: on everything! Pickles are so nice to have on hand — what sandwich isn’t instantly transformed with the addition of a briney bite? What taco doesn’t shine a little brighter when peppered with tangy spheres?
No sandwich. No taco. I hope these pickled jalapeños find their way into your condiment collection soon. Your sandwiches and tacos ( and pizza! ) will thank you. Here are a few ideas:
- Detroit-Syle Pizza
- Simple Weeknight Tacos
- Chicken Tinga Tacos
- Chickpea Taco Bowls
- Sweet Potato & Black Bean Burritos
- Vegetarian Bean and Cheese Enchiladas
Other Vegetables to Quick Pickle
ALL the vegetables. Over the years I’ve used this brine to pickle beets, turnips, carrots, radishes, peppers, onions, fennel, kohlrabi, cauliflower … everything.
How to Make Pickled Jalapeños, Step by Step
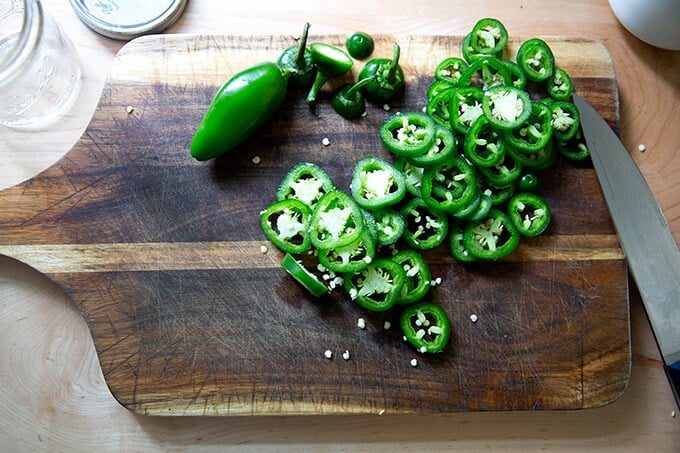
Slice up 3 to 4 jalapeños (or as many as you wish). There is no need to remove the seeds! Simply slice straight down to create spheres.
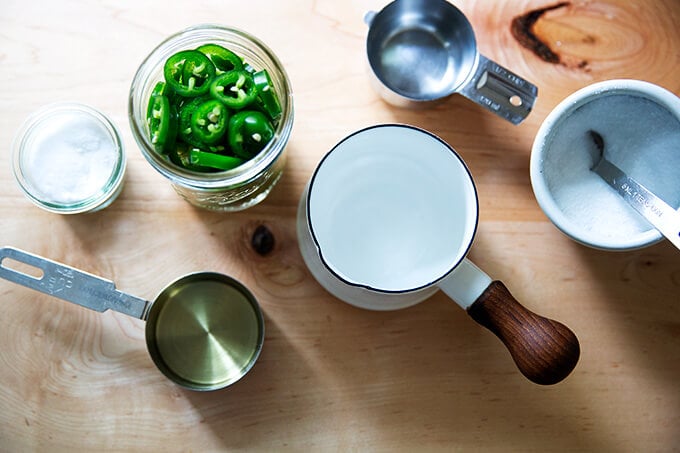
Transfer them to a glass jar. Then combine: 1/2 cup water, 1/2 cup vinegar, 1 teaspoon sugar, and 1 teaspoon salt in a small saucepan, and bring it to a simmer.
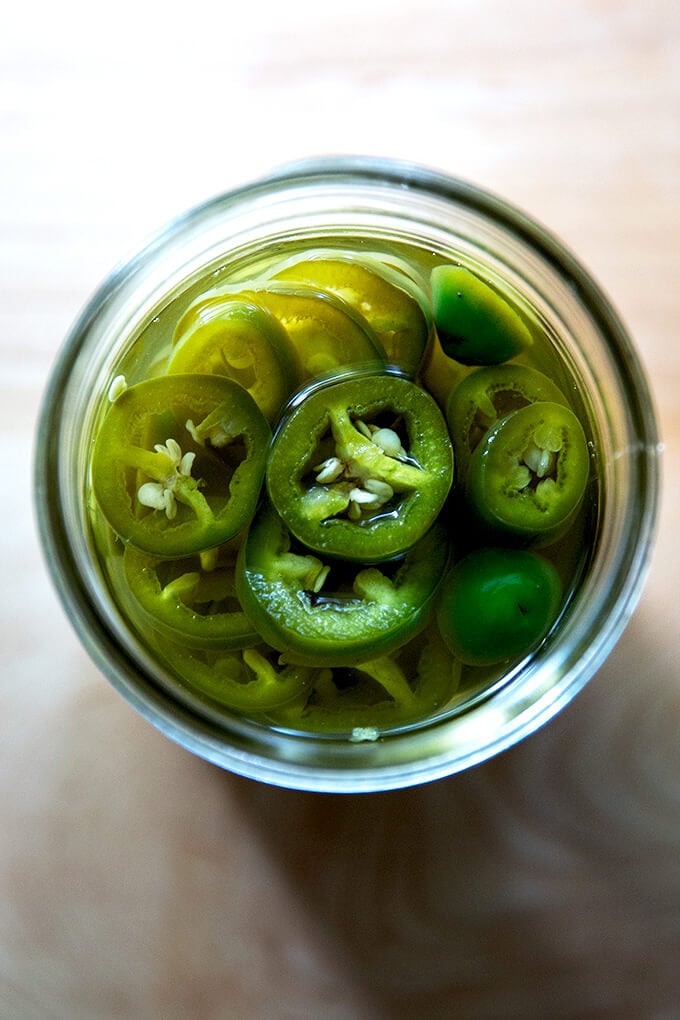
Pour the hot brine over the sliced jalapeños. Let the peppers cool completely in the brine.
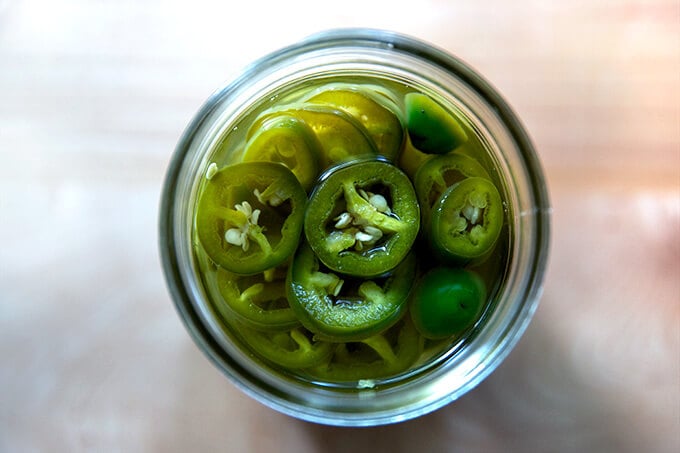
Store in the fridge for months.
Sprinkle the pickled jalapeños over tacos or bake them atop pizza :
Description
This quick-pickled jalapeños recipe is ready within 5 minutes! The homemade pickle jalapeño brine uses 4 simple ingredients: equal parts water and vinegar, plus a little salt and sugar. You’ll find that these sliced jalapeños are the perfect crunchy, tangy topping for everything from pizza to tacos. Once prepared, store in the fridge for best results.
Adapted from a David Lebovitz recipe, which I’ve written about previously , this pickle recipe is the only one I use.
Salt: I always use Diamond Crystal kosher salt, but any kind of salt will work just fine in this recipe.
- 1/2 cup water
- 1/2 cup vinegar, such as distilled white, rice, white balsamic, or apple cider
- 1 teaspoon sugar
- 1 teaspoon salt, see notes above
- 3 – 4 jalapeños, sliced thinly, no need to remove the seeds
- Combine the water, vinegar, sugar, and salt in a small saucepan. Bring to a simmer and stir to ensure the sugar and salt are dissolved.
- Place the jalapeños into a glass jar, such as a 2-cup Mason jar. Pour the hot pickle brine over top. Use a spoon to push the peppers down to ensure they are submerged. Let cool completely; then cover and stash in the fridge for many months.
- Prep Time: 5 minutes
- Category: Pickle
- Method: Stovetop
- Cuisine: American, Mexican
Description
This quick-pickled jalapeños recipe is ready within 5 minutes! The homemade pickle jalapeño brine uses 4 simple ingredients: equal parts water and vinegar, plus a little salt and sugar. You’ll find that these sliced jalapeños are the perfect crunchy, tangy topping for everything from pizza to tacos. Once prepared, store in the fridge for best results.
Adapted from a David Lebovitz recipe, which I’ve written about previously , this pickle recipe is the only one I use.
Salt: I always use Diamond Crystal kosher salt, but any kind of salt will work just fine in this recipe.
- 1/2 cup water
- 1/2 cup vinegar, such as distilled white, rice, white balsamic, or apple cider
- 1 teaspoon sugar
- 1 teaspoon salt, see notes above
- 3 - 4 jalapeños, sliced thinly, no need to remove the seeds
- Combine the water, vinegar, sugar, and salt in a small saucepan. Bring to a simmer and stir to ensure the sugar and salt are dissolved.
- Place the jalapeños into a glass jar, such as a 2-cup Mason jar. Pour the hot pickle brine over top. Use a spoon to push the peppers down to ensure they are submerged. Let cool completely; then cover and stash in the fridge for many months.
- Prep Time: 5 minutes
- Category: Pickle
- Method: Stovetop
- Cuisine: American, Mexican
Find it online : https://alexandracooks.com/2021/08/03/quick-pickled-jalapenos/
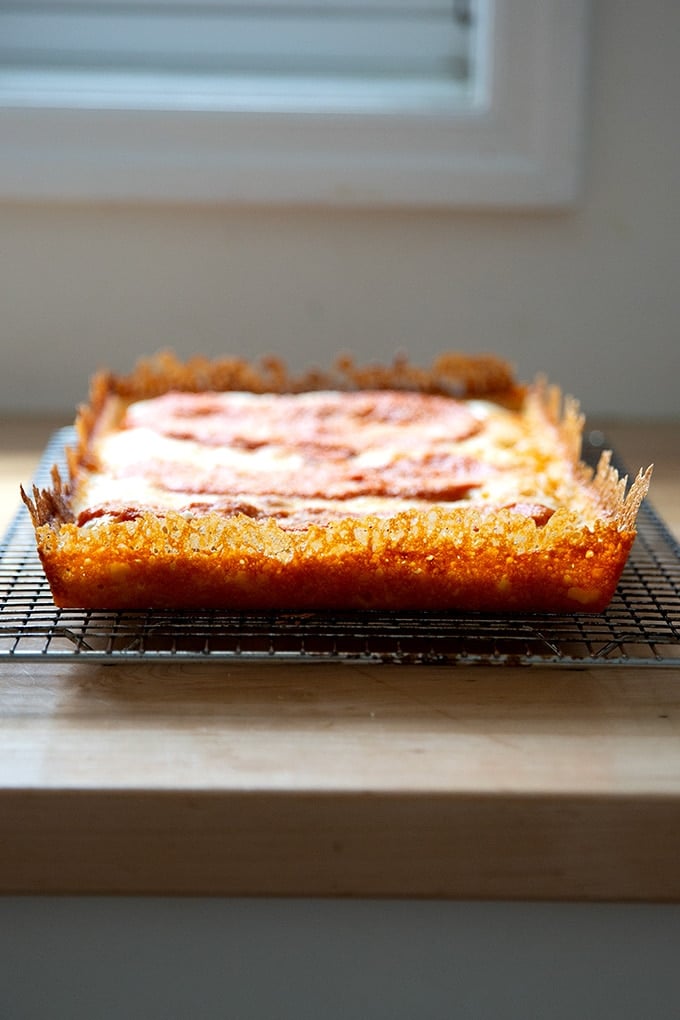
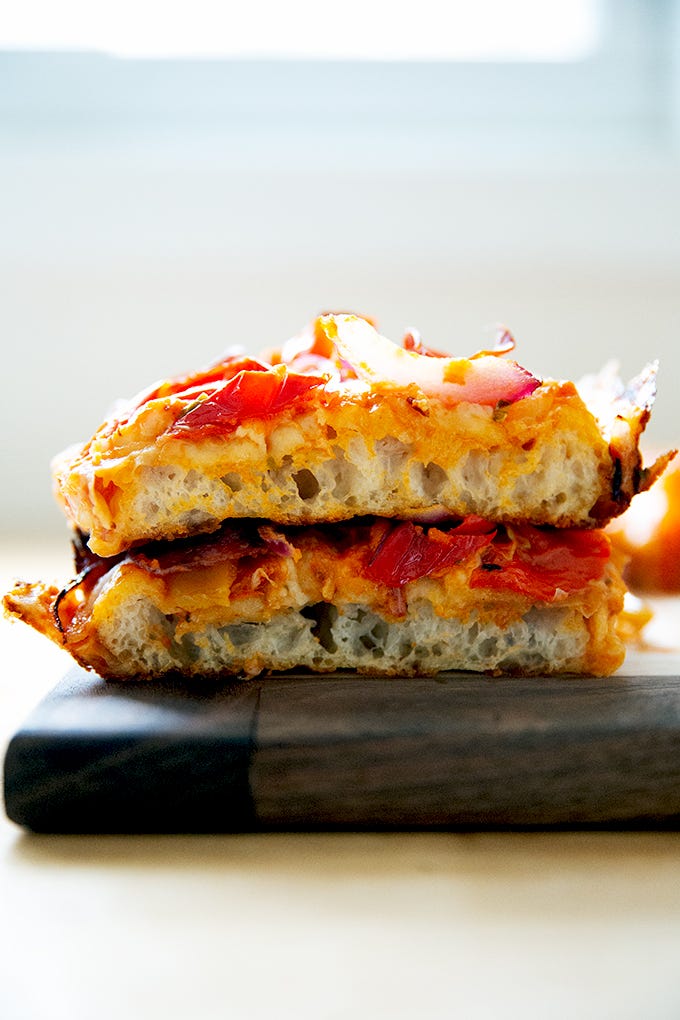
Detroit-style pizza is not unlike a cheesed- and sauced-focaccia. It is heavenly and is great for feeding a crowd. Read on to learn the secret to baking a Detroit-style pizza with a light and airy crust with an irresistible cheese frico crust.

My introduction to Detroit-style pizza came by way of Matt and Emily Hyland, the couple behind Pizza Loves Emily, whose New Haven-style pizzas are near and dear to my heart, and whose Emmy Squared slices follow close behind.
At the height of the lockdown, longing to eat something from beyond my 5-mile radius, I splurged on a trio of pizzas from Emmy Squared via GoldBelly. When the world opened up, I experienced their delicious pan pizzas, topped variously with everything from pickled jalapeños and banana peppers to Calabrian chilies and smoked gouda, at their Brooklyn brick-and-mortar.
These experiences left me determined to make Detroit-style pizza at home. Guess what, Friends? Homemade Detroit-style pizza is as dreamy as imagined. Can I tell you the best part? You can complete so much of the prep — from mixing the dough to parbaking it — days in advance. Read on to learn how to make excellent Detroit-style pizza at home with a light and airy crust and an irresistible cheese frico crust.
PS: How to Make Homemade Sicilian-Style Pizza
Detroit-Style Pizza: A Few Notes and Rules
Of all the pizza styles out there, Detroit-style is perhaps governed by the most rules. Let’s explore them:
- The dough of Detroit-Style pizza, DSP for short, should be high hydration, and the baked crust should be light and airy, similar to focaccia. Traditional DSP is not parbaked.
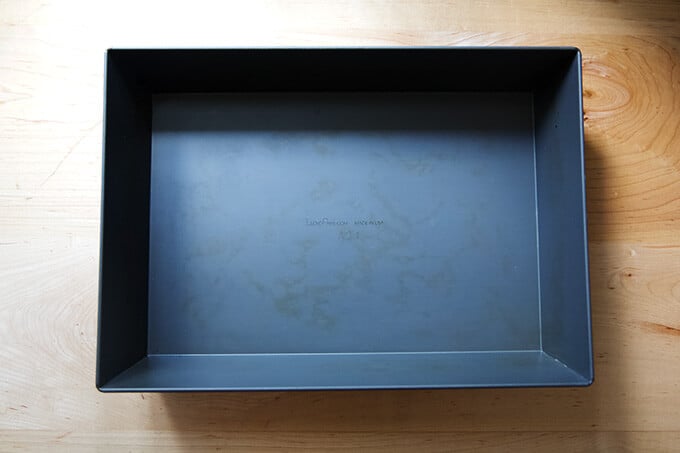
- The story of Detroit’s Buddy’s Pizza , the “original” Detroit-style pizza, is that the owner used his mom’s Sicilian pizza recipe, but placed the dough in rectangular blue steel pans — these were “scrap” pans from the nearby auto plants. Lloyd Pans is a company that makes, among many things, Detroit-style pizzas pans — they arrive already seasoned, and they truly make a beautiful crust.
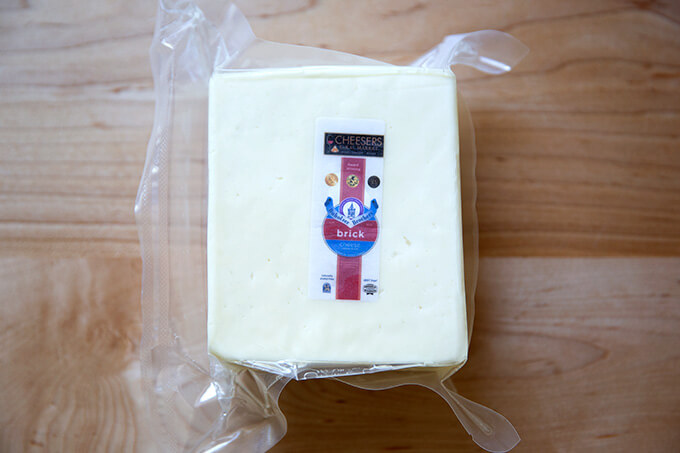
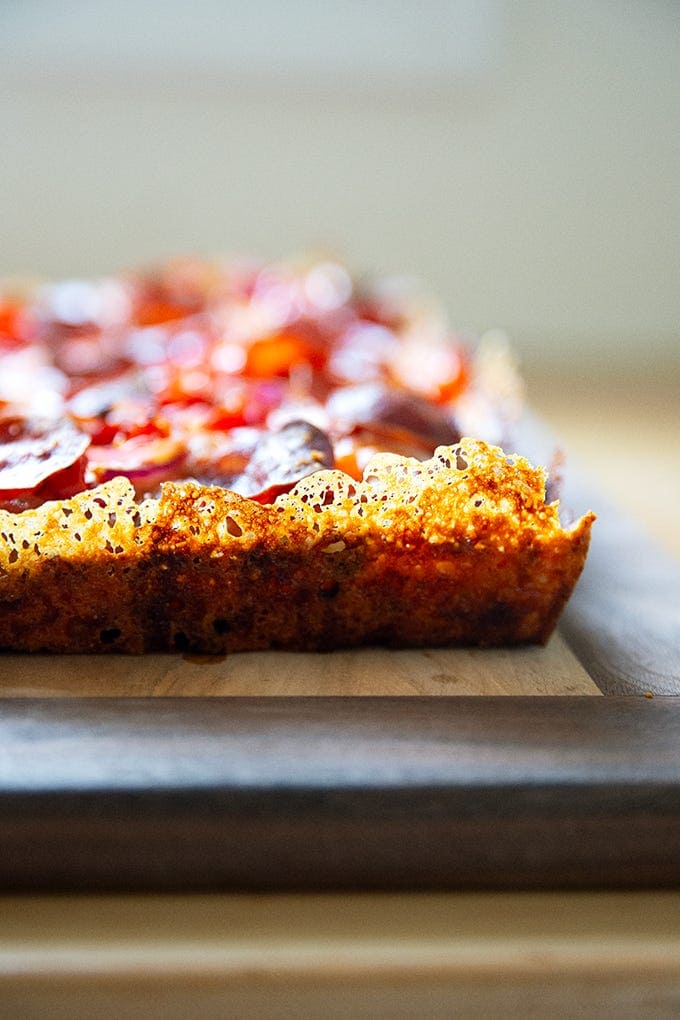
- The cheese , Wisconsin Brick Cheese , which is derived from white American cheddar but has a higher fat content, is traditional. In DSP, cheese goes on the dough before the sauce and is spread edge-to-edge. This method allows the cheese’s fat to pool at the pan’s edges and fry the dough, creating a cheese frico crust (see below).
- The sauce , a cooked tomato sauce , is applied last, often in dollops or two or three “racing” stripes. DSP is not super saucy.
Wisconsin Brick Cheese:
2 Tips for Success
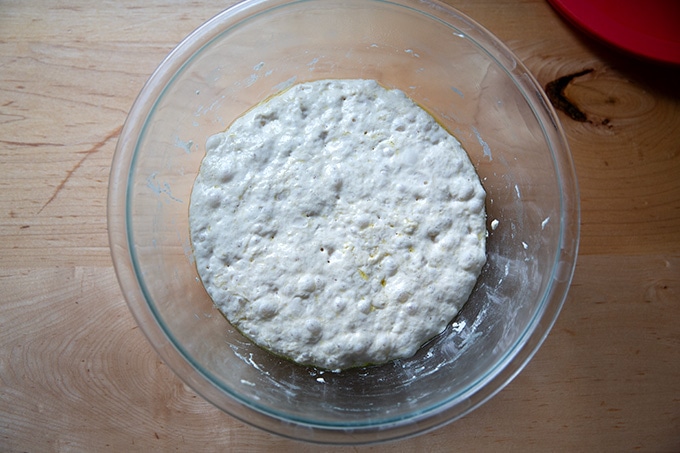
- As noted above, the crust of a DSP should be light and airy. To achieve this, plan ahead, and allow your dough to cold proof, which will make for a lighter, airier dough. I get the best results when I bulk ferment at room temperature for 10 to 12 hours; then transfer the dough to the fridge for 24 to 48 hours. The longer the dough ferments, the more gas bubbles are produced, and when those gas bubbles hit the hot oven, they expand, creating a light, porous crust.
- Break from tradition and parbake your crust. Read on to learn why.
Why Parbake Your Crust?
For two reasons:
- If you have struggled to get your bottom crust to cook completely before your toppings burn, parbaking is the solution.
- If you’re looking to create a dramatic cheese frico crust, the parbake is essential. During the parbake, the dough will shrink from the sides of the pan ever so slightly, creating a space for cheese to wedge itself into and ultimately build into a tall, lacy cheese crust.
How to Make Detroit-Style Pizza, Step by Step
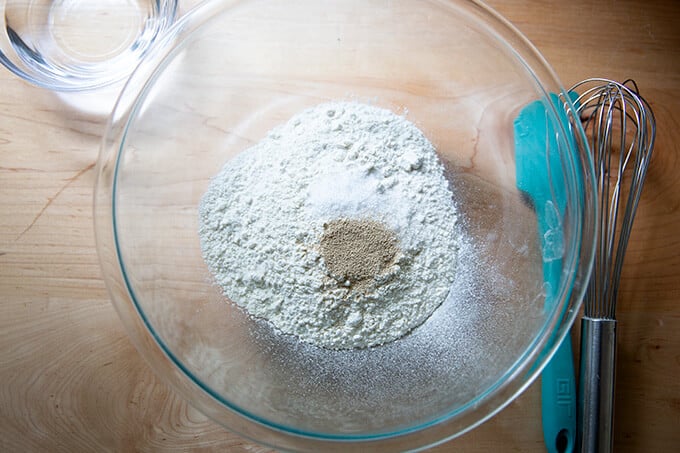
Gather your ingredients: bread flour, salt, cold water, and instant yeast, SAF is my preference. (Find instructions for using a sourdough starter in the recipe box.)

Whisk together the flour, salt, and instant yeast:
Add cold water.
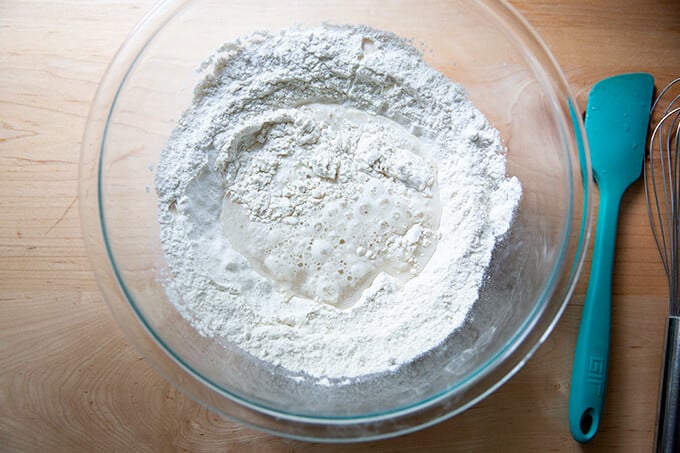
And stir to form a sticky dough ball. Cover the dough with a teaspoon of olive oil. Cover with an airtight lid or plastic wrap and let sit at room temperature overnight or for 10 to 12 hours.
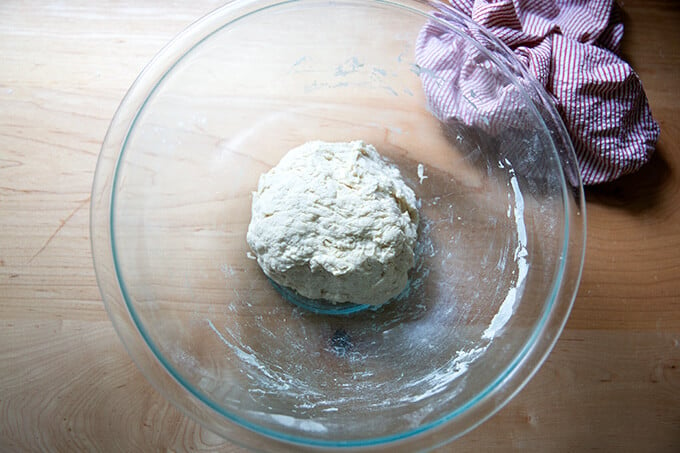
The following morning, remove the lid.
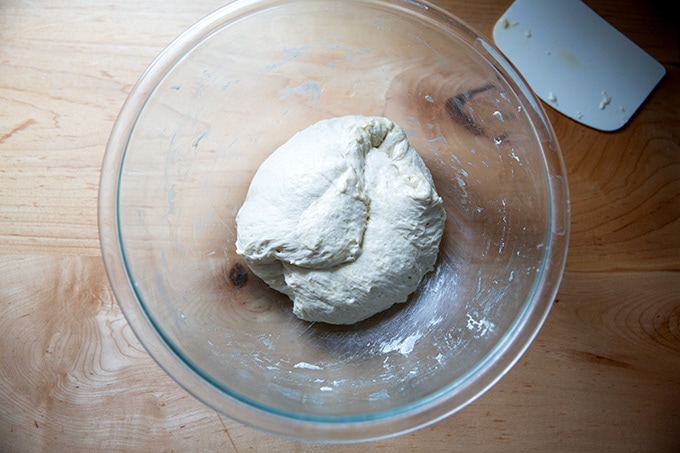
Deflate the dough. I like to use a flexible dough scraper for this. At this point you can transfer the dough to the fridge and let it rest for as long as week. I find 2-3 days to be the sweet spot.
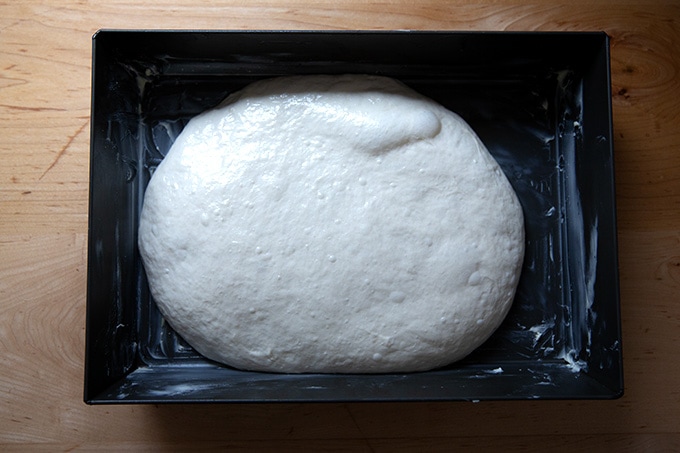
Or you can proceed: place it in your prepared pan: a buttered Detroit-style pizza pan with 1 teaspoon of oil in the center:
Let the dough rise for 3 to 4 hours.
Then dimple and stretch the dough to the edges.
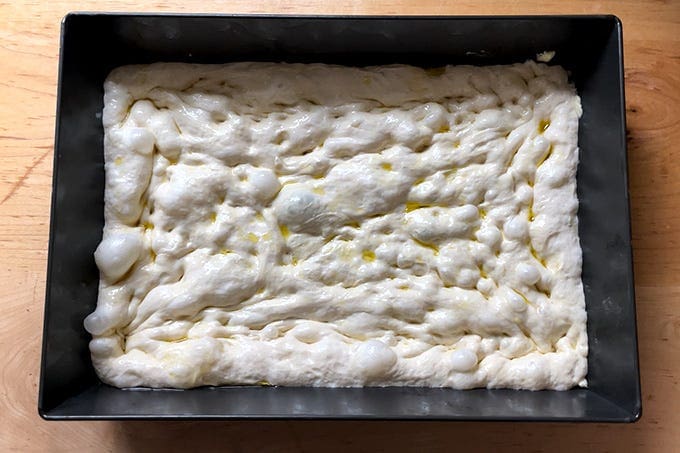
Let it rise for another hour, then parbake it for 8 minutes at 500ºF:
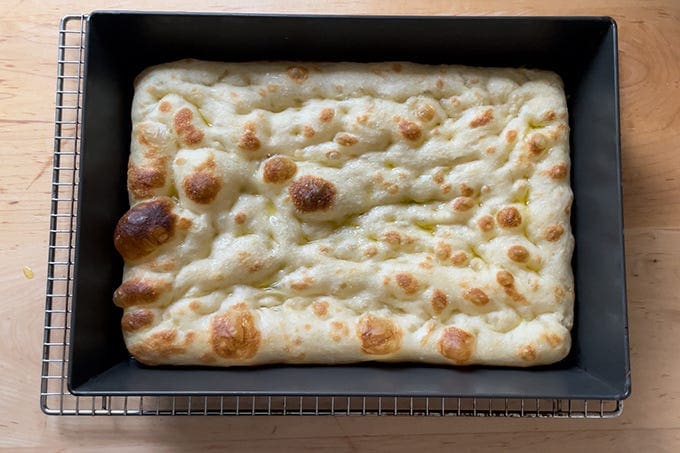
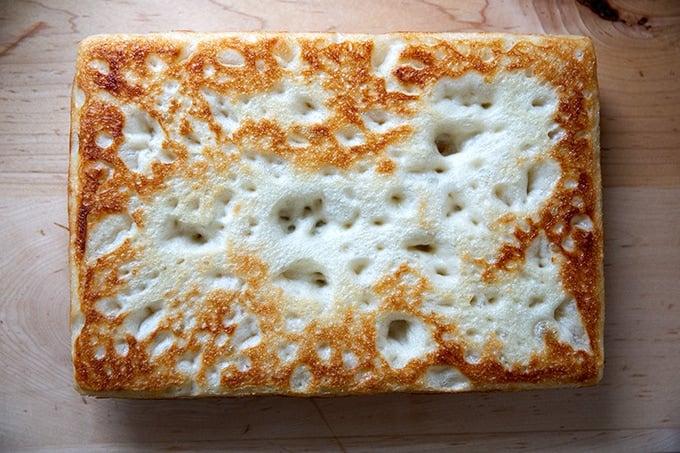
Remove the parbaked crust from the pan and let it cool upside down on the rack:
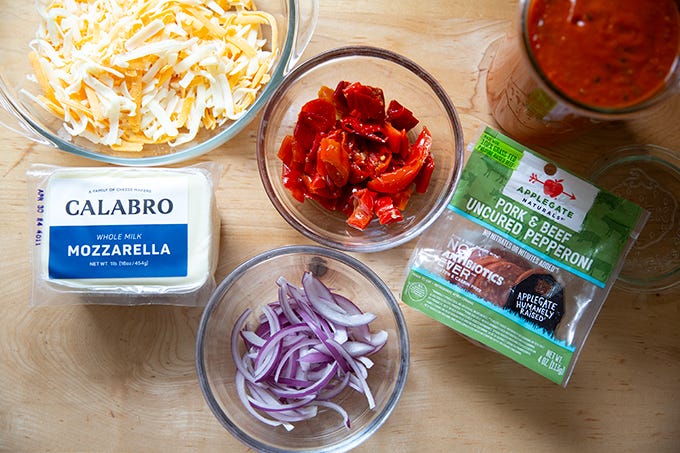
Meanwhile, gather your toppings:
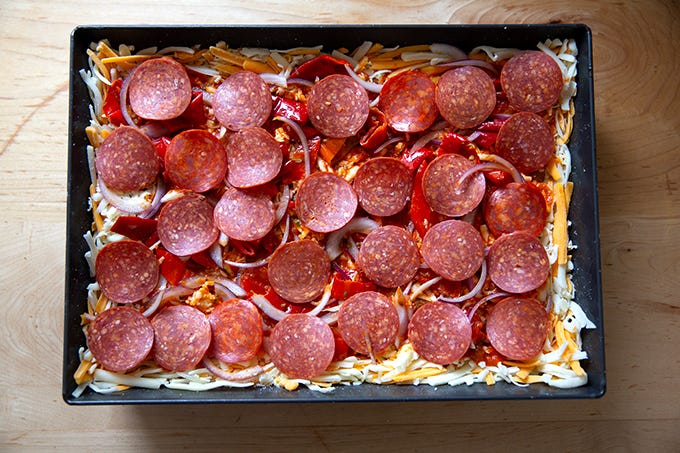
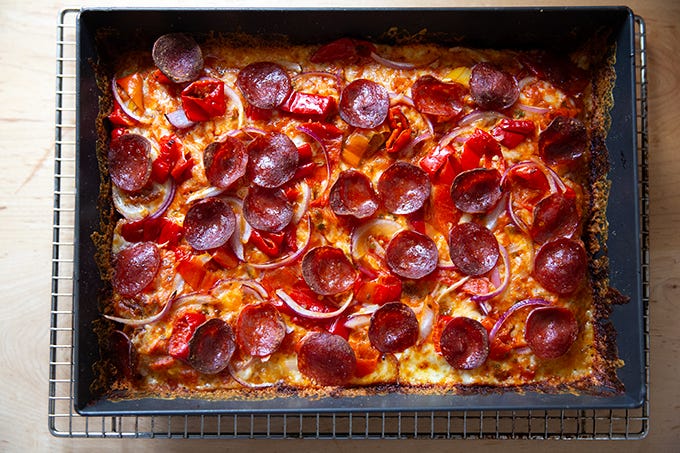
Return the parbaked crust to the pan, then top it as desired:
Return to the oven at 475ºF and bake for 10 minutes.
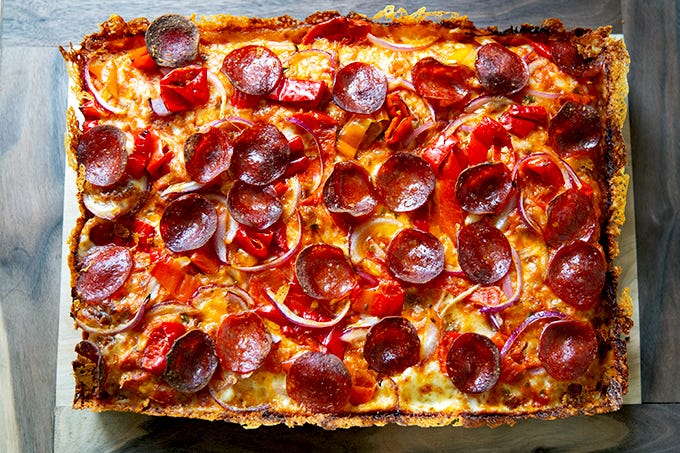
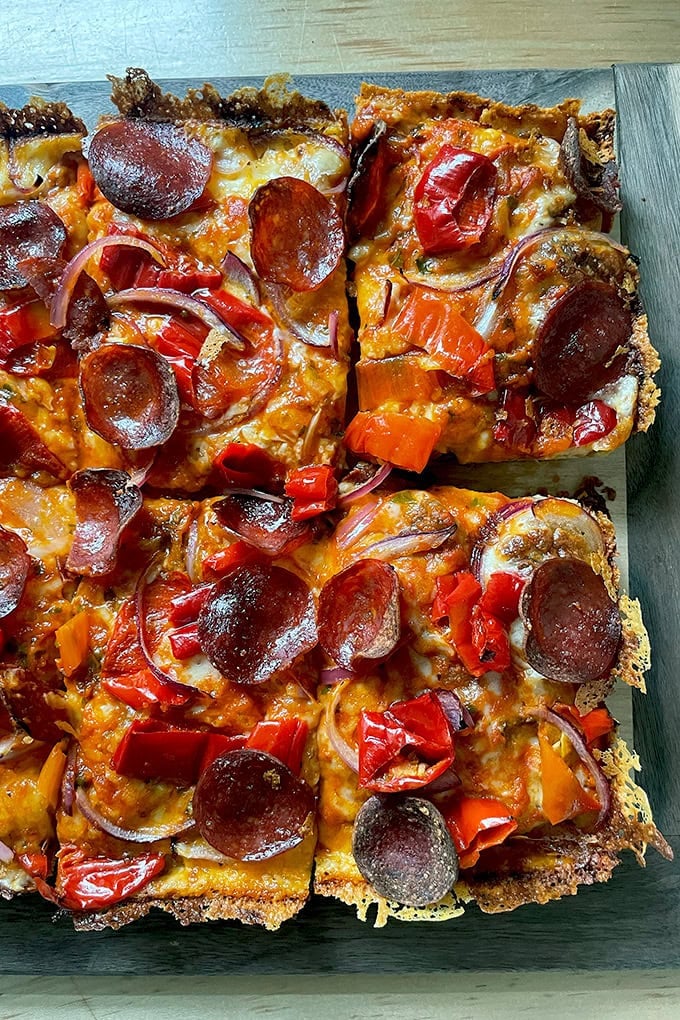
Let cool for 5 minutes in pan, then transfer to a board to cut and serve.
Frico crust:
Crumb shot:
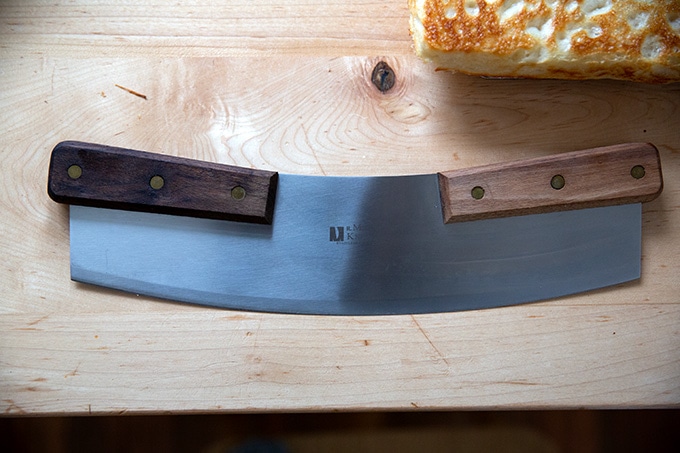
In closing, this is a nice tool to add to your arsenal of pizza-making gear: a mezzaluna. I love this one :
Description
Detroit-style pizza is not unlike a cheesed- and sauced-focaccia. It is heavenly and is great for feeding a crowd. Read on to learn the secret to baking a Detroit-style pizza with a light and airy crust with an irresistible cheese frico crust.
Attention Pizza Fans: My pizza cookbook is here! Get your copy: Pizza Night.
UPDATE 2/10/2023: I have updated the original yeast-leavened recipe by increasing the hydration and adding a parbake. Find the original recipe here .
Notes:
As always, for best results, please use a digital scale to measure everything. Volume cups simply are not accurate.
Flour: I have had success using all-purpose flour, but if you can get your hands on bread flour, that is ideal, especially if you live in Canada or abroad. Moreover, if you live in Canada or abroad, you may need to reduce the water amount. Consider holding back some of the water (25 grams or so) during the mixing process to ensure you don’t end up with a soupy mess. You can always add it back in slowly if the dough is too dry.
Cheese: Wisconsin Brick cheese is traditional but it can be hard to come by if you live in the Northeast. A mix of whole milk mozzarella and Cheddar or Monterey Jack works great for the interior surface. I love using Calabro for the interior.
Pre-shredded Cheese: The starches in pre-shredded cheese prevent the cheese from clumping and melting too quickly. They are essential for creating a dramatic cheese frico crust on the perimeter.
Sauce: I love a vodka sauce on pizza, such as this one or this one . This is my favorite fresh tomato sauce recipe . Of course, use your favorite tomato sauce here. I love all of the Rao’s brand sauces.
Pan: I hate to encourage spending money on yet another piece of equipment, but a Lloyd Detroit-Style pizza pan does make a difference. I love my 9×13-inch USA pan, but a Lloyd Pan truly creates a crisper, more golden bottom. Furthermore, if you have a Baking Steel or pizza stone, baking the pizza on it will encourage even better browning, and if you don’t have a Lloyd pan, I suggest using the Baking Steel, which will help crisp up the bottom.
Timeline: Plan ahead. I like to mix the dough in the evening, let it rise overnight, then bake it the following day.
The toppings : The pickled jalapeño and pepperoni pizza below is inspired by “The Colony” served at several of the Matt and Emily Hyland pizza restaurants, the recipe for which also can be found in their book, EMILY: The Cookbook .
For the yeast-leavened pizza dough:
- 288 grams ( 2.25 cups ) bread flour
- 6 grams ( 1.5 teaspoons ) kosher salt
- 2 grams ( 1/2 teaspoon ) instant yeast, SAF is my preference
- 240 grams (about 1 cup ) cold water
For the sourdough pizza dough:
- 255 grams ( 1.75 cups + 1 tablespoon ) bread flour
- 6 grams ( 1.5 teaspoons ) kosher salt
- 100 grams ( 1/2 cup ) active, bubbly sourdough starter
- 185 grams ( 3/4 cup ) water
For each pizza:
- 1 tablespoon ( 14 g ) softened butter
- 1 teaspoon ( 5 g ) olive oil
- 6 ounces pre-shredded Cheddar (for the cheese frico crust)
- 4 ounces pre-shredded low-moisture, whole-milk mozzarella (for the cheese frico crust)
- 6 ounces hand-grated low-moisture, whole-milk mozzarella for the interior surface (Calabro is my favorite)
- 2 ounces thinly sliced pepperoni, I love Applegate
- 1/2 cup thinly sliced red onion
- 1/4 cup pickled jalapeños or other pickled peppers (such as Mama Lil’s), or to taste, optional
- 1/2 cup tomato sauce, such as this one or this one , or your favorite jarred sauce
- light drizzle honey, optional
To make the yeast-leavened pizza dough:
- In a large bowl, whisk together the flour, salt, and instant yeast. Add the water. Using a rubber spatula, mix until the water is absorbed and the ingredients form a sticky dough ball. Cover the bowl, let the dough rest for 30 minutes, then stretch and fold it: using a wet hand, grab an edge of the dough and stretch it up and in. Repeat this 8 to 10 times, grabbing a different edge each time, ultimately shaping the dough into a ball. Slick the dough with a teaspoon of olive oil. Cover the bowl with an airtight lid. Let rise overnight or for 10 to 12 hours at room temperature.
- Using lightly oiled hands or a flexible bowl scraper, deflate the dough by releasing it from the sides of the bowl and pulling it towards the center. Shape it into a rough ball. At this point, you can transfer the dough to the fridge for up to a week. I find the sweet spot to be 2-3 days. Alternatively, you can skip to preparing the pan.
To make the sourdough pizza dough:
- Place the water in a large bowl. Add the starter and stir with a spatula to combine. Add the salt and stir again; then add the flour. Mix again until the flour is mostly incorporated. Use your hands if necessary to briefly knead in the last bits of flour. Cover vessel with a tea towel or cloth bowl cover and let stand for 30 minutes.
- After 30 minutes have passed, reach into the vessel and pull the dough up and into the center. Turn the vessel quarter turns and continue this pulling 8 to 10 times. Let the dough rest for another 30 minutes; then repeat the stretching and folding. After these two sets of stretches and folds, you should see a difference in the texture of the dough: it will be smoother, stronger, and more elastic.
- If you have a straight-sided vessel, transfer the dough to it; then cover it with a tea towel or use a lidded vessel — I love this 4-quart Pyrex bowl + lid set, and set aside to rise at room temperature (70ºF/21ºC) for 4 to 8 hours (the time will vary depending on the time of year, the strength of your starter, and the temperature of your kitchen) or until the dough has roughly doubled in volume. (A straight-sided vessel makes monitoring the bulk fermentation especially easy because it allows you to see when your dough has truly doubled.)
- Turn the dough out onto a work surface and shape into a rough ball. I like to do this without flour, but use flour as needed — the dough will be sticky. Use the pinkie-edges of your hands to pinch the dough underneath to create a ball. Skip to preparing the pan.
Prepare the pan:
- Grease a 10×14-inch pan with the tablespoon of softened butter. Pour 1 teaspoon of olive oil into the center. Place the dough ball in the pan and turn to coat. Let rest for 3 to 4 hours. With lightly oiled hands, stretch the dough to fit the pan. Let the dough rest again for 1 hour.
Parbake the dough:
- Preheat the oven to 500ºF.
- Dimple the dough one last time with lightly oiled hands taking care not to dimple the perimeter. Transfer the pan to the oven for 8 minutes.
- Remove the pan from the oven and carefully transfer the dough to a cooling rack. Let it cool upside down on the rack for 20 minutes. Do not wash the pan.
- Once the dough is cooled, you can transfer it to an airtight storage bag for 1 to 2 days at room temperature or up to 3 months in the freezer.
Top the pizza:
- Preheat the oven to 475ºF. If you do have a Baking Steel or pizza stone, place it on a rack in the middle or lower third of the oven while it preheats.
- Return the parbaked crust to its pan (bottom side down).
- Combine the two pre-shredded cheeses for the frico crust in a medium bowl. Spread this cheese around the perimeter of the dough pressing it into the sides of the pan.
- Sprinkle the hand-grated mozzarella over the interior surface of the dough.
- Finish topping the pizza: spread the 1/2 cup of tomato sauce evenly over the top. Spread the pepperoni evenly over the surface, followed by the red onion. If you are using pickled jalapeños, scatter them evenly over the pizza, keeping in mind heat tolerance — they make the pizza very spicy.
Bake the pizza:
- Transfer pizza to the oven for 10 minutes or until the edges are caramelized to your liking. Remove the pan from the oven and let the pizza rest for 5 minutes in the pan. Carefully run a paring knife or spatula around the pan’s edges. Then, carefully remove the entire pizza from the pan, transferring it to a cutting board. If you are using the honey, drizzle it over top. Cut the pizza into 12 pieces and serve.
- Prep Time: 24 hours
- Cook Time: 15 minutes
- Category: Dinner
- Method: Oven
- Cuisine: American
