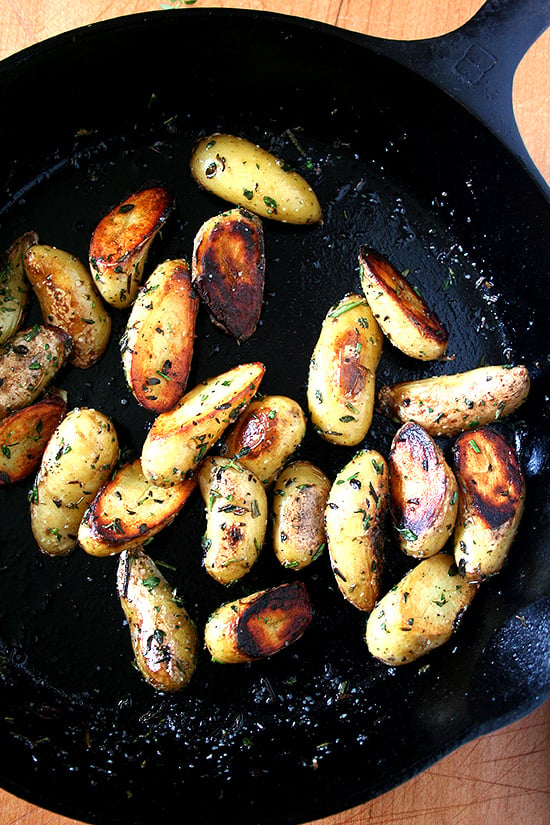
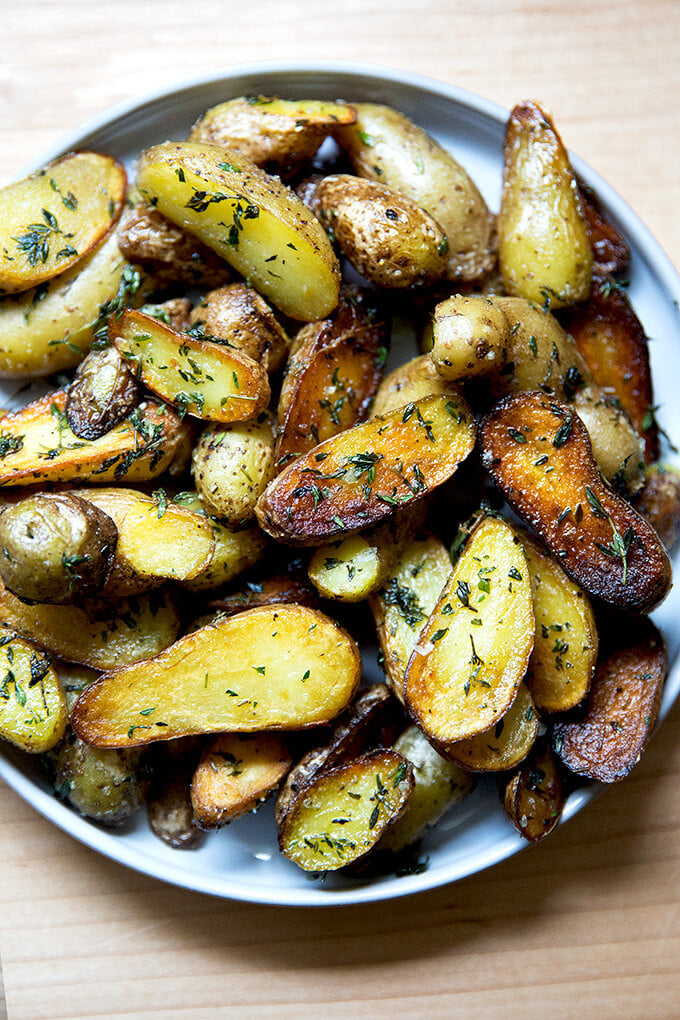
The key to perfectly cooked fingerlings? Boil first; then crisp them up in a skillet over high heat.
Potatoes in many a form — from creamy and mashed to cheese-crusted and hasselbacked — hold a dear place in my heart. But these crispy, herb-flecked fingerlings hands down are my favorite.
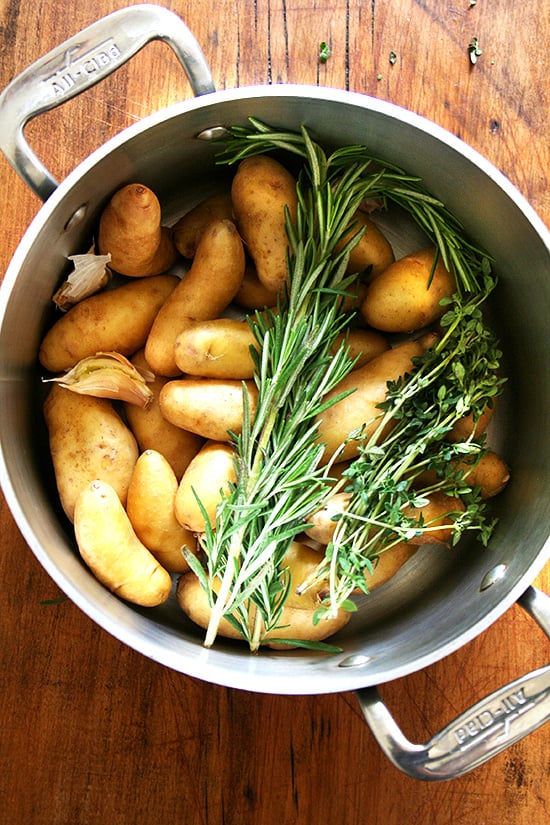
I learned how to make them by the caseload. By the caseload of salt, too. I was working at Fork in Philadelphia and gasped the first time I saw the chef unload a box — literally one 3-lb. box — of kosher salt into a pot, albeit a very large pot, filled with fingerling potatoes, water, many cloves of garlic and several bunches of rosemary and thyme.
Bring the water to a boil, he instructed, then turn off the heat. The potatoes, he ensured, would finish cooking as they cooled.
He was right. The potatoes were cooked perfectly, not the slightest bit overdone. And moreover, they were seasoned perfectly, not a bit too salty, and subtly infused with the flavors of rosemary, thyme, and garlic.
Often I eat these potatoes straight out of the pot without a bit of extra seasoning. And I love them sliced and tossed into salads.
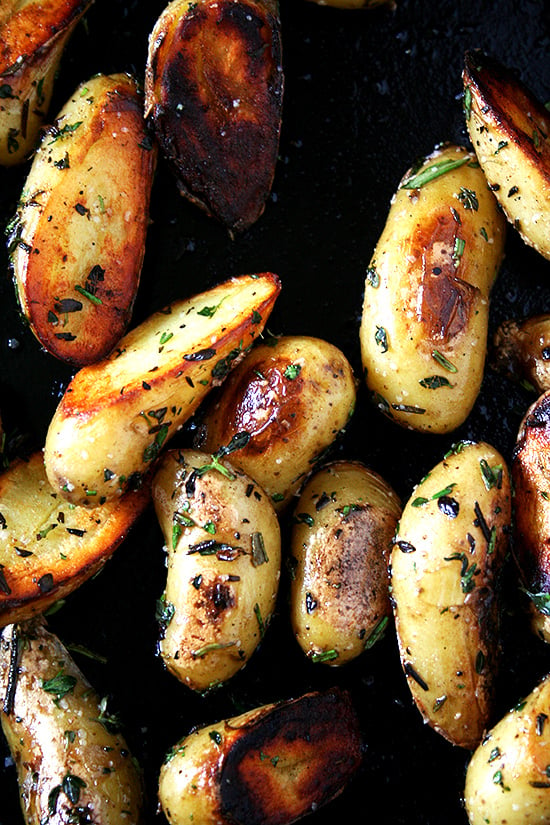
But when I’m up for it, I crisp them up, as I learned at Fork, in a hot skillet with some olive oil, chopped rosemary and thyme, and a pinch more salt. It’s such a treat. I know you’ll love them, too.
PS: All the Potato Recipes right this way .
How to Cook Fingerling Potatoes in Two Steps
Place potatoes and seasonings — garlic, thyme, rosemary, and salt — in a large pot. Cover with cold water; then bring to a simmer. Depending on the pot you are using and the quantity of potatoes, times will vary, but the key is to turn off the burner as soon as the water boils. The potatoes will finish cooking as they cool in their cooking liquid.
Once cool, halve the potatoes on the bias; then crisp up in olive oil in a hot skillet until golden. Season with more rosemary, thyme, and salt.
Transfer to a platter and serve immediately.
Description
The key to perfectly cooked fingerlings? Boil first; then crisp them up over high heat.
I learned to cook potatoes this way while working at Fork in Philadelphia. The chef at the time cooked fingerlings as directed below, the keys being:
- Use a ton of salt.
- Bring the water to a boil, then shut it off. As the potatoes cool, they continue to cook, and they take on the seasonings of the herbs and salt. They are irresistible. Note: Best to use a pot with a narrow opening to ensure the cooking liquid does not cool down too quickly.
To cook the potatoes:
- 1 1/2 lbs. fingerling potatoes or other small potatoes
- 1/3 cup kosher salt
- several sprigs of rosemary and thyme
- 2 cloves garlic, smashed
To crisp the potatoes:
- olive oil
- kosher salt or flaky sea salt, such as Maldon
- a few more sprigs rosemary and thyme, leaves removed and minced
- Place fingerlings in a pot. Cover with approximately one inch of water. Add the salt, herbs and garlic. Bring the pot of water to a boil, then turn off the heat. Let the potatoes cool completely in their liquid before proceeding.
- Once cool, you can eat the potatoes as they are or you can brown them. These potatoes are wonderful to have on hand — they are truly delicious cooked as they are, sliced and tossed into salads or just eaten straight out of the refrigerator.
- If you want to crisp them up a bit, slice the potatoes in half on a bias (or leave them whole if they are really small). Then, heat a pan (preferably cast iron or carbon steel or stainless steel) over high heat. Add a thin layer of olive oil and swirl the pan to coat the bottom — the pan and oil should be very hot before adding the potatoes. Add the potatoes, shake the pan once and then let them be. Do not disturb them for a minute or two. Check one before trying to shake the pan or stir them with a spoon — you want that edge to get crispy and it won’t get crispy if you try to move them too quickly.
- Once the fingerlings are browning nicely, shake the pan, toss in the herbs and give them a pinch more of kosher salt. Serve immediately. I like to eat mine with Sriracha. Yum!
- Prep Time: 5 minutes
- Cook Time: 5 minutes
- Category: Side Dish
- Method: Stovetop
- Cuisine: American
The key to perfectly cooked fingerlings? Boil first; then crisp them up in a skillet over high heat.
Potatoes in many a form — from creamy and mashed to cheese-crusted and hasselbacked — hold a dear place in my heart. But these crispy, herb-flecked fingerlings hands down are my favorite.
I learned how to make them by the caseload. By the caseload of salt, too. I was working at Fork in Philadelphia and gasped the first time I saw the chef unload a box — literally one 3-lb. box — of kosher salt into a pot, albeit a very large pot, filled with fingerling potatoes, water, many cloves of garlic and several bunches of rosemary and thyme.
Bring the water to a boil, he instructed, then turn off the heat. The potatoes, he ensured, would finish cooking as they cooled.
He was right. The potatoes were cooked perfectly, not the slightest bit overdone. And moreover, they were seasoned perfectly, not a bit too salty, and subtly infused with the flavors of rosemary, thyme, and garlic.
Often I eat these potatoes straight out of the pot without a bit of extra seasoning. And I love them sliced and tossed into salads.
But when I’m up for it, I crisp them up, as I learned at Fork, in a hot skillet with some olive oil, chopped rosemary and thyme, and a pinch more salt. It’s such a treat. I know you’ll love them, too.
PS: All the Potato Recipes right this way .
How to Cook Fingerling Potatoes in Two Steps
Place potatoes and seasonings — garlic, thyme, rosemary, and salt — in a large pot. Cover with cold water; then bring to a simmer. Depending on the pot you are using and the quantity of potatoes, times will vary, but the key is to turn off the burner as soon as the water boils. The potatoes will finish cooking as they cool in their cooking liquid.
Once cool, halve the potatoes on the bias; then crisp up in olive oil in a hot skillet until golden. Season with more rosemary, thyme, and salt.
Transfer to a platter and serve immediately.
Description
The key to perfectly cooked fingerlings? Boil first; then crisp them up over high heat.
I learned to cook potatoes this way while working at Fork in Philadelphia. The chef at the time cooked fingerlings as directed below, the keys being:
- Use a ton of salt.
- Bring the water to a boil, then shut it off. As the potatoes cool, they continue to cook, and they take on the seasonings of the herbs and salt. They are irresistible. Note: Best to use a pot with a narrow opening to ensure the cooking liquid does not cool down too quickly.
To cook the potatoes:
- 1 1/2 lbs. fingerling potatoes or other small potatoes
- 1/3 cup kosher salt
- several sprigs of rosemary and thyme
- 2 cloves garlic, smashed
To crisp the potatoes:
- olive oil
- kosher salt or flaky sea salt, such as Maldon
- a few more sprigs rosemary and thyme, leaves removed and minced
- Place fingerlings in a pot. Cover with approximately one inch of water. Add the salt, herbs and garlic. Bring the pot of water to a boil, then turn off the heat. Let the potatoes cool completely in their liquid before proceeding.
- Once cool, you can eat the potatoes as they are or you can brown them. These potatoes are wonderful to have on hand — they are truly delicious cooked as they are, sliced and tossed into salads or just eaten straight out of the refrigerator.
- If you want to crisp them up a bit, slice the potatoes in half on a bias (or leave them whole if they are really small). Then, heat a pan (preferably cast iron or carbon steel or stainless steel) over high heat. Add a thin layer of olive oil and swirl the pan to coat the bottom — the pan and oil should be very hot before adding the potatoes. Add the potatoes, shake the pan once and then let them be. Do not disturb them for a minute or two. Check one before trying to shake the pan or stir them with a spoon — you want that edge to get crispy and it won’t get crispy if you try to move them too quickly.
- Once the fingerlings are browning nicely, shake the pan, toss in the herbs and give them a pinch more of kosher salt. Serve immediately. I like to eat mine with Sriracha. Yum!
- Prep Time: 5 minutes
- Cook Time: 5 minutes
- Category: Side Dish
- Method: Stovetop
- Cuisine: American
Find it online : https://alexandracooks.com/2010/06/20/fingerling-potatoes-with-rosemary-and-thyme-crispy-or-not/


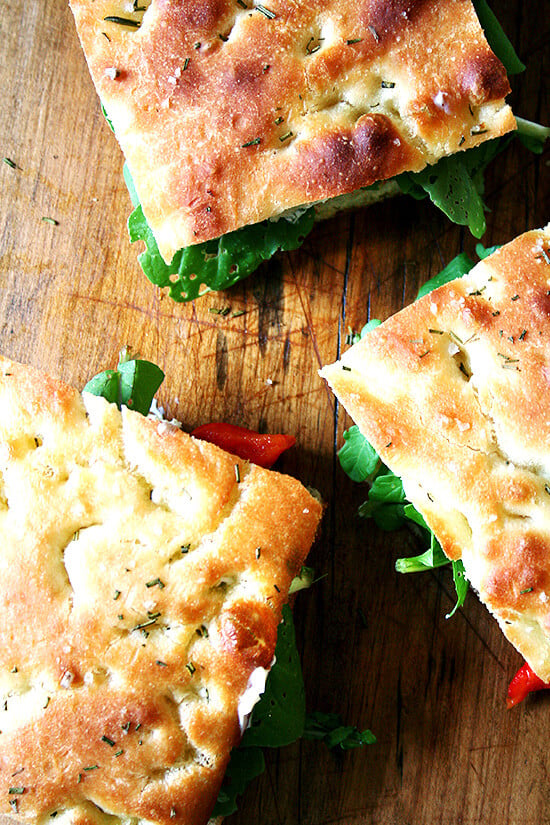
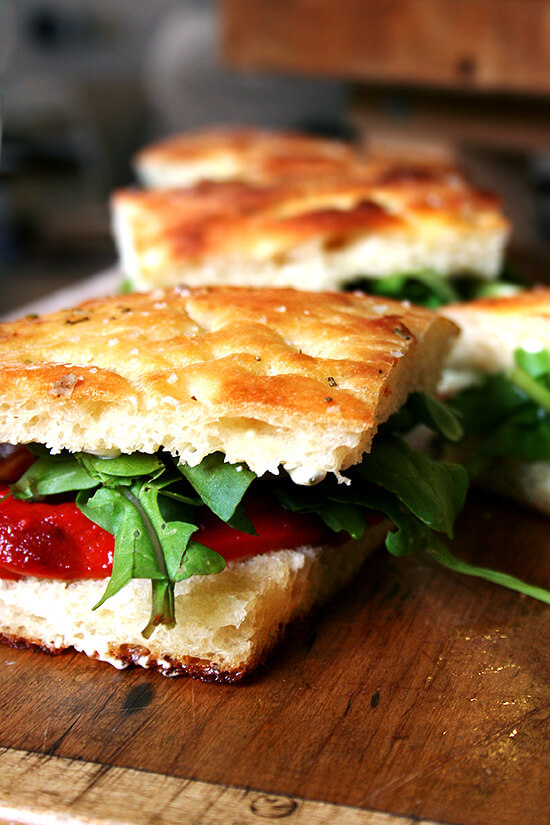
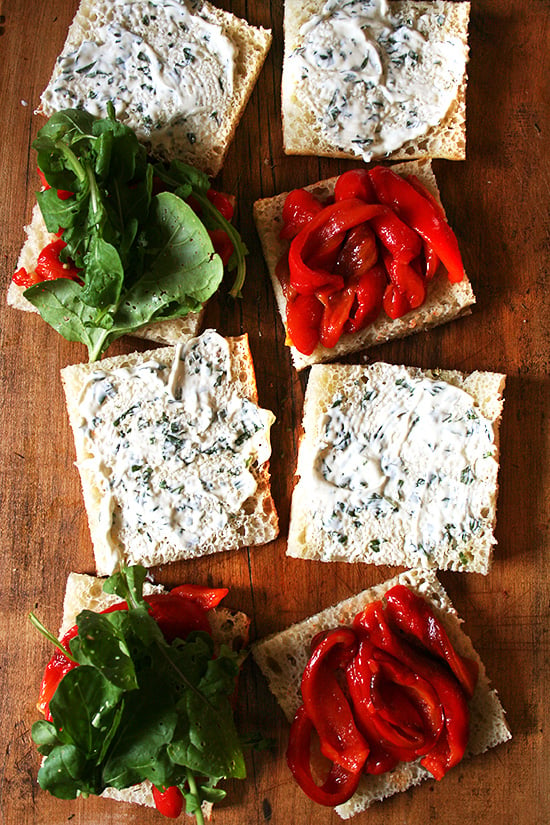
Next time you are invited to a potluck picnic, volunteer to make sandwiches. And then make these. You will be loved forever. I promise.
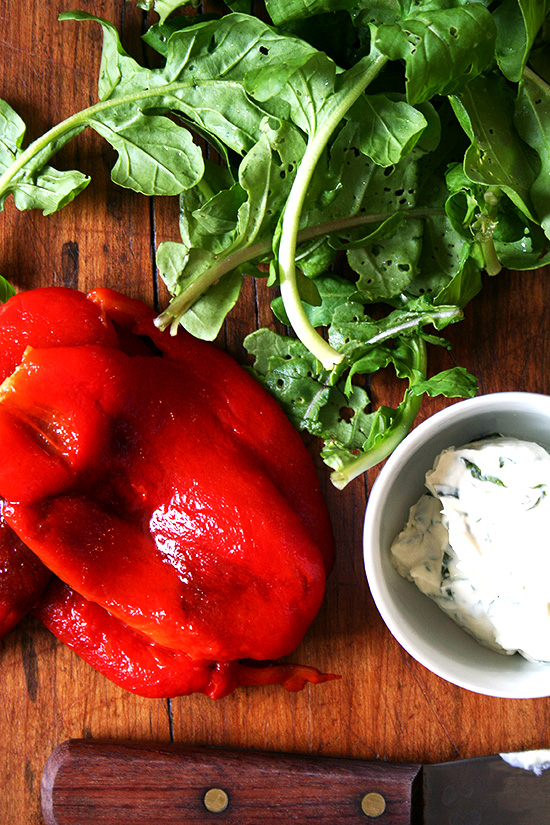
Roasted red peppers, arugula and an herbed goat cheese* is a particularly nice combination at the moment but later in the summer, when the tomatoes are peaking, a classic Caprese salad on this homemade focaccia will be just as well received.
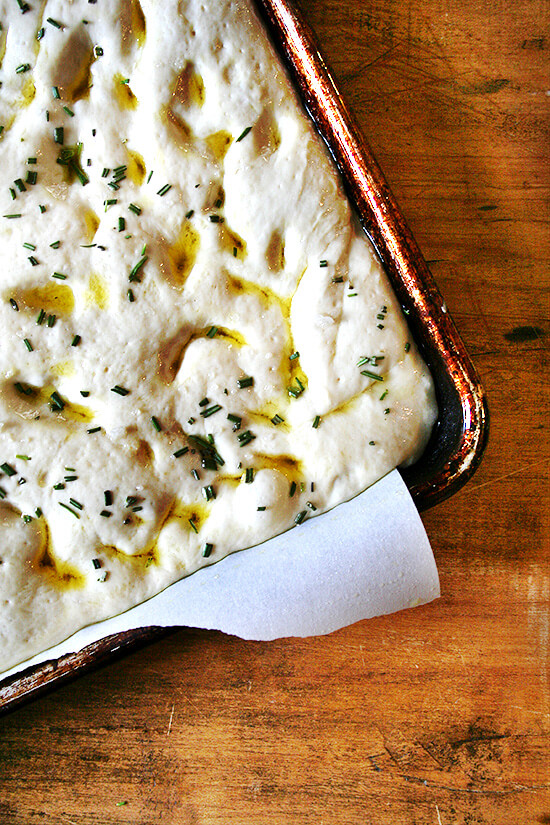
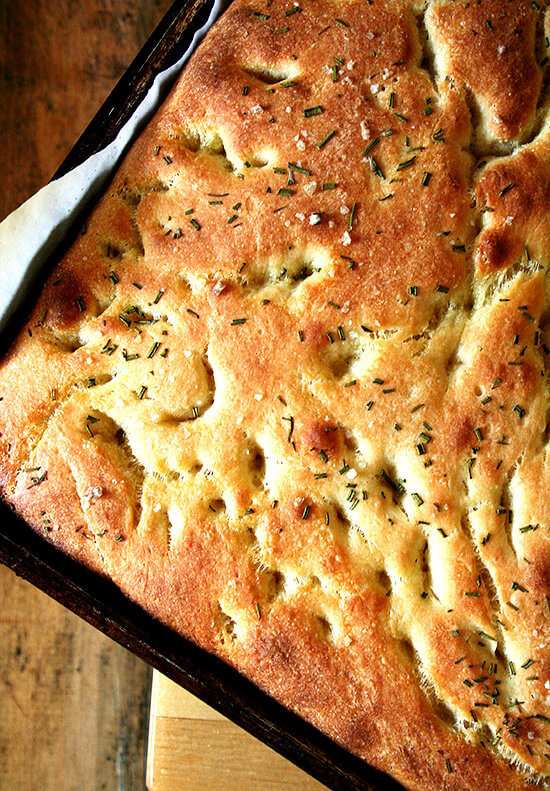
I have been making this focaccia recipe since it was printed in Fine Cooking magazine over six years ago now. It’s credited to Peter Reinhart and, like all of his recipes, is very precise. But unlike many of his recipes, which seem to begin days in advance of baking time, this one is just an overnighter and only takes minutes to prepare. It’s particularly easy if you have a stand mixer but Reinhart provides detailed by-hand mixing instructions as well. Make it. It’s a winner for sure.
I learned something, too, about roasting peppers while preparing for this picnic: Patience pays. I roasted these peppers as I usually do — on a parchment-lined sheetpan under the broiler for about 15 to 20 minutes or until evenly blackened — and steamed them as I usually do — in an aluminum bowl covered with plastic wrap. But instead of rushing the peeling, charring my little fingers in the process, I waited to peel till the following morning. It was a breeze. From here on out, I will roast, steam and peel 24 hrs. in advance … rrrrrigghhht.
- Note: I whipped a log of honey-goat cheese from Trader Joe’s with fresh basil and about 1/4 cup of crème fraîche (for texture), which made a delicious spread. Any herb or combination of herbs would be nice but I definitely recommend whipping the goat cheese with a little bit of milk or yogurt or something of the sort to make spreading easier.
Description
Notes: If you don’t have a mixer, follow the instructions on the Fine Cooking website for mixing by hand.
- 1 lb. 9 oz. ( 5 – 1/2 cups) unbleached bread flour
- 2 – 1/2 cups cold water (about 55°F)
- 2 Tbs. plus 1 tsp. granulated sugar ( 1 oz .)
- 2 tsp . table salt or 3-1/2 tsp. kosher salt ( 1/2 oz .)
- 1 packet (1/4 oz.) instant yeast (also called quick-rise, rapid-rise, or fast-rising yeast)
- 10 Tbs. extra-virgin olive oil
- Sea salt or kosher salt for sprinkling
Mix the dough:
- The day before baking, mix the dough: Combine the flour, water, sugar, salt, and yeast in the large bowl of a stand mixer (use the paddle attachment, not the dough hook). Slowly mix until the ingredients form a ball around the paddle, about 30 seconds. Switch to the dough hook and mix on medium low for another 3 minutes. Stop the machine to scrape the dough off the hook; let the dough rest for 5 minutes and then mix on medium low for another 3 minutes, until it’s relatively smooth. At this point, the dough will resemble melted mozzarella and be very sticky. If you stretch a small piece, it will barely hold together.
- Coat a bowl large enough to hold the dough when it doubles in size with 1 Tbs. of the olive oil. Transfer the dough to the bowl and rotate the dough to coat it with the oil.
- Hold the bowl steady with one hand. Wet the other hand in water, grasp the dough and stretch it to nearly twice its size.
- Lay the stretched section back over the dough. Rotate the bowl a quarter turn and repeat this stretch-and-fold technique. Do this two more times so that you have rotated the bowl a full 360 degrees and stretched and folded the dough four times. Drizzle 1 Tbs. of the olive oil over the dough and flip it over. Wrap the bowl well with plastic and refrigerate it overnight, or for at least 8 to 10 hours.
Shape the focaccia:
- Remove the bowl of dough from the refrigerator and start shaping the focaccia 3 hours before you intend to bake it (2 hours on a warm day). The dough will have nearly doubled in size. Cover a 13×18-inch rimmed baking sheet with parchment or a silicone baking mat and coat the surface with 2 Tbs. of the olive oil.
- Gently slide a rubber spatula or a dough scraper under the dough and guide it out of the bowl onto the center of the pan. The dough will sink beneath its own weight, expelling some gas but retaining enough to keep an airy gluten network that will grow into nice holes.
- Drizzle 2 Tbs. of the olive oil on top of the dough. (Don’t worry if some rolls off onto the pan; it will all be absorbed eventually.)
- Dimple the entire dough surface, working from the center to the edges, pressing your fingertips straight down to create hollows in the dough while gently pushing the dough down and out toward the edges of the pan. At first you might only be able to spread the dough to cover about one-half to three-quarters of the pan. Don’t force the dough when it begins to resist you. Set it aside to rest for 20 minutes. The oil will prevent a crust from forming.
- After letting the dough rest, drizzle another 2 Tbs. olive oil over the dough’s surface and dimple again. This time, you will be able to push the dough to fill or almost fill the entire pan. It should be about 1/4 to 1/2 inch thick. If it doesn’t stay in the corners, don’t worry; the dough will fill the corners as it rises.
- Cover the dough loosely with oiled plastic wrap, put the pan on a rack to let air circulate around it, and let the dough rise at room temperature until it’s about 1-1/2 times its original size and swells to the rim of the pan. This will take 2 to 3 hours, depending on the temperature of the room. Thirty minutes before baking, heat your oven to 475°F.
Bake the focaccia:
- Just before baking, gently remove the plastic wrap and sprinkle a few pinches of sea salt or kosher salt over the dough. Put the pan in the middle of the hot oven and reduce the heat to 450°F. After 15 minutes, rotate the pan to ensure even baking.
- Check the dough after another 7 minutes. If it’s done, it will be golden brown on top and, if you lift a corner of the dough, the underside will be golden as well. If not, return the pan to the oven for another 1 to 2 minutes and check again.
- Set a cooling rack over a sheet of aluminum foil or parchment (to catch drippings). Use a metal spatula to release the dough from the sides of the pan. Slide the spatula under one end of the focaccia and jiggle it out of the pan onto the rack. If any oil remains in the pan, pour it evenly over the focaccia’s surface. Carefully remove the parchment or silicone liner from beneath the focaccia. Let cool for 20 minutes before cutting and serving.
Prep Time: 30 minutes
Cook Time: 9 minutes
red bell peppers
- Preheat the broiler. Line a sheetpan with parchment paper for easy cleaning. Alternatively, grease the sheetpan with a little bit of olive oil.
- Cut peppers in half lengthwise. Remove stem and seeds. Place peppers cut side down on sheet pan. Broil for about 15 to 20 minutes or until evenly charred.
- Place peppers in a large bowl. Cover with plastic wrap. Steam until completely cool — overnight is ideal. Use peppers for salads, sandwiches, pasta salads, etc.
- Prep Time: 5 minutes
- Cook Time: 15 minutes
Herbed Goat Cheese
There are many ways to make a yummy herbed goat cheese. This is what I did: I whipped a log of honey-goat cheese (delicious on its own) from Trader Joe’s with fresh basil and about 1/4 cup of crème fraîche (for texture), which made a delectable spread. Any herb or combination of herbs would be nice but I definitely recommend whipping the goat cheese with a little bit of milk or yogurt or something of the sort to make spreading easier.