A few weeks ago I was flipping through Yotam Ottolenghi’s Simple and came across a stunning photo of mashed potatoes. They swooshed across the platter, creating peaks and valleys, an herby olive oil pooled all around. The recipe was titled “aromatic olive oil mash”.
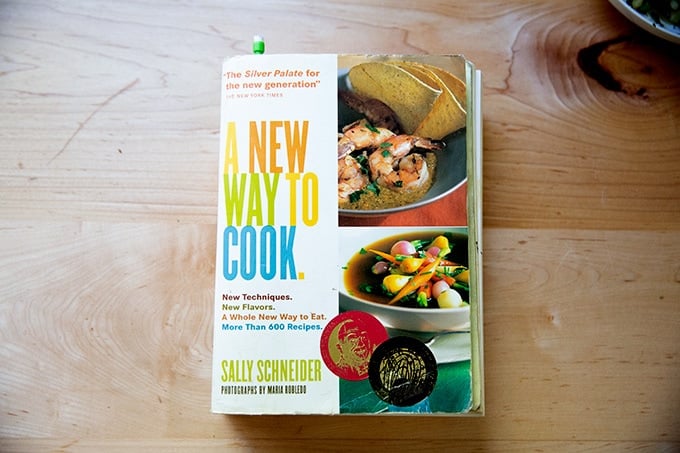
Photos of mashed potatoes typically don’t get my juices flowing, but this one did. And while I’m sure the recipe, which called for making a garlicky oil infused with thyme, mint, and lemon zest, is delicious, I decided to go a different route: I would make Sally Schneider’s tried-and-true buttermilk mashed potatoes from A New Way to Cook and top it with the scallion-cilantro “sizzle” I use in this homemade ranch dip .
As Ina says: How bad can that be?
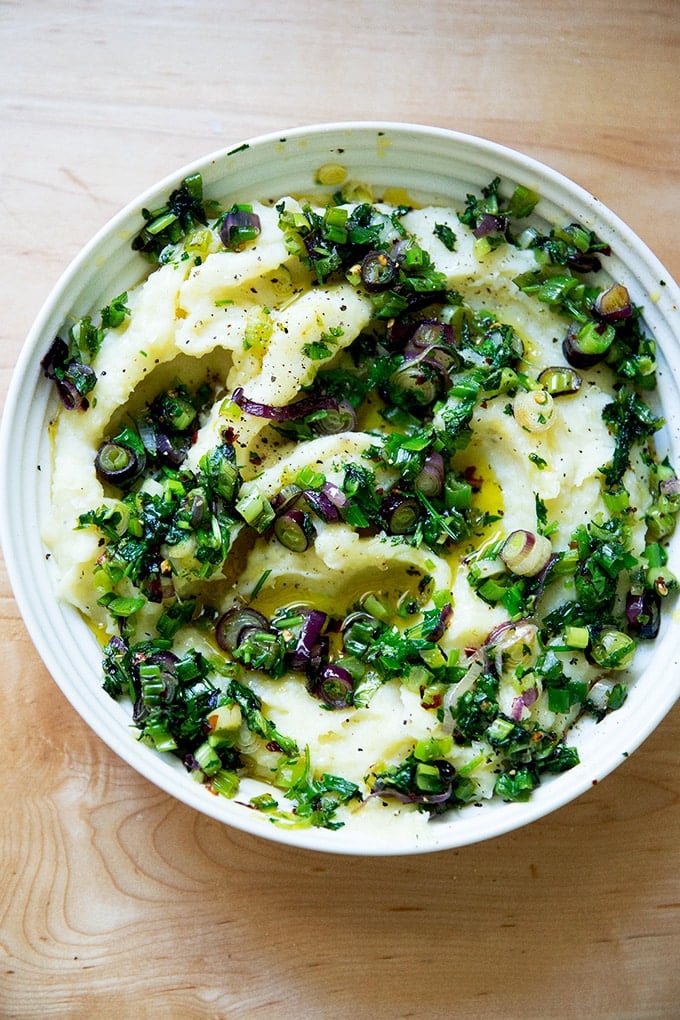
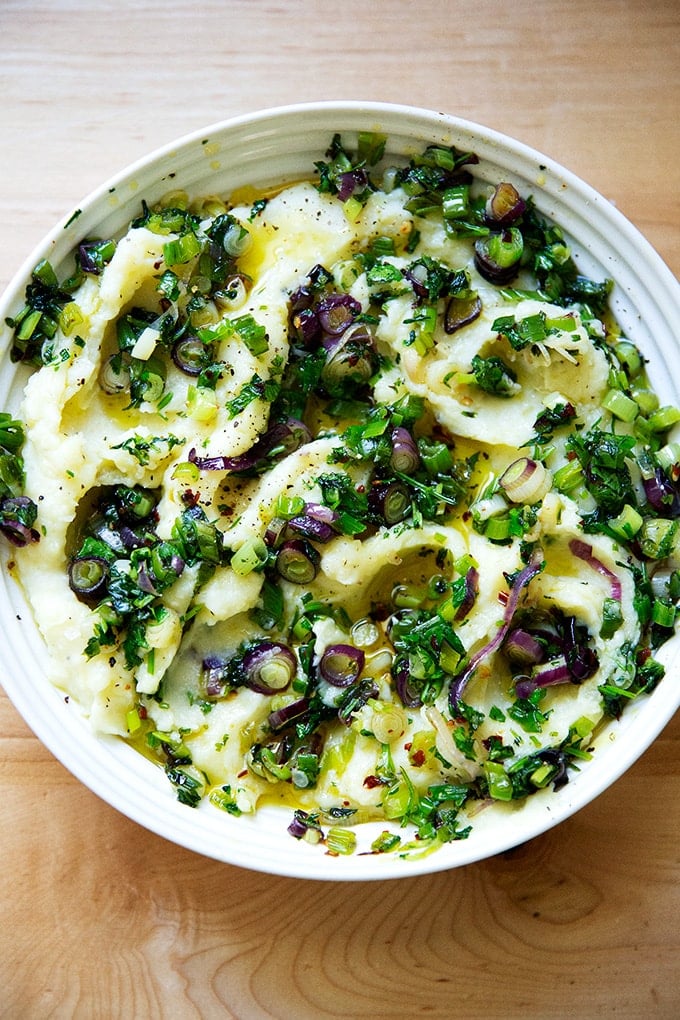
Friends: these potatoes! I don’t think I’ll be able to serve mashed potatoes any other way. Not only are they visually very appealing, but they’re also just so darn tasty, creamy and tangy thanks to the buttermilk, and bright and spicy thanks to the herb-and-chili infused olive oil.
Because I’ve never shared Sally’s mashed potato recipe, let me tell you a little bit about it. True to many of Sally’s recipes, this one calls for very few enrichments, relying on big flavor ingredients and techniques instead.
In this recipe she uses whole milk buttermilk because it has a natural creaminess yet is far lower in fat than milk or cream. She also uses some of the reserved potato-cooking liquid to thin the mash as needed. And finally, only after the potatoes have absorbed the liquid, Sally adds a single tablespoon of butter. By adding the butter at the end, she says, “the butter stays on the surface of the potatoes, its flavor readily discernible, imparting a truly rich finish.”
Every time I make these potatoes I am astonished there is no cream and very little butter — they taste far richer than they actually are. And, as I noted above, while this herb-infused oil will be a must for me from here on out, I only spoon it over half of the potatoes, keeping the remaining half ungarnished for the children and any other mashed potato purists in attendance.
In the recipe box below, you’ll also find a recipe for another favorite variation of these potatoes: roasted garlic. For this one, you roast two heads of garlic; then you squeeze the soft, buttery, caramelized cloves into the purée. It’s a subtle touch, but one that adds a nice earthiness and slight sweetness, too.
But before we get to the recipe, can we talk mashing gear?
Best Tools for Mashed Potatoes
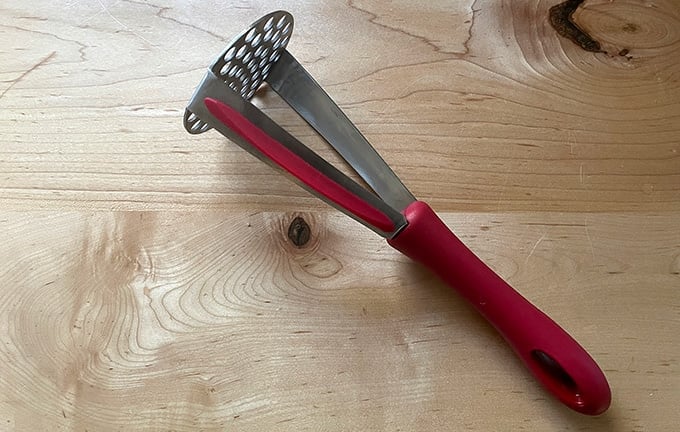
The above-pictured potato masher is a new tool in my arsenal, and I am super impressed by how well it works and very happy to have it because it has streamlined the mashed potato-making process for me.
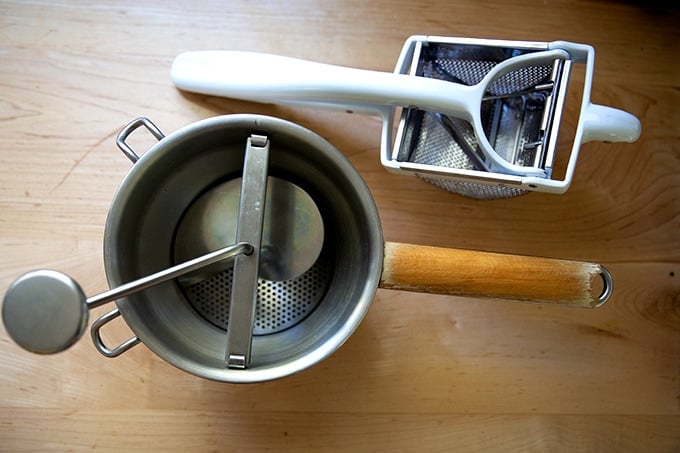
Prior to buying it, I always used the below-pictured food mill or the ricer for mashed potatoes, and while both of those tools make for especially smooth purées, I don’t love the experience of using either: each requires using an additional bowl, each is a little awkward to use as the potatoes get stuck in various crevices, and each is kind of a pain to clean. (There’s also always the initial problem of locating them 🤣)
A potato masher to a food mill is not unlike what an immersion blender is to a food processor — a tool that gets the job done, maybe not as perfectly but still very effectively and definitely more efficiently.
Final note: I’m sure most of you know this, but using a food processor is not a good idea for mashed potatoes because the intense whipping process gives the potatoes a gummy texture.
How to Make Buttermilk Mashed Potatoes, Step by Step
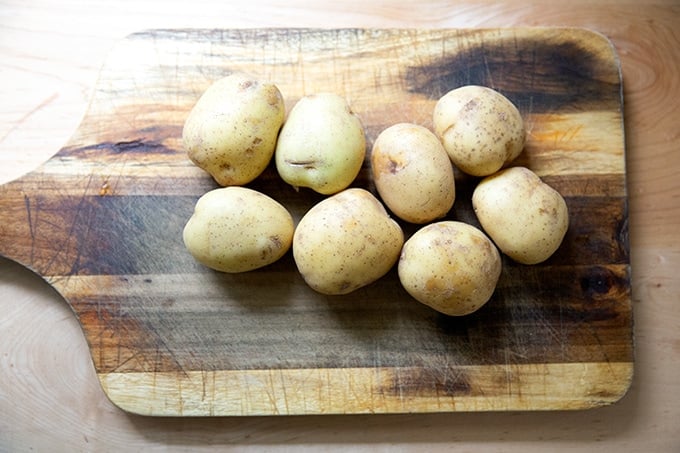
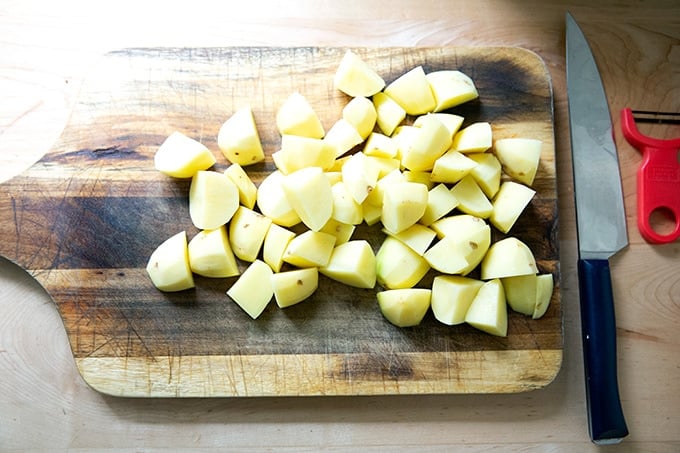
Gather your potatoes. I’m using Yukon Golds here.
Peel and roughly chop the potatoes.
Place them in a pot and cover them with cold water.
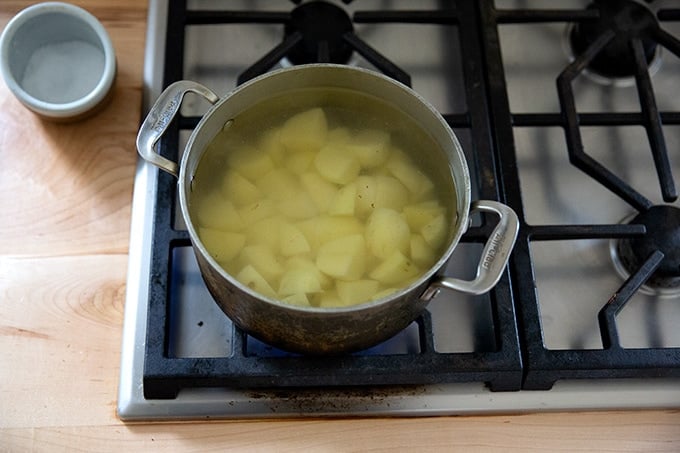
Bring them to a simmer and boil for 45 minutes. Before draining, reserve some of the cooking liquid.
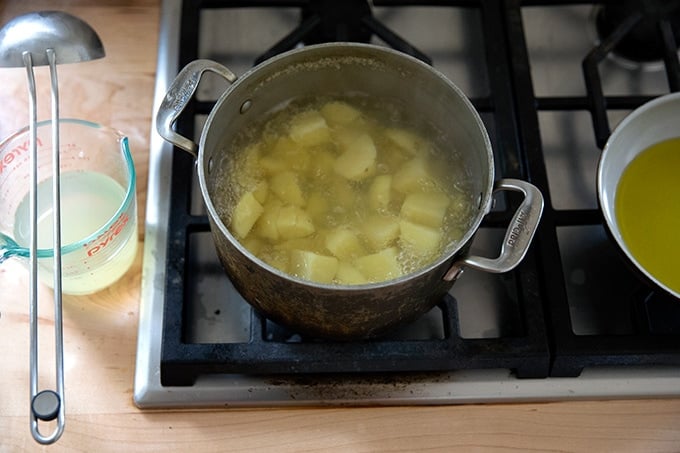
Drain them; then return them to the pot over low heat and let them cook for a few minutes to dry out.

Add buttermilk, reserved cooking liquid, salt, and pepper.
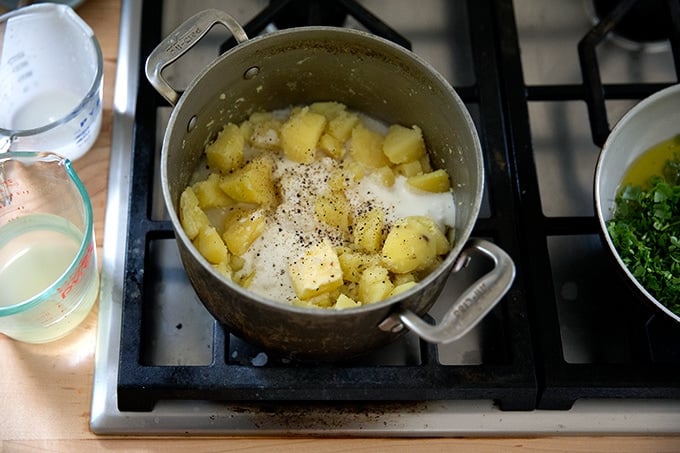
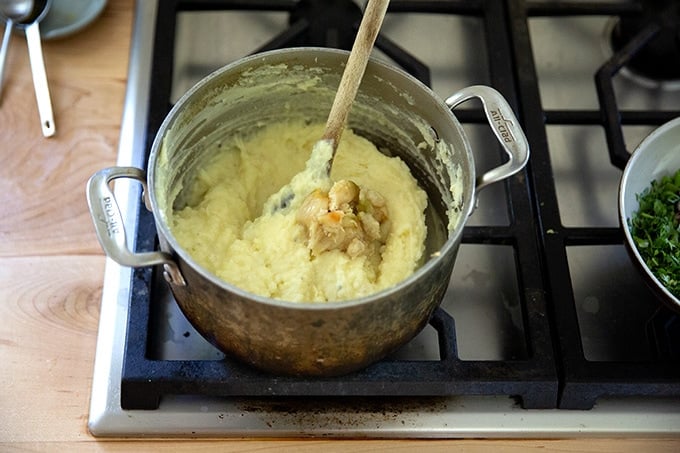
Then mash until mostly smooth. I love this potato masher.
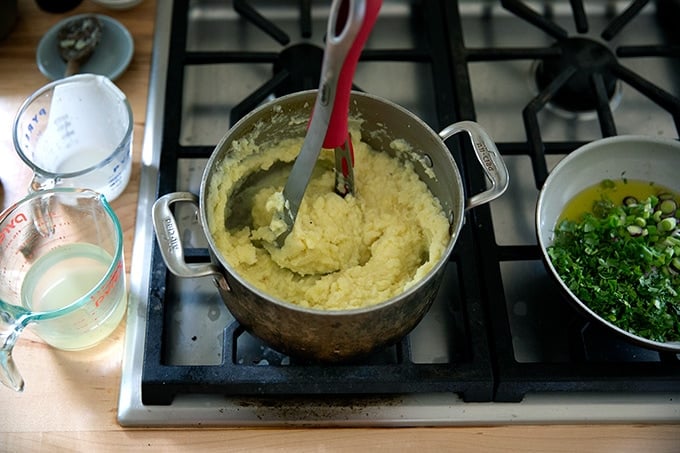
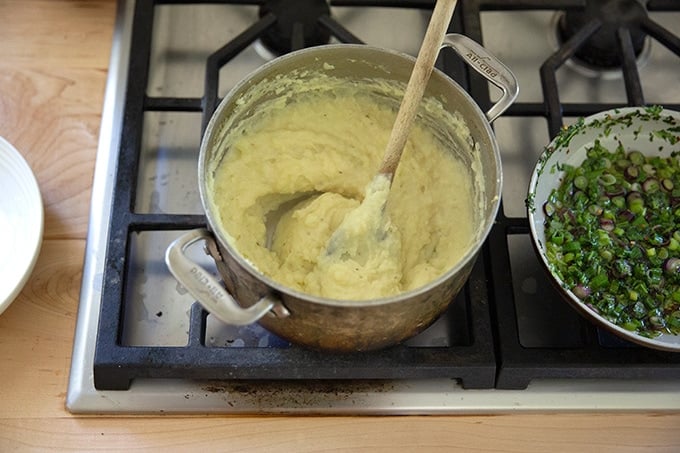
Once mostly mashed, add a tablespoon of butter, and beat further. You can switch to a spoon or spatula at this point.
You can stop right there, or… jazz them up:
Herby “Ranch” Mashed Potatoes
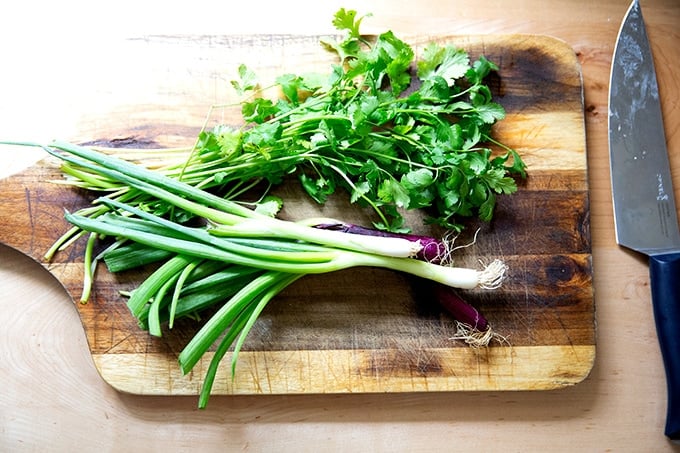
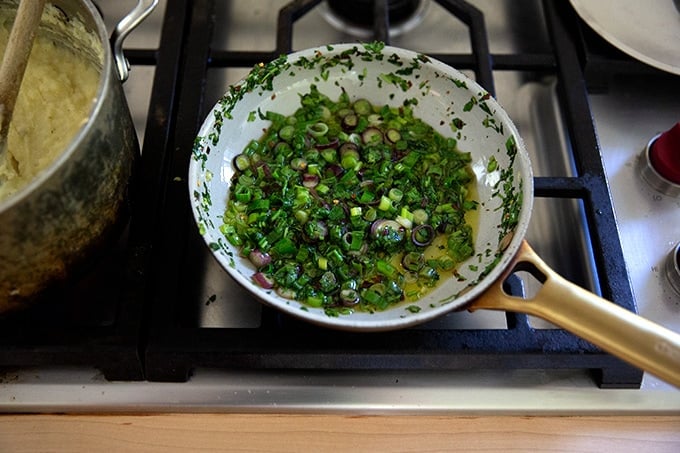
This is my favorite way to eat mashed potatoes. If you’ve made this homemade ranch dip , the process will feel very familiar. Gather scallions and cilantro. (Omit the cilantro if you hate it.)
Slice the scallions, chop the cilantro, and transfer them to a small skillet with olive oil and crushed red pepper flakes.
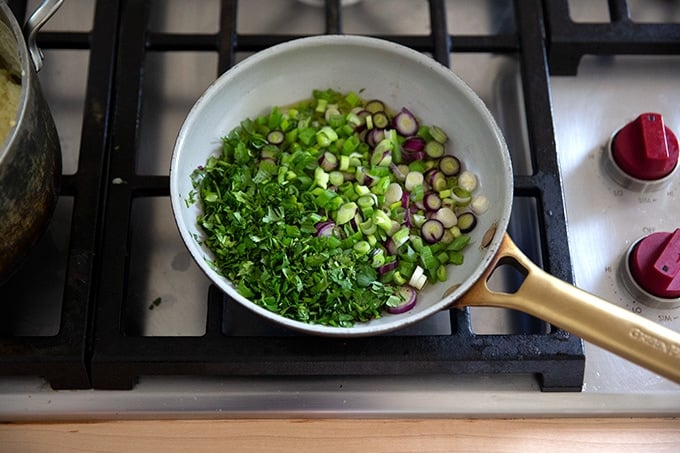
Cook over medium heat until the herbs begin to soften and sizzle.
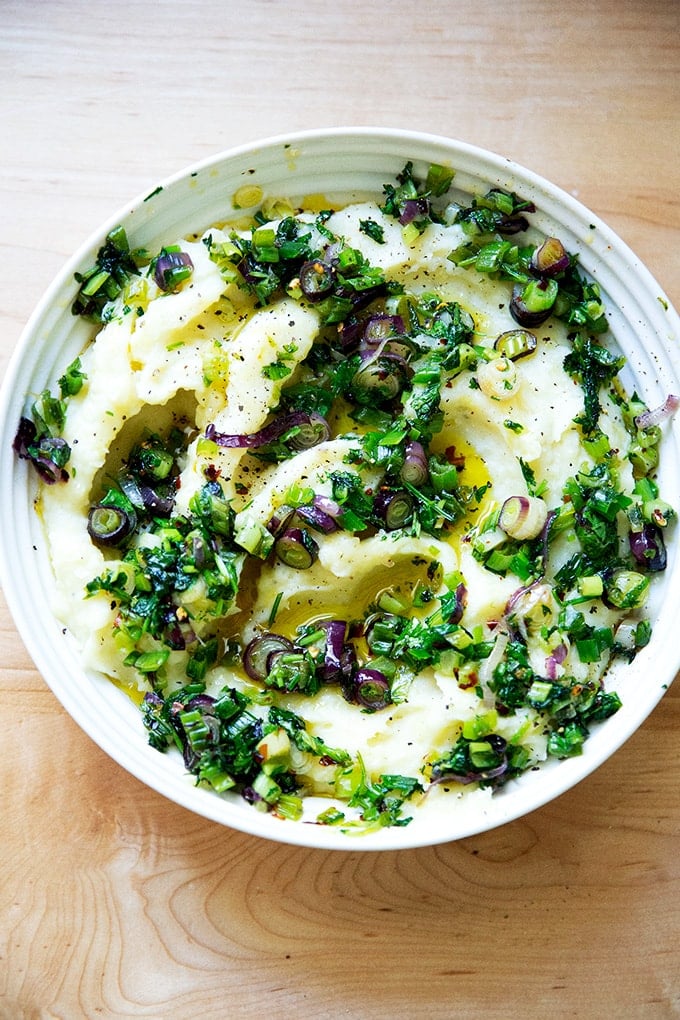
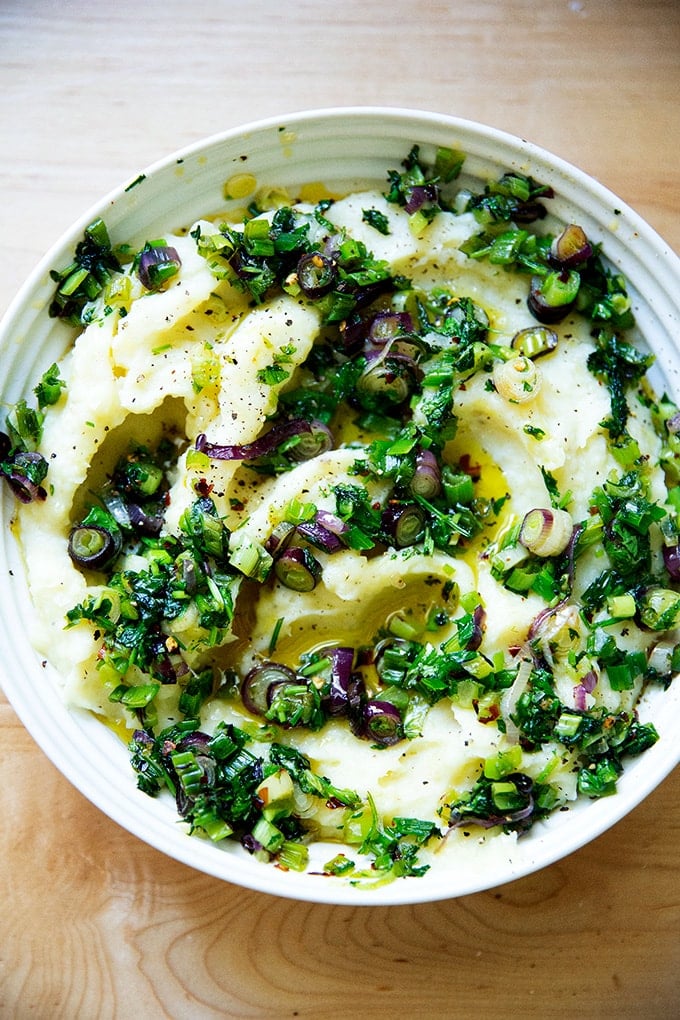
Transfer mashed potatoes to a serving dish; then spoon the herby oil over top. (Note: I only garnish half the potatoes with this herby dressing and I leave half plain for the kids.)
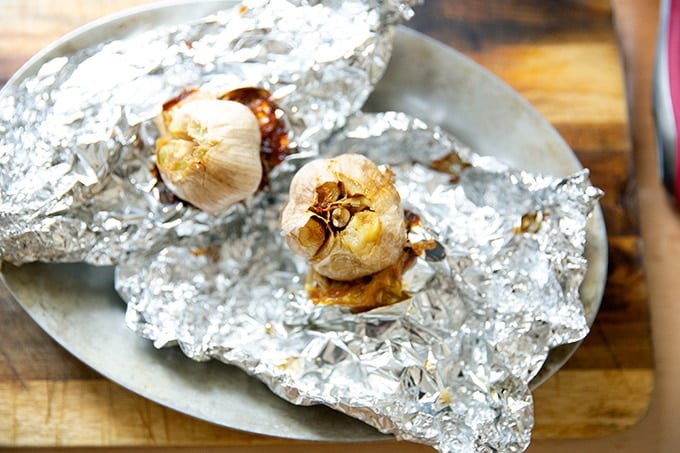
How to Make Roasted Garlic Mashed Potatoes
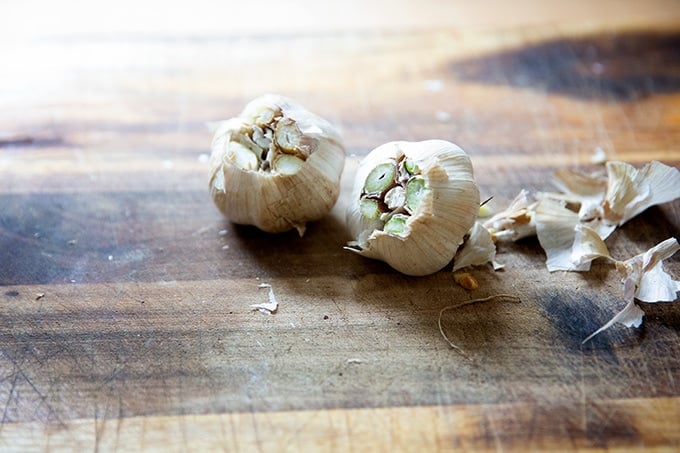
To make roasted garlic mashed potatoes, trim away the tops of two heads of garlic.
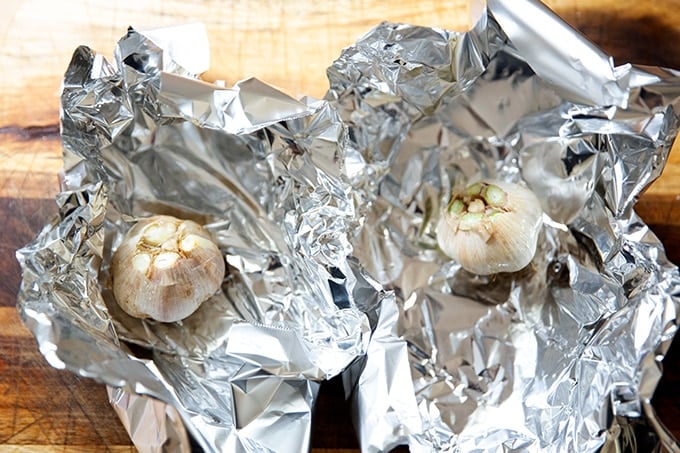
Place each head on a small sheet of foil. Drizzle with olive oil. Curl up the sides of the foil to make an enclosure. Pour a tablespoon of water into the pouch. Close the foil sides to make a tight pouch; then transfer to a 425ºF oven for 35-45 minutes.
Open the pouches to find nicely caramelized, butter-soft cloves — these are heavenly spread over toast.
Squeeze out the cloves; then transfer to your mashed potatoes, and stir to combine.
You can combine the roasted garlic mashed potatoes with the herby dressing if you wish:
As noted above, the base recipe for the mashed potatoes as well as the roasted garlic variation comes from Sally Schneider’s A New Way to Cook , which was my cooking bible for many years.

I truly could eat this whole bowl:
Description
Adapted from Sally Schneider’s A New Way To Cook .
Notes:
Potatoes: If possible use something like Yellow Finns or Yukon Golds, which become extremely creamy when mashed. If made with baking potatoes, the result will be grainy and watery.
Gear: For the smoothest potatoes, pass the potatoes through a food mill or a ricer before adding the buttermilk and reserved cooking liquid in step 2. As noted in the post, I love this Zyliss Potato Masher.
Buttermilk: Use whole milk buttermilk if possible. Low-fat buttermilk won’t impart the same creaminess and richness, and it might impart more tartness as well. The original recipe calls for warming the buttermilk, but I find as long as I measure it and leave it at room temperature when I start boiling the potatoes, it works just fine.
Herby garnish: As noted in the post, I spoon the garnish over only half of the potatoes, and I leave half of the potatoes plain for the children. If you like the idea of using this garnish over all of the potatoes, I would double it, and use a larger skillet.
Roasted Garlic Variation: After the potatoes are mashed, add two heads of roasted garlic cloves to the pot. Stir to combine.
For the buttermilk mashed potatoes:
- 1 3/4 pounds Yukon Gold potatoes, peeled and cut into 2-inch chunks (you’ll have about 1 1/2 pounds of potatoes post peeling)
- 2 teaspoons kosher salt
- 3/4 cup buttermilk, room temperature, see notes above
- 1 tablespoon unsalted butter
- Freshly ground black pepper
- Flaky sea salt, if you have it
For the herby garnish (see notes above before making):
- 3 tablespoons olive oil
- 4 scallions, thinly sliced, to yield a heaping half cup or so
- 1/4 to 1/2 teaspoon crushed red pepper flakes
- 2 to 4 tablespoons finely chopped cilantro
- Place the potatoes and the 2 teaspoons of the salt in a medium saucepan, add enough water to cover, and bring to a boil over high heat. Reduce the heat to moderate and simmer until the potatoes are tender when pierced with a fork, about 45 minutes. Drain, reserving at least 1/4 cup of the cooking water — I like to reserve at least a cup of the cooking liquid.
- Return the potatoes to the pan and set over low heat, uncovered, for about 5 minutes, stirring occasionally, to let the potatoes dry out a little. (See notes above if using a ricer or food mill.) Add the buttermilk, ¼ cup of the reserved cooking liquid, pepper to taste, and a pinch of sea salt. Mash the potatoes with a potato masher until you have a coarse purée. Add the butter and mash again. Once the potatoes are as mashed up as possible you can switch to a wooden spoon or spatula and beat them further. Taste. Add more sea salt and pepper to taste. Thin with more reserved cooking liquid if desired.
- To make the herby sizzle: Heat the oil, scallions, crushed red pepper flakes, and cilantro in a small skillet or saucepan over medium heat. Cook, swirling occasionally, until the scallions and red pepper flakes start to visually and audibly sizzle. Season with a pinch of sea salt and remove from the heat.
- To serve: Transfer half of the potatoes to a serving dish. Use the back of a spoon to swoosh the potatoes around a bit, creating peaks and valleys. Spoon the herby oil over top, allowing the oil to pool in the crevices. Crack more pepper over top and, if you wish, season with another pinch of sea salt.
- Prep Time: 10 minutes
- Cook Time: 1 hour
- Category: Side Dish
- Method: Stovetop
- Cuisine: American
Find it online : https://alexandracooks.com/2021/10/09/creamy-no-cream-buttermilk-mashed-potatoes-with-variations-herbs-roasted-garlic/
Below you will find guidance for both making pie dough and parbaking or blind baking it. This trusted method will ensure your crusts do not shrink in the oven and will prevent your finished pies from having soggy bottoms .
For many years, I shied away from parbaking my pie crusts. I never found the bottoms terribly soggy when I didn’t parbake, and I hated the process: from dealing with pie weights to chilling to baking, I found the process time-consuming, and, moreover, I always found the crust of my finished pies to be overbaked.
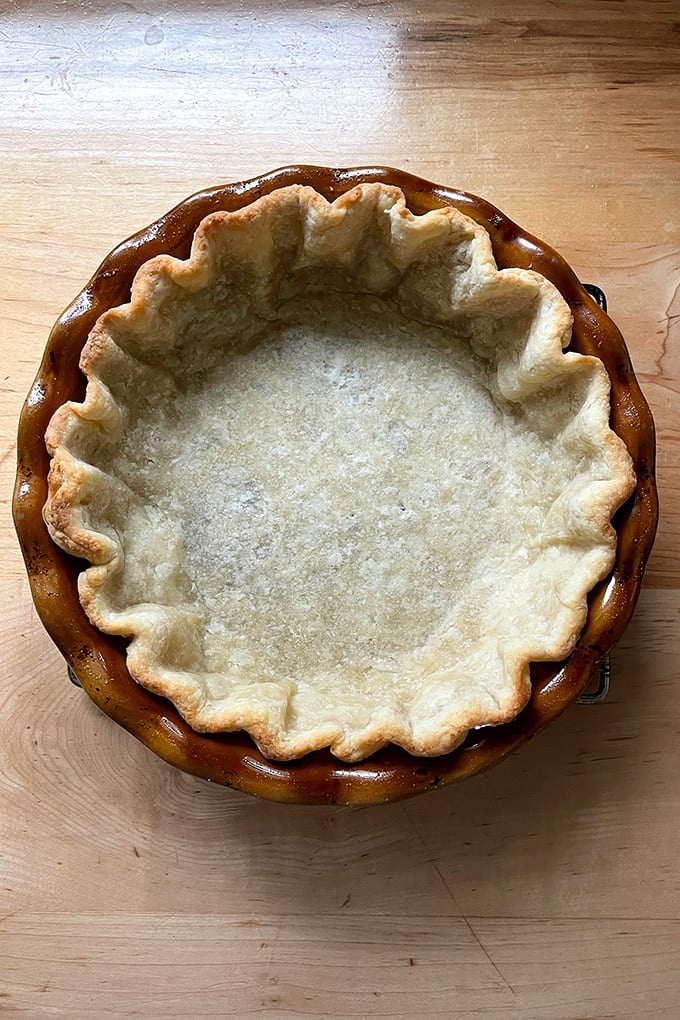
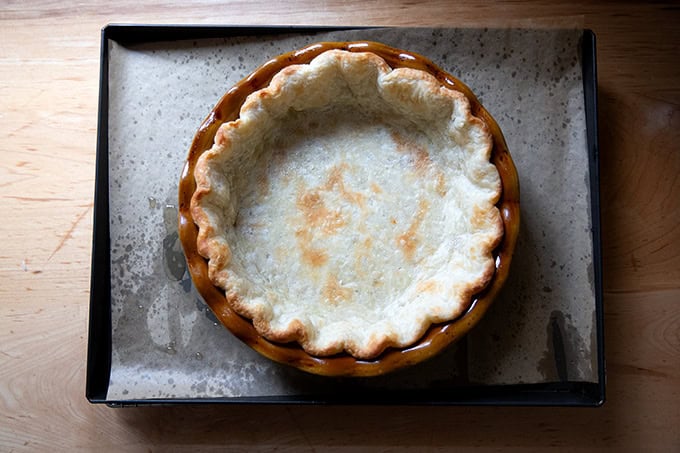
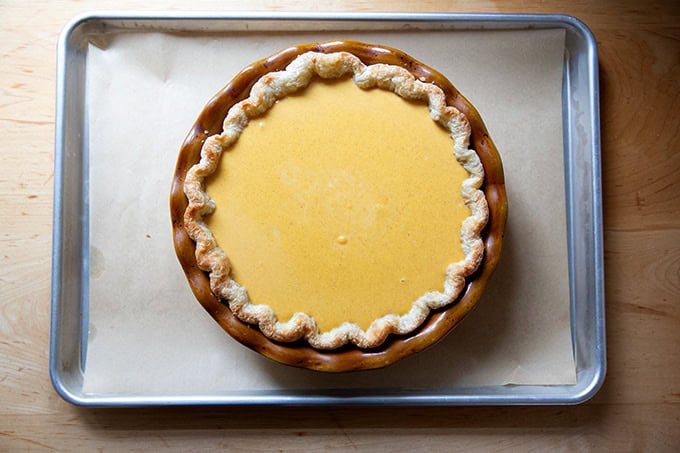
Several years ago, however, I saw a photo in The Book on Pie depicting a correctly baked parbaked pie crust. It looked barely toasted, mostly blonde with the faintest hint of brown; the edges were lightly golden. The suggested baking method called for an initial 15-20 minutes with pie weights in the crust, followed by 2-3 minutes without the weights.
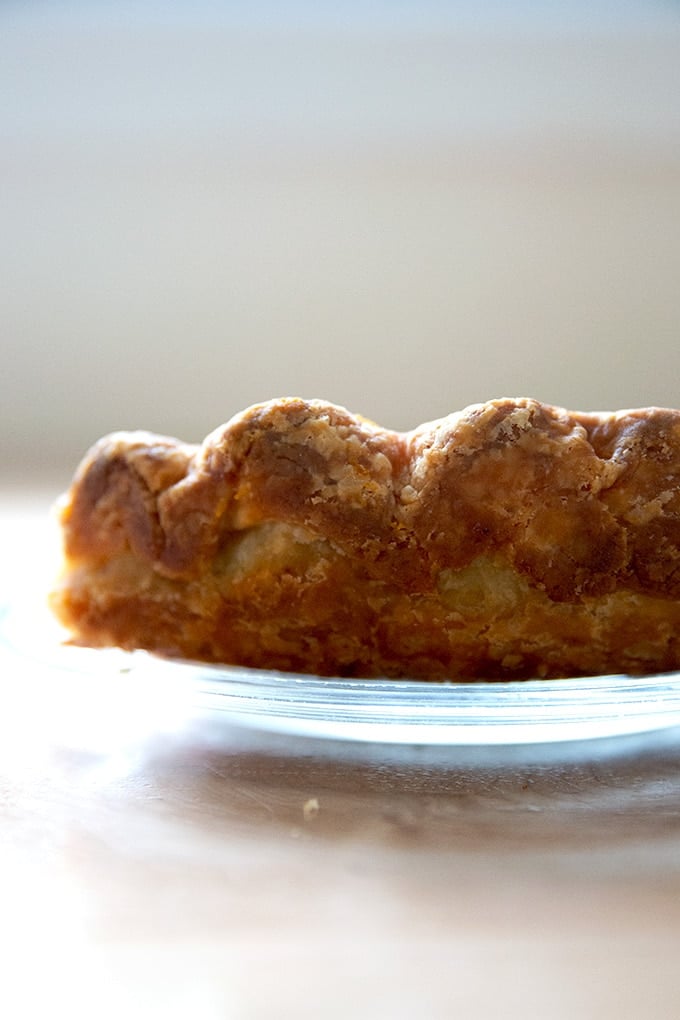
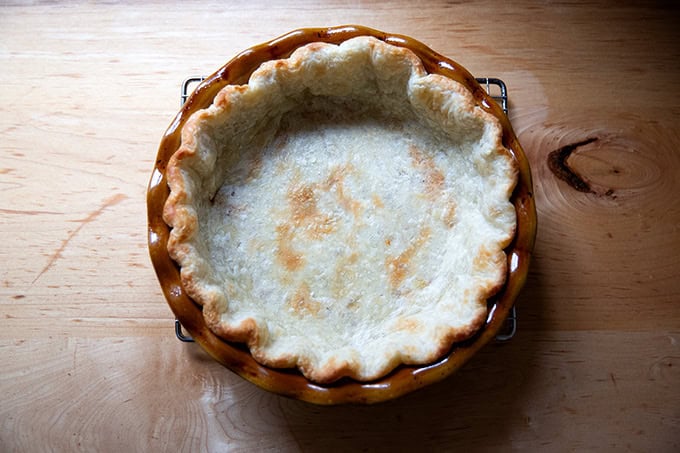
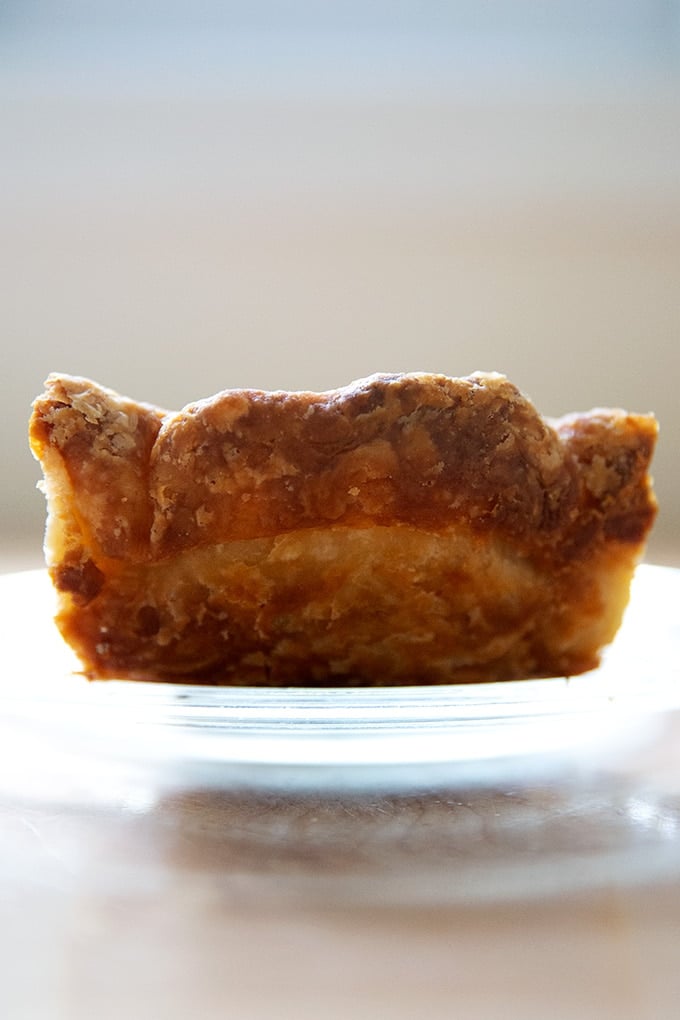
Following the method, my parbaked crust emerged from the oven with edges lightly toasted and the bottom surface mostly blonde. And the crust of the finished pie was deeply caramelized but not at all overcooked. See below:
Parbaked crust:
Fully baked crust:
I now find parbaking an essential step in my pie-making process. It does require some planning, but overall it is not hard, especially if you pay attention to the details, namely two things:
- Chilling your pie dough before rolling it out and before parbaking it.
- Using a sufficient amount of pie weights.
Let’s explore each:
The Importance of Chilling Your Pie Dough
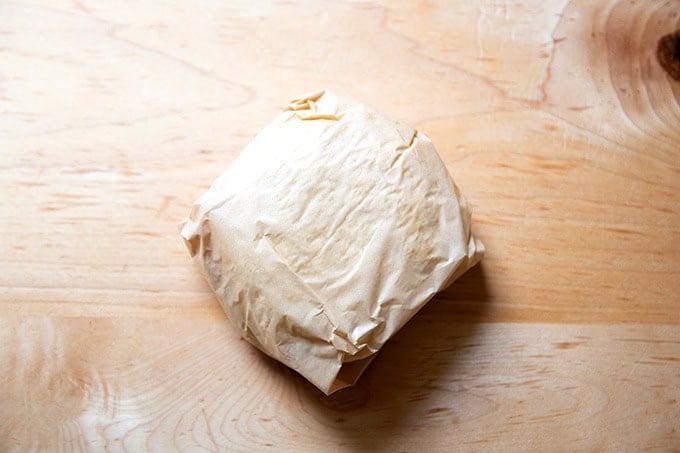
After you make your pie dough, you should let it rest in the fridge for at least 30 minutes or better, 12 to 24 hours, before you roll it out. Why? For two reasons:
- Chilling the dough after mixing makes it easier to roll out. This is because chilling allows the natural protein stands (i.e. the gluten) that form when flour is hydrated to soften and relax, making the dough easier to roll out.
- A rested dough will shrink less in the oven due, again, to the gluten having had the chance to relax.
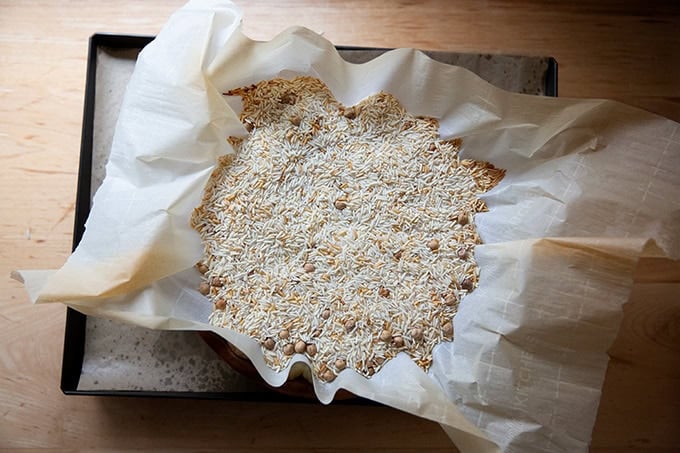
You Need More Pie Weights Than You Think
When you fill your parchment-lined pie shell with weights (or dried rice or beans, which you can save and reuse), be sure to fill it to the very top. I use 3.5 pounds of dried rice/beans per shell, and I pile them high above the rim of the dough.

How to Parbake Pie Dough, Step by Step
Remove your chilled round of pie dough from the fridge. (See recipe box for pie dough recipe.)
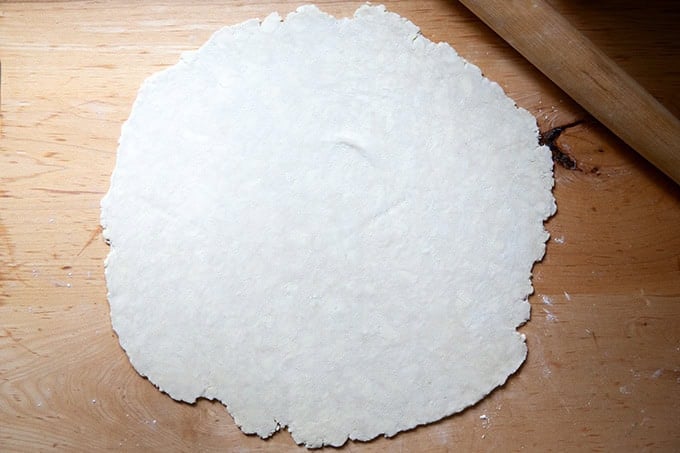
Roll it out on a lightly floured work surface into roughly a 15-inch round:
Fold in half, then half again, and transfer it to a pie plate:
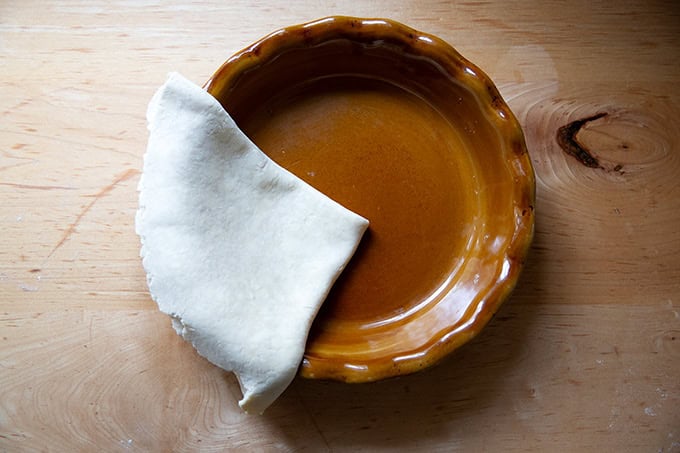
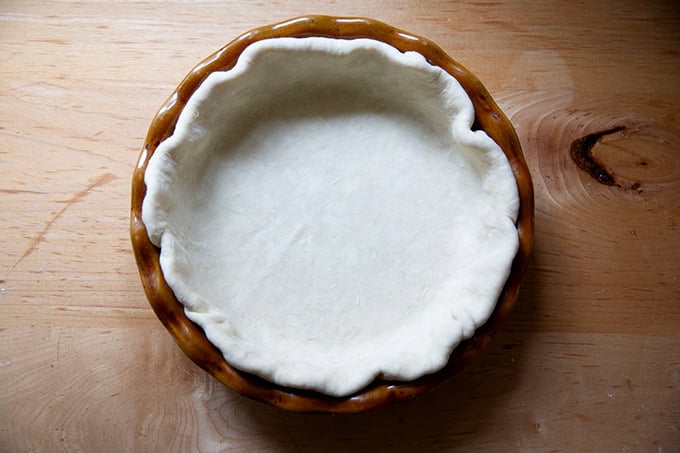
Unfold the pie dough and trim the over-hanging dough, leaving roughly a 1/2 inch of dough extending beyond the edge.
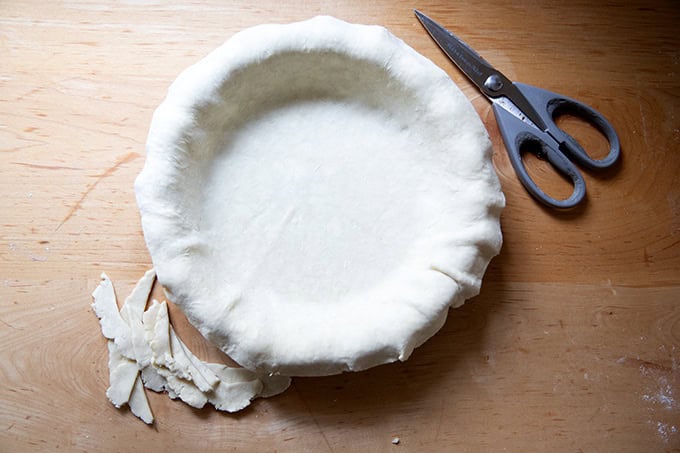
Tuck the overhanging dough behind itself into the pie plate:
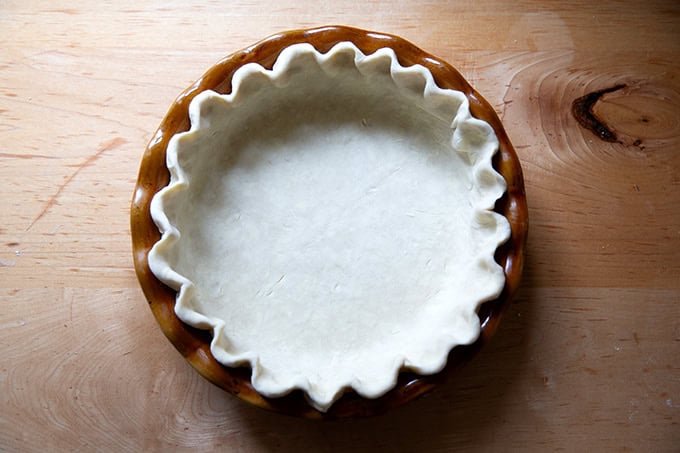
Then pinch the dough using both hands to make a pleated edge. Chill for 30 minutes.
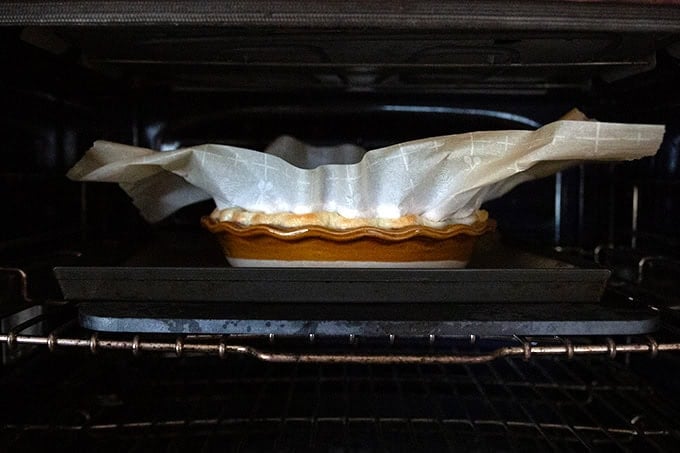
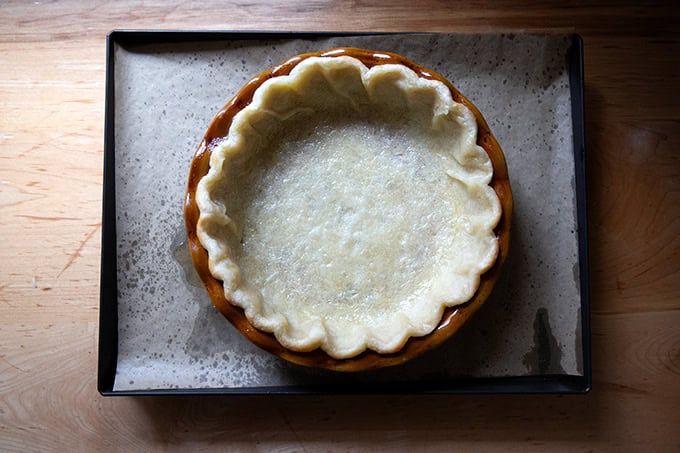
Lay a sheet of parchment paper across the dough and fill it with dried beans or rice: be generous with the beans/rice! I fill mine so that the beans and rice extend at least a half inch above the rim of the crust.
Transfer to the oven and bake for roughly 20 minutes, relying on the visual cues: remove the pan when you see light browning at the edges:
Lift the entire parchment paper sling out of the parbaked crust…
… then return the pan to the oven …
… for another 2-3 minutes:
Transfer to a cooling rack:
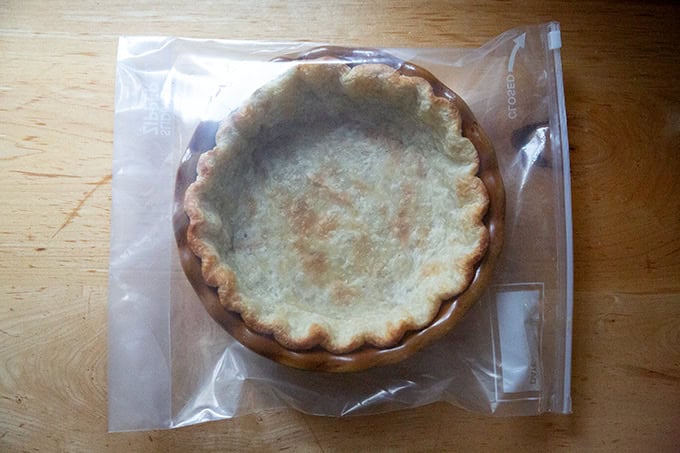
Let cool completely before storing. See storage notes in recipe box. I find these 2-gallon bags to be so handy for storing parbaked crusts and other large items.
When you are ready to bake, simply fill your parbaked shell with the filling and bake as directed. This is this butternut squash pie filling :
Can you see how flaky the crust is?

Description
Below you will find guidance for both making pie dough and parbaking or blind baking it. This trusted method will ensure your crusts do not shrink in the oven and will prevent your finished pies from having soggy bottoms .
Here are a few recipes that benefit from a parbaked crust:
- Bourbon Pecan Pie
- Roasted Butternut Squash Pie (i.e. The Best Pumpkin Pie)
- Salted Maple Pie
Notes:
Plan ahead: Ideally, make your dough 12 to 24 hours before you plan to roll it out. Doing so allows the flour to fully hydrate and allows the gluten to relax. This makes rolling the dough out more easily and also helps minimize shrinking in the oven.
To make a double batch : do not load your food processor with double quantities. Make the dough in separate batches — no need to wash the food processor in between batches.
To make a half batch , see quantities in the notes section below.
Favorite Pie Plate: I swear by my ceramic Emile Henry 9-inch Pie Plate .
Do not bake pies directly on the rack — butter will seep out and when it hits the oven floor (or Baking Steel), it will make a smoky mess. Instead, place your pies on sheet pans and use parchment paper, if you wish, for easy clean up.
Dough Storage: Dough can be made up to three days in advance and stored in the fridge or made weeks in advance and stored in the freezer. To thaw, place dough in the fridge overnight before baking.
Once you roll out your dough and fit it into your pie plate, don’t freeze it — the crust will not bake properly directly from the freezer.
Parbaked Crust Storage: Once you parbake your pie shells, let them cool completely; then store in an airtight vessel or bag — a 2-gallon zip-top bag works well. Store at room temperature for up to 3 days or freeze for up to 3 months.
Pie-Making Schedule: This is a great schedule to follow if you are making pies for Thanksgiving or any holiday: Tuesday (or 2 days before you plan to serve your pies): Make the dough and chill it. Wednesday: Parbake the crust. Thursday: Fill and bake the pie.
2½ cups ( 320g ) all-purpose flour
2 tablespoons ( 25 g ) sugar
½ teaspoon ( 3 g ) kosher salt
16 tablespoons ( 227g ) unsalted or salted butter, cut into small pieces and chilled
½ cup + 2 tablespoons ( 142g ) ice water
For baking and storing:
- pie weights or dried beans/rice — I always use dried beans/rice. You need more than you think — over 3 lbs. per pie. You can use them forever and ever. I store mine in this OXO vessel .
- parchment paper — I like the large size of Reynolds for parbaking.
- Jumbo ziptop bags — the 2-gallon size is particularly helpful
- In the bowl of a food processor , pulse the flour, sugar, and salt together. Add the chilled, cubed butter. Pulse at 1-second intervals until butter is the size of peas — should be about ten 1-second pulses. Add the ice water and pulse again about 10 times until the mixture is crumbly but holds together when pinched. ( To make without a food processor: In a large bowl, whisk flour, sugar, and salt together. Add the butter to the flour mixture, and using the back of a fork or a pastry cutter, incorporate it until it is in small pieces. Add ice water and continue to stir with a fork until mixture is crumbly but holds together when pinched.)
- Lay two clean tea towels on a work surface. Dump half of the crumbly dough mixture (roughly 350 grams) into the center of each. Grab the four corners of the towel together and twist to create a beggar’s purse, pressing the dough into a round. Use your hands to pack and flatten the round. Wrap in plastic wrap or parchment paper, place in ziplock or other airtight bag/vessel, and stash in the fridge for at least 30 minutes, but ideally 12 to 24 hours or for as long as 3 days. You also can store it in the freezer for as long as 3 months.
- To parbake or blind bake the pie crust: Heat your oven to 425ºF. If you have a Baking Steel or pizza stone, place it on a rack in the lower third of your oven. ( Steels and stones retain heat well, and they encourage proper and even browning on the bottoms of pie. They also help keep the oven temperature’s even as you open and close the door to check on your pie. ) On a lightly floured work surface, roll out one of the chilled rounds of pie dough, flipping the round over every few strokes, until you have a circle roughly 15 inches in diameter. Note: If you are using very chilled dough, you may find it helpful to pound it gently with your rolling pin before beginning the rolling.
- Transfer the round to a pie plate. Trim any excessive overhanging pie dough — there should be roughly one inch of dough overhanging the edge. Save the scraps in an airtight container in the fridge. Tuck the overhanging dough behind itself; then use your fingers to crimp the edge into a fluted pattern — video guidance here . If time permits, chill the shell for 30 minutes. Lay a sheet of parchment across the pie plate and pour pie weights or dried beans into the center until they reach the top of the pie crust. Use your hands to press the weights down and fit them into the edges of the fluted crust.
- Transfer the filled pie crust to a parchment-lined sheet pan and transfer to the oven for 15-20 minutes or until the edges are just beginning to color — do rely on the visual cues here. It sometimes takes my crusts a little longer to take on that light color at the edges.
- Remove the pan from the oven and carefully remove the pie weights or dried beans (which you can use again and again — let them cool completely; then transfer to a storage bag). Return the pan to the oven. For a parbaked crust, bake the shell for another 2 to 3 minutes — it should take on only the slightest bit of more color all around. For a blind-baked crust , return the shell to the oven for another 10 to 12 minutes or until the crust is evenly golden brown.
- Once you parbake or blind bake your pie shells, let them cool completely; then store them in an airtight vessel or bag — a 2-gallon zip-top bag works well. Store at room temperature for up to 3 days or in the freezer for up to 3 months. From here, proceed with whichever pie recipe you are making. I use this pie crust for every pie I make. See notes above.
Notes
Half Recipe Quantities:
1 1/4 cups (160 g) all-purpose flour
1 tablespoon sugar
1/4 teaspoon table or kosher salt
8 tablespoons (114 g) cold, cubed butter, salted or unsalted
1/4 C. + 1 T. (71 g) ice water
Prep Time: 1 hour
Cook Time: 25 minutes
Category: Dessert
Method: Oven, Food Processor
Cuisine: American, French
