When focaccia meets cinnamon roll, good things happen. In this union, focaccia dough gets folded and dimpled with a cinnamon-brown sugar-butter mixture and baked until bubbly and golden all around. Cinnamon rolls without all the fuss? Yes. You. Can 🎉
Assembling cinnamon rolls always feels like a process, from making the dough and rolling it out, to spreading on the filling and coiling it up, to slicing, baking, and making the glaze.
Cinnamon roll focaccia feels effortless in comparison. As you know, focaccia dough , made with 4 ingredients, takes no time to stir together, and it can hang out in your fridge for days.
Moreover, with cinnamon roll focaccia, there’s no rolling and coiling — you’ll fold and dimple the dough, but all of this takes place in the confines of the 9×13-inch pan you’ll bake the focaccia in. You won’t flour a work surface or your hands, you won’t coil or cut. Overall, it’s very simple.
This would be the perfect thing to make for a fall or winter brunch, when you need something sweet to feed a crowd but maybe don’t have the energy for a more elaborate ensemble. Find step-by-step instructions below.
Cinnamon-Sugar Focaccia, Step by Step
First, gather your ingredients:
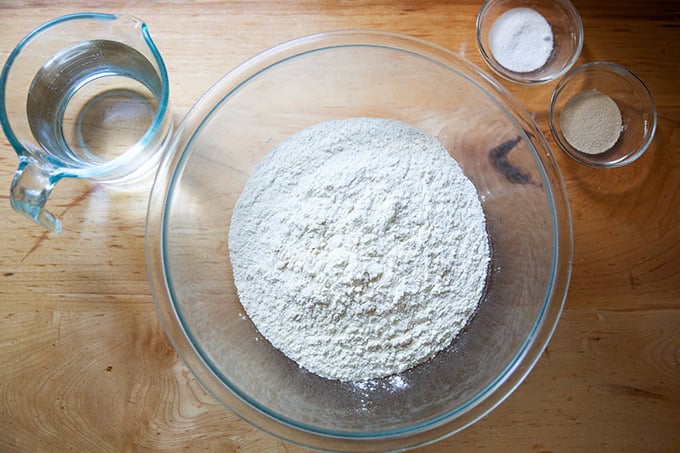
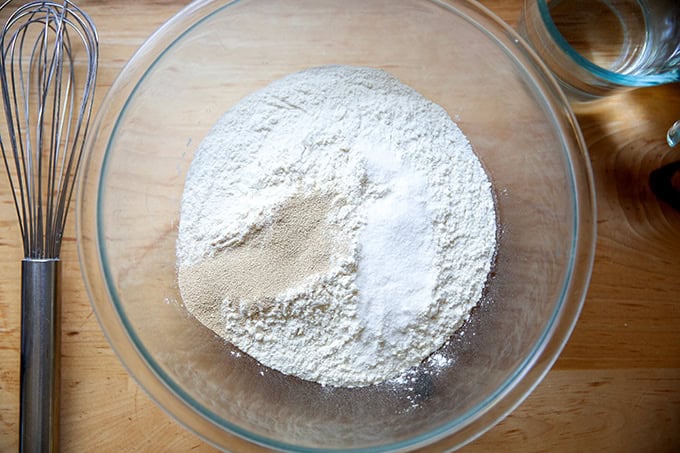
Whisk together the flour, salt, and instant yeast, then…
…add the water:
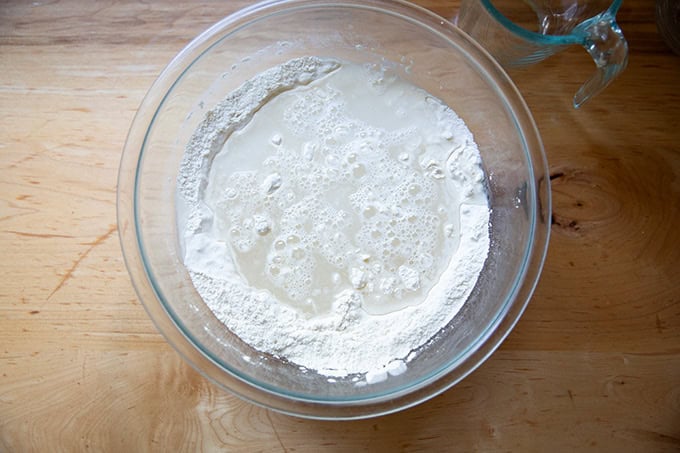
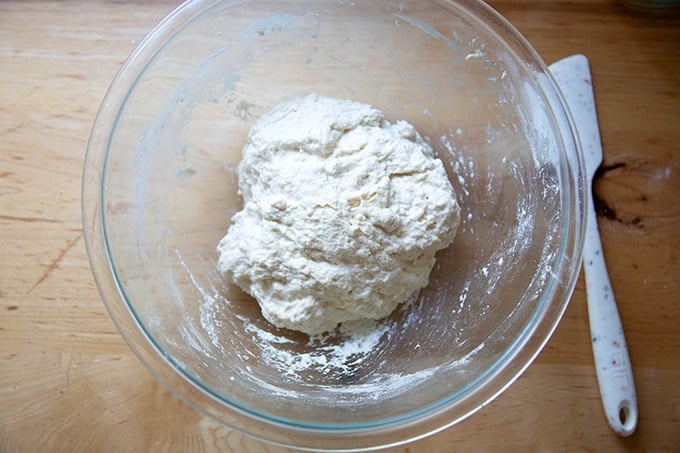
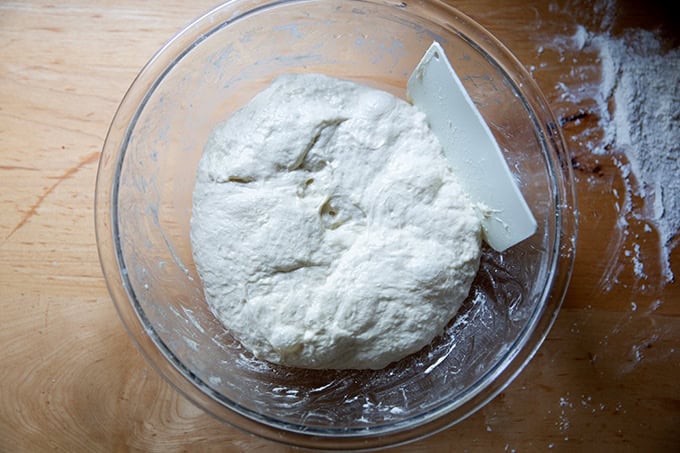
And stir with a spatula until you have a sticky dough ball:
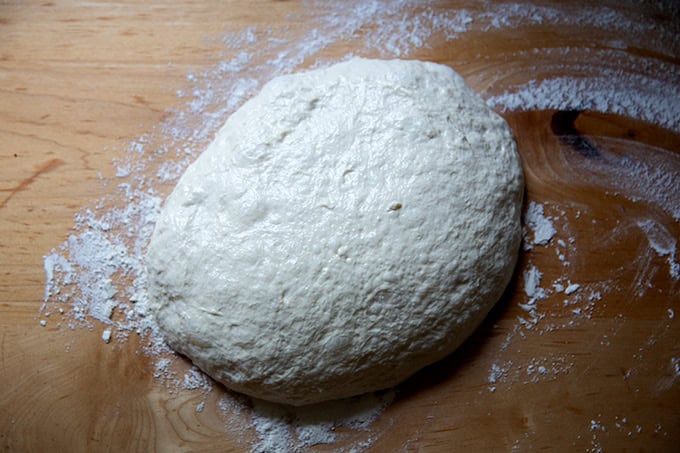
Cover the bowl and let rest for 30 minutes, then stretch and fold it. Video guidance:
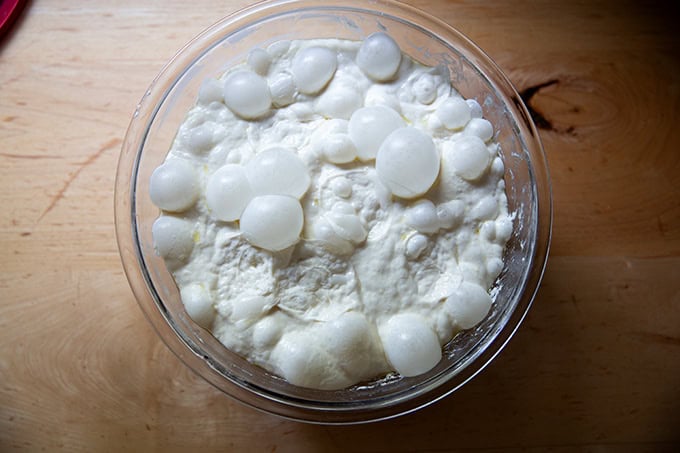
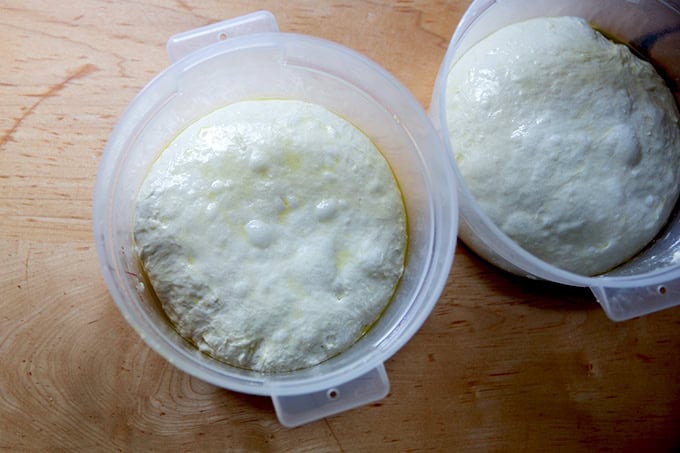
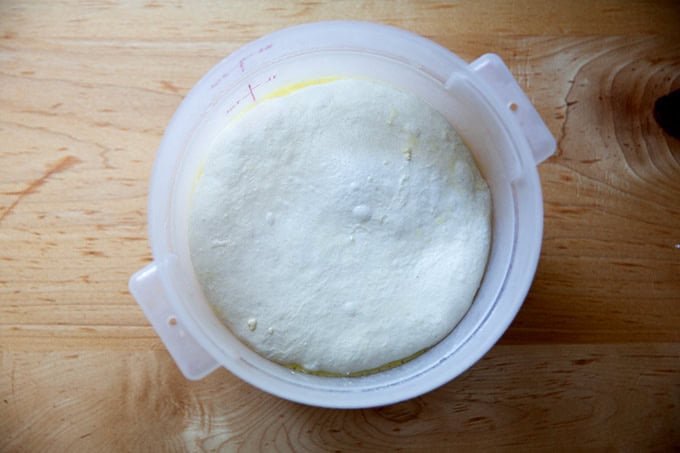
Slick the dough with oil, cover the bowl, then stick in the fridge for at least 12 hours or as long as 3 days.
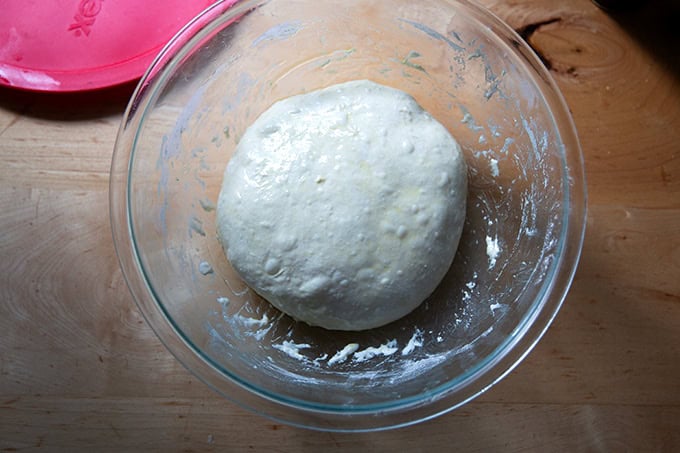
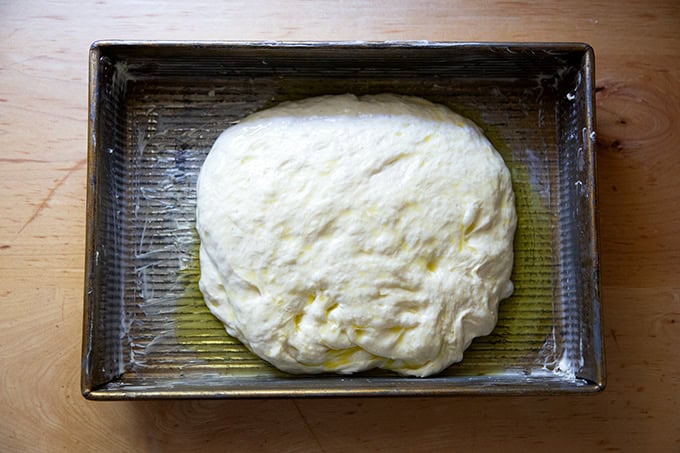
Remove from the fridge and take a moment to marvel at its beauty:
Then deflate it with a flexible bench scraper.
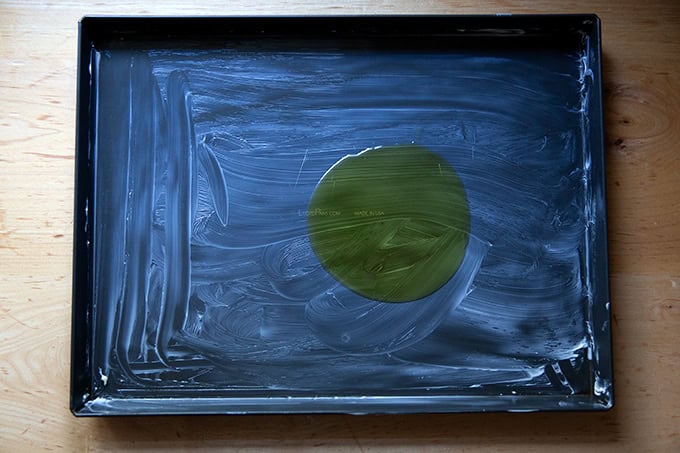
Prepare your pan:

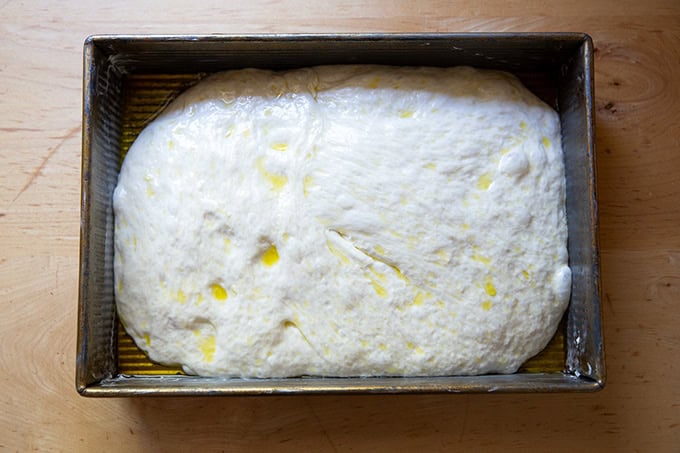
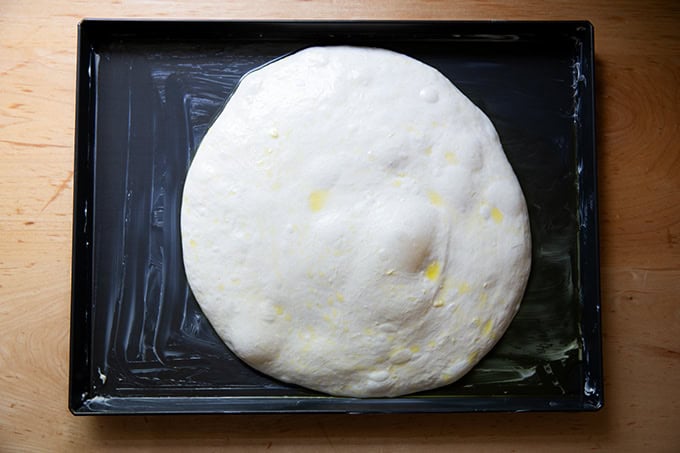
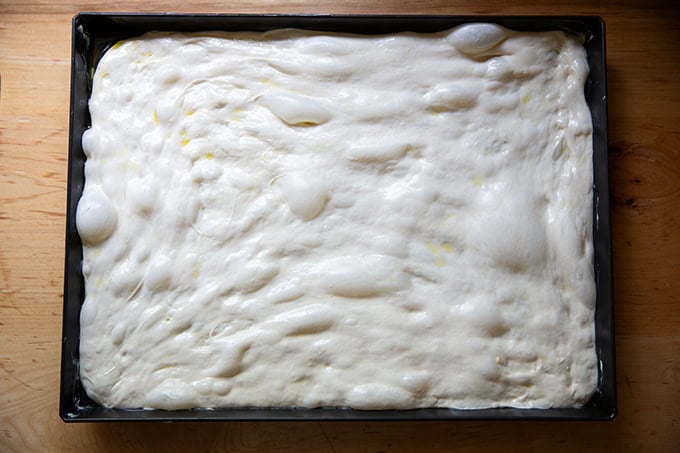
Turn the dough into the pan, and turn it in the oil to coat.
Don’t touch it for 1.5 hours:
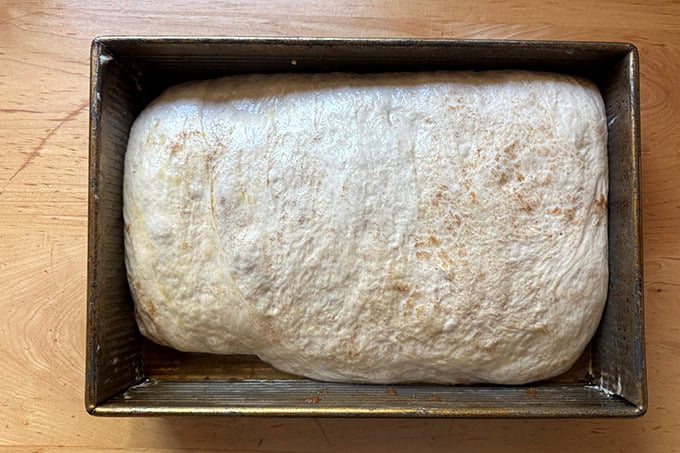
Then stretch it to fit the pan:
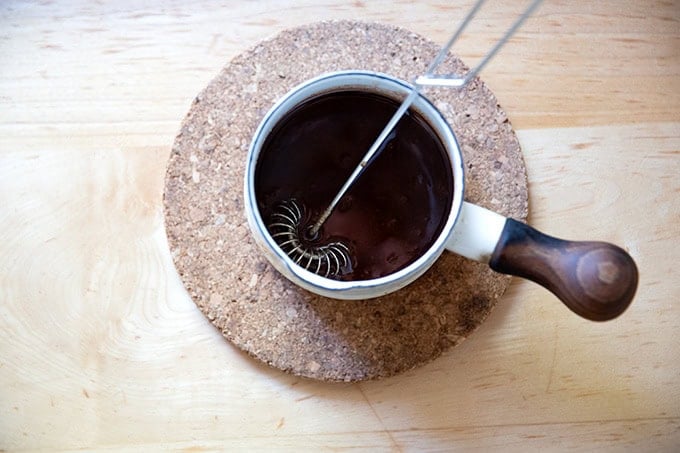
In a small saucepan over low heat, combine some butter, brown sugar, and cinnamon:
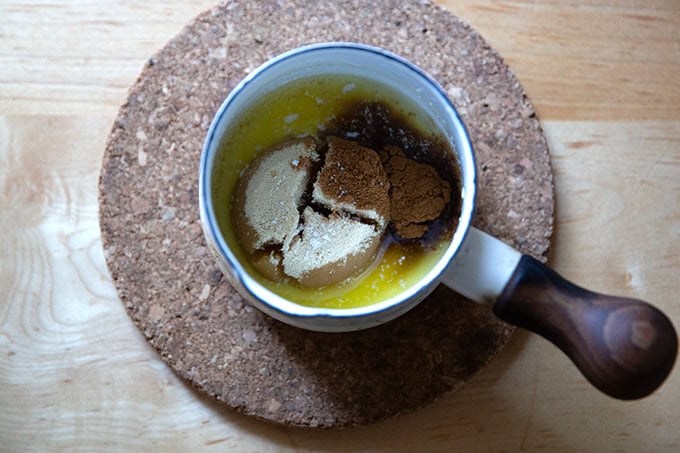
Whisk until smooth…
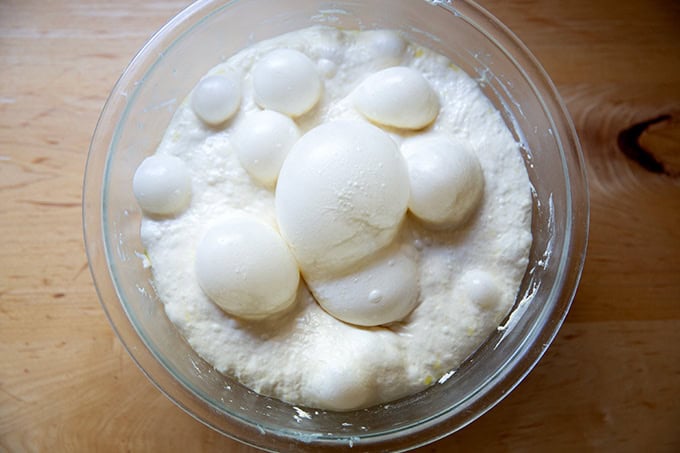
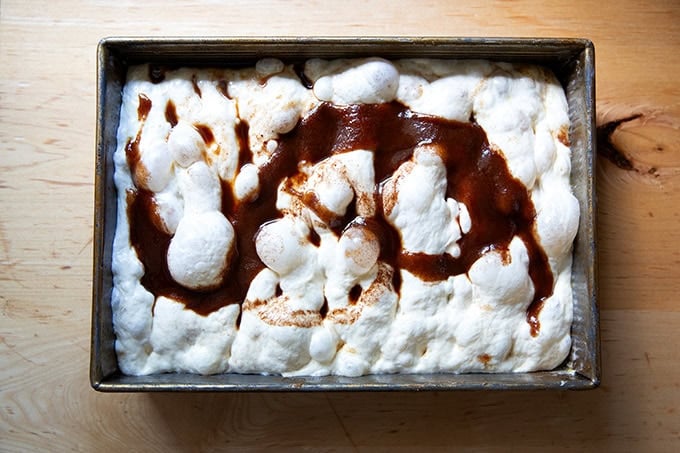
… then pour over the dough, distributing it as evenly as possible:
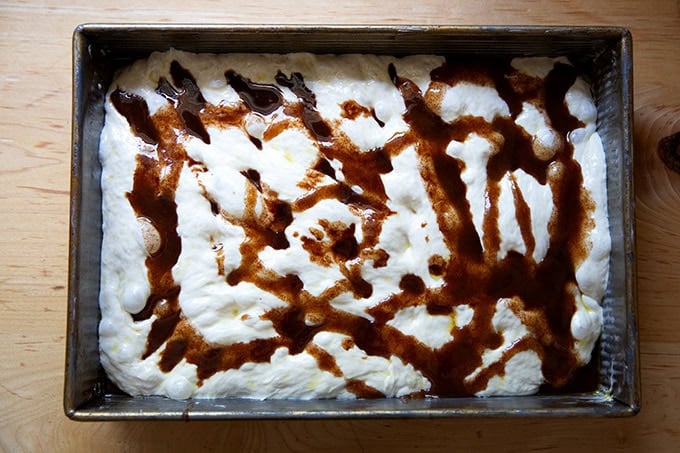
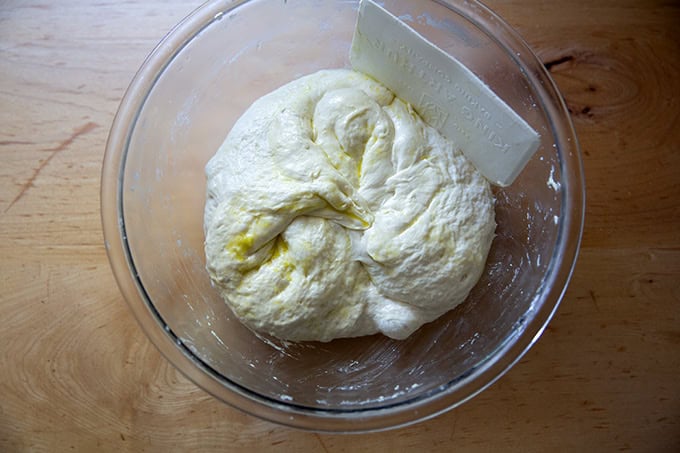
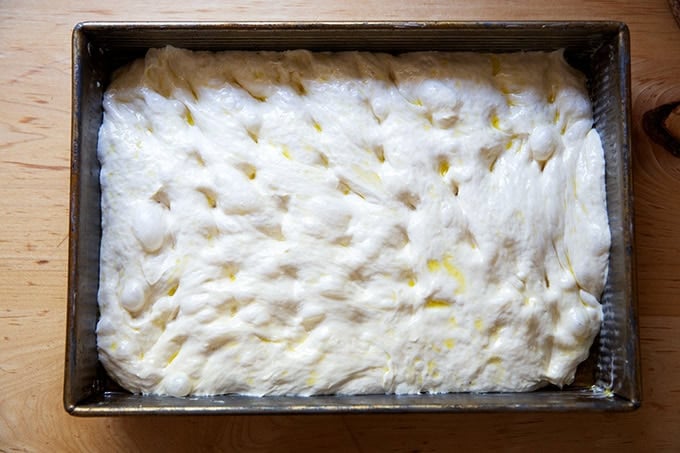
Spread the cinnamon-sugar mixture over the dough, then fold the dough envelope-style, and turn it so that the open ends of the envelope face the short ends of the pan:
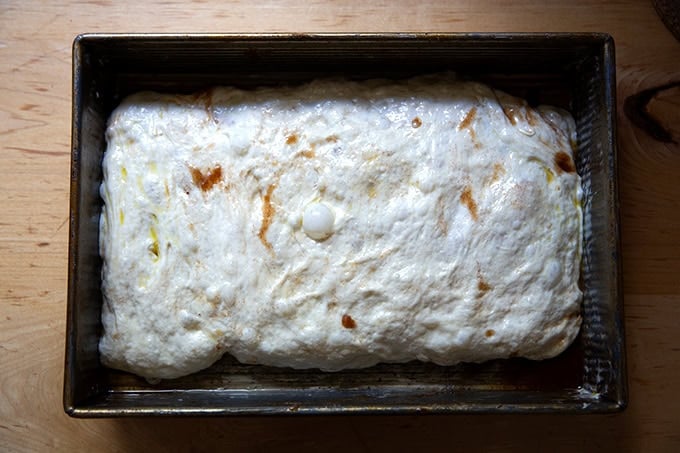
Cover the pan, and let it rest for another 1.5 hours or return to the fridge for another 24 hours (see notes below):
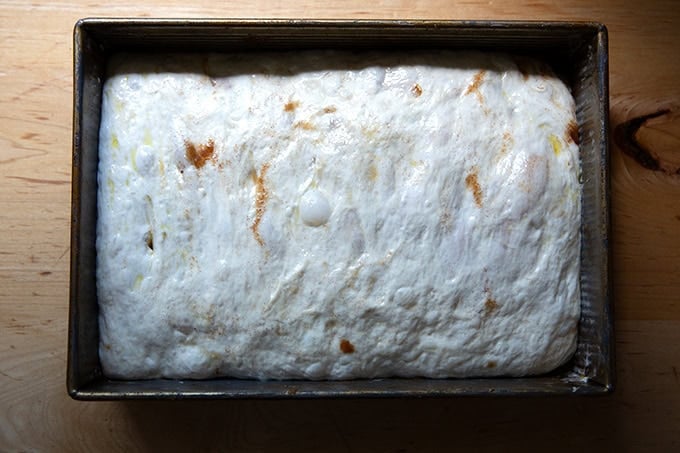
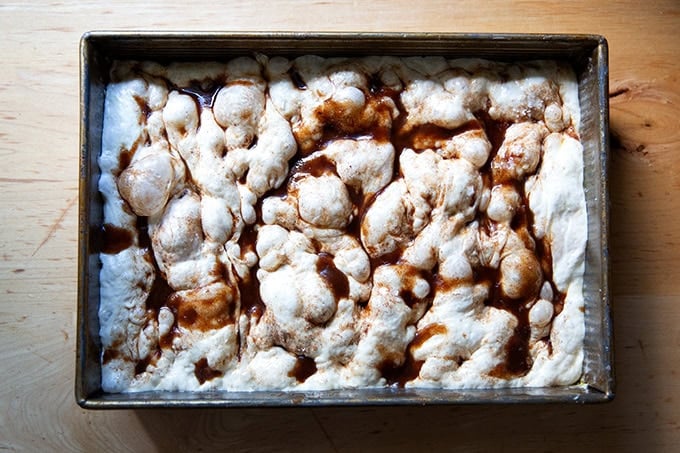
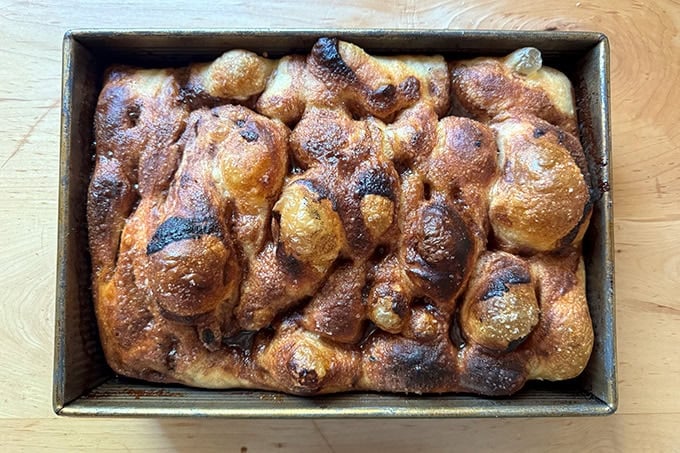
Then mix another batch of the cinnamon sugar butter mixture over the dough and dimple, distributing the mixture as your dimple:
Sprinkle with sea salt, then transfer to the oven…
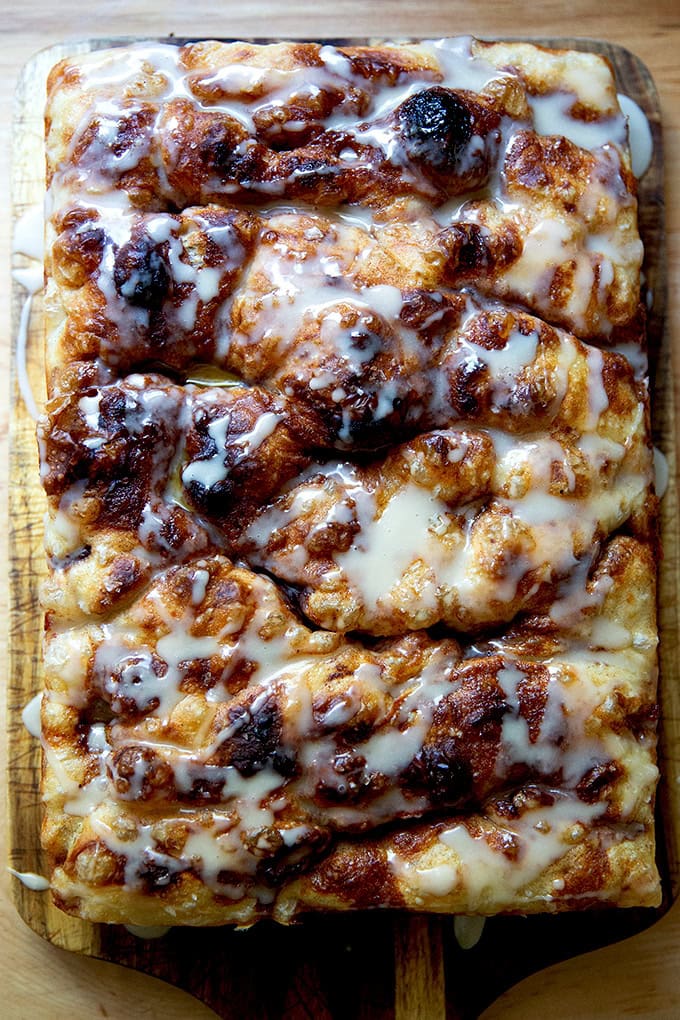
… and bake until evenly golden:
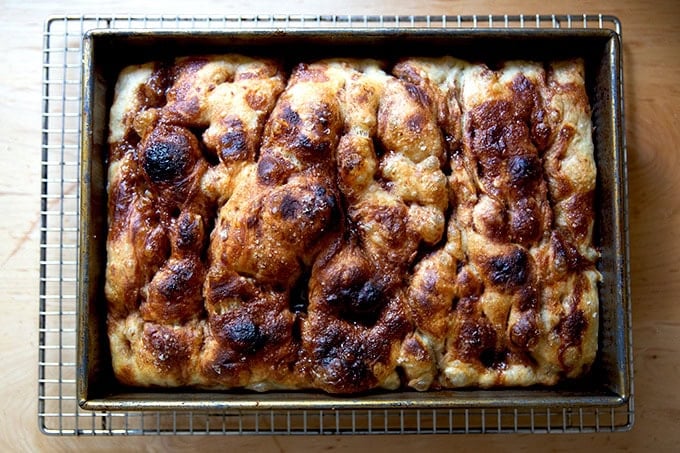
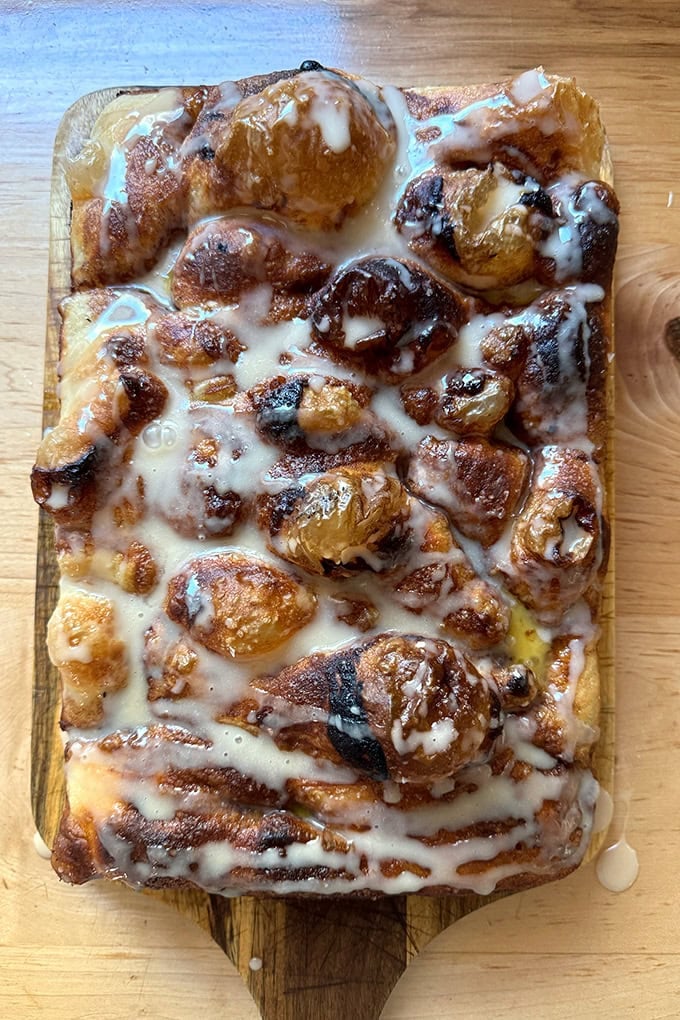
Transfer the focaccia to a cooling rack:
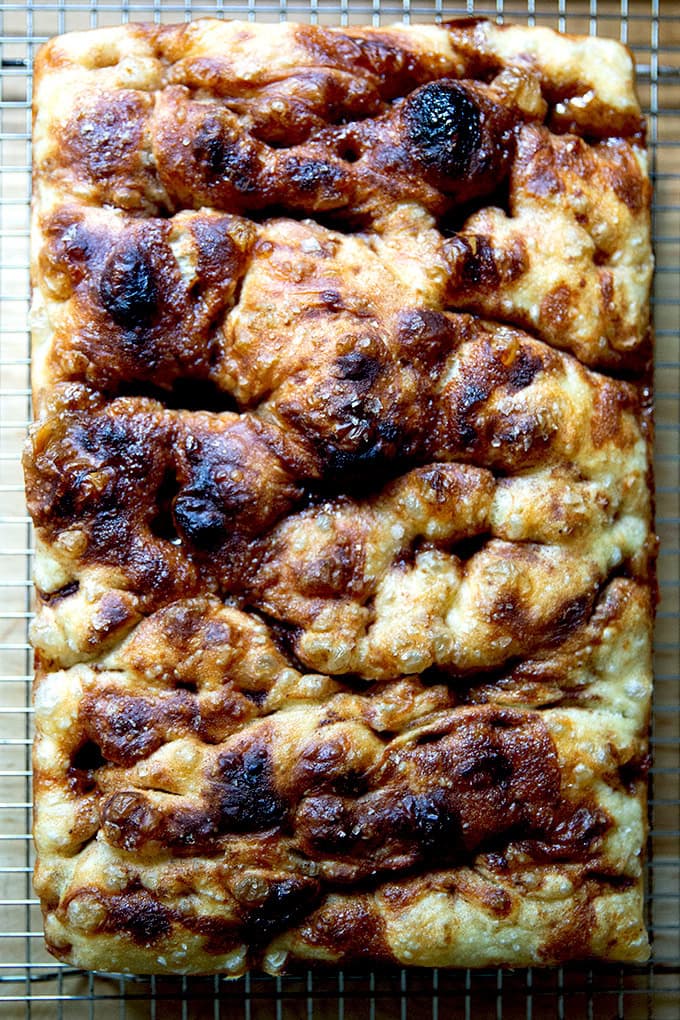
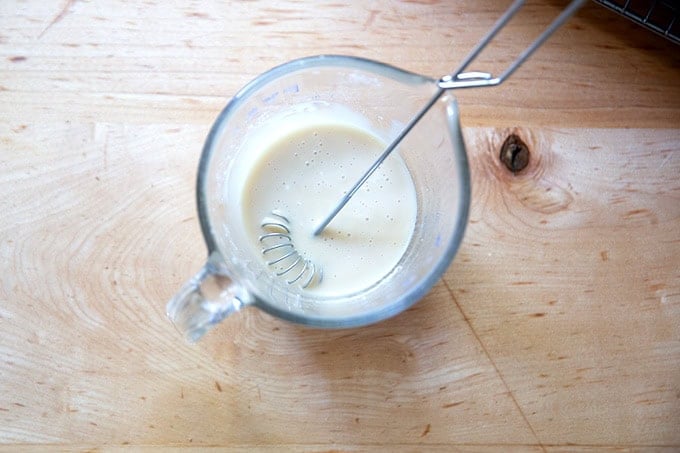
Let cool briefly, while you mix up a simple glaze:
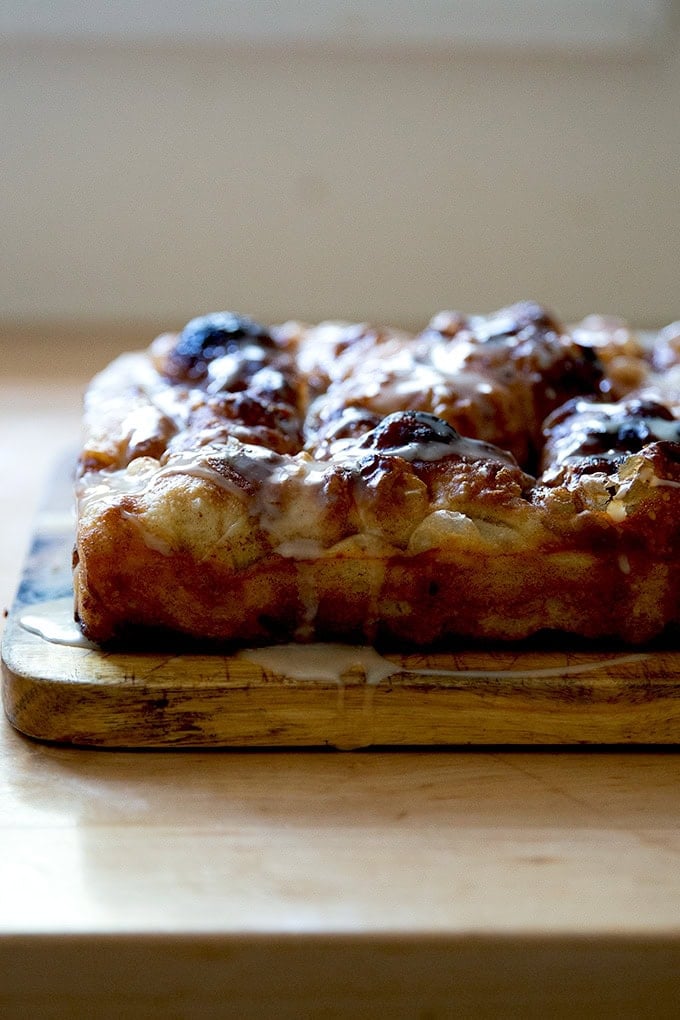
Then transfer the focaccia to a serving board, and drizzle the glaze over the top:
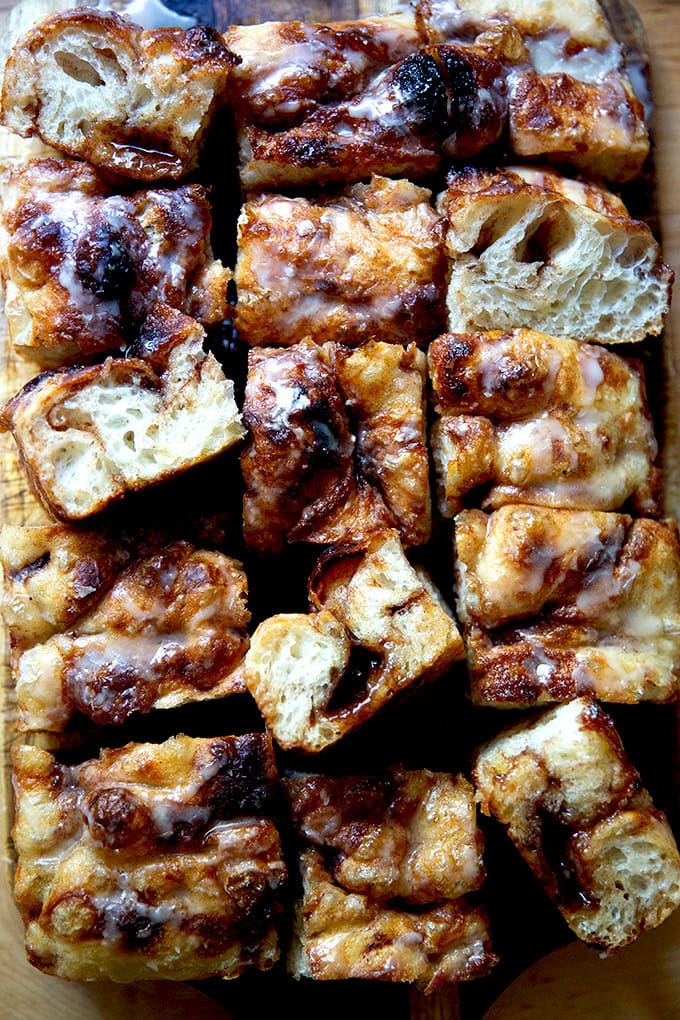
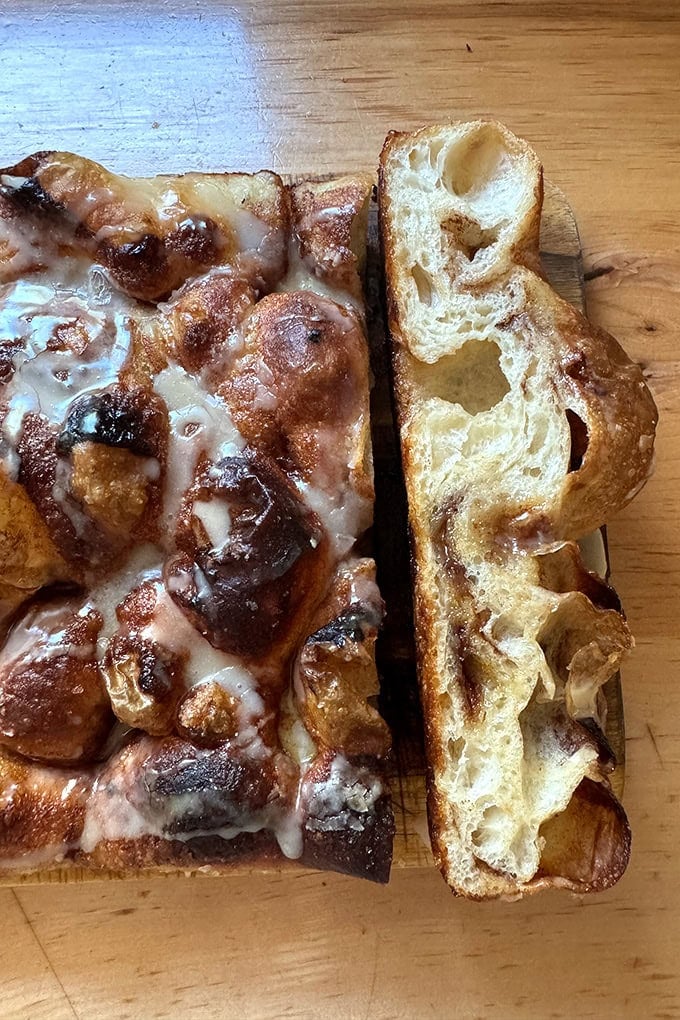
Cut into squares and serve:
Make It Ahead
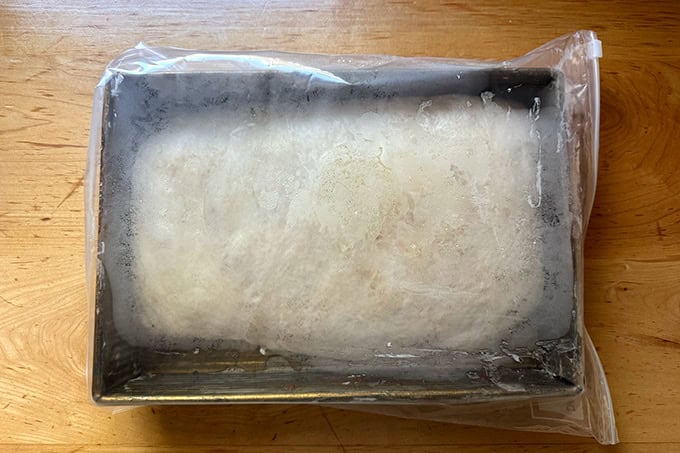
If you want to reduce the amount of work on the morning you want to serve this, you can make the recipe through step 8, but after you cover the pan, you’ll return it to the fridge. You can use plastic wrap or a zip-top bag. I love these 2-gallon bags for this purpose:
Remove it one hour before you plan on baking it and let it rise at room temperature (covered):
Then proceed with the recipe, dimpling and spreading over the final layer of the brown sugar-cinnamon-butter mixture. Note: as you dimple, you will feel the cold inside layer of the initial brown sugar-cinnamon-butter mixture — it will feel slightly solidified… don’t worry, it will be fine.

Bake as directed:
Glaze as directed:
Cut and enjoy the deliciousness:
Description
When focaccia meets cinnamon roll, good things happen. In this union, focaccia dough gets folded and dimpled with a cinnamon-brown sugar-butter mixture and baked until bubbly and golden all around. Cinnamon rolls without all the fuss? Yes. You. Can 🎉
In sum, this is this overnight focaccia recipe folded with a cinnamon-sugar-butter layer inspired by @_lacebakes
Notes:
- As always, for best results, use a digital scale to measure the flour and water.
- Flour: If you live in a humid environment, I would suggest using bread flour. If you are in Canada or the UK, also consider using bread flour or consider holding back some of the water — reference the video for how the texture of the bread should look; then add water as needed.
- Salt: The rule of thumb with bread dough is that the weight of the salt should be 2 to 3% the weight of the flour. For this recipe, that is 10 to 15 grams. If you are sensitive to salt, use 1o grams. If you are not, use 12 to 15 grams salt. I use Diamond Crystal kosher salt.
- Yeast: I love SAF instant yeast . I buy it in bulk, transfer it to a quart storage container , and store it in my fridge for months. You can store it in the freezer also. If you are using active-dry yeast , simply sprinkle the yeast over the lukewarm water and let it stand for 15 minutes or until it gets foamy; then proceed with the recipe.
- The Pan: I love this 9×13-inch USA pan for focaccia.
- Adapting the recipe for sourdough: Make this sourdough focaccia through step 5, then proceed with the recipe here, picking up at step 5, letting the dough proof for 1.5 hours in the pan before proceeding with the recipe.
Timing:
- Plan ahead: Ideally, the mixed dough spends a day or two in the fridge — this creates an especially bubbly-textured focaccia. Once the dough is removed from the fridge, you can take one of two paths: Make the recipe through step 8, but return the pan to the fridge for another day. Here’s a rough schedule of what that would look like: Wednesday or Thursday: Mix dough, stick it in the fridge. Friday: When you have time, remove the dough, let it proof for 1.5 hours in the pan, layer it and shape as directed, then return it to the fridge (covered). Saturday: Remove the pan from the fridge 1 hour before you want to bake it. Let the dough rest for 1.5 hours, then proceed with the recipe. With this method, you’ll be baking the focaccia roughly 4 hours after you remove the dough from the fridge. So, if you wanted to serve this for a 10 or 11 am brunch, you would want to remove the dough from the fridge around 6 or 7 am.
- If you are short on time and want to make this start to finish in one day: Use lukewarm water and let the mixed dough rise at room temperature until doubled, about 1.5 to 2 hours. Then proceed with the recipe as written.
For the dough:
- 4 cups (512 g) bread or all-purpose flour, see notes above
- 2 to 3 teaspoons (10 to 15 grams) kosher salt, see notes above
- 2 teaspoons (8 g) instant yeast , see notes above if using active dry
- 2 cups (455 g) cold or room temperature water
- olive oil
- Softened butter, for the pan
For the cinnamon-sugar mixture:
- ½ cup (113 grams) butter, salted or unsalted butter, divided
- ½ cup (100 grams) brown sugar, divided
- 4 teaspoons cinnamon, divided
- flaky sea salt, such as Maldon
For the glaze:
- 1 cup (113 grams) confectioners’ sugar
- 2 tablespoons (28 grams) milk or heavy cream
- 1 teaspoon vanilla extract
- Make the dough: In a large bowl, whisk together the flour, salt, and instant yeast. Add the water. Using a rubber spatula, mix until the liquid is absorbed and the ingredients form a sticky dough ball. Cover the bowl and let it rest for 30 minutes.
- Stretch and fold the dough: Fill a small bowl with water. Using a wet hand, stretch and fold the dough by grabbing an edge and pulling it up and towards the center. Repeat this stretching and folding process, 8 to 10 times, moving your hand around the edge of the dough with every set of stretches and folds. As you stretch and fold, you should feel the dough transform from being sticky and shaggy to smooth and cohesive. Find video guidance in the post above as well as here .
- Let it rise: Rub the surface of the dough lightly with olive oil. Cover the bowl with a lid or plastic wrap and place in the refrigerator immediately for at least 12 hours or for as long as three days. (See notes above if you need to skip the overnight rise for time purposes.)
- Prepare the pan: Grease a 9×13-inch pan with softened butter. (Note: This greasing step may seem excessive, but with some pans, it is imperative to do so to prevent sticking. With my USA pans, I can get away with olive oil alone; with my glass baking dishes, butter is a must.) Pour 2 tablespoons of oil into the pan.
- Deflate the dough: Using a flexible bench scraper or a lightly oiled hand, deflate the dough by releasing it from the sides of the bowl and pulling it toward the center. Rotate the bowl in quarter turns as you deflate, turning the mass into a rough ball. Turn the dough out into the olive oil in the prepared pan. Turn the dough several times in the oil to ensure it is completely coated. Let the dough rest for 1.5 hours. Cover the pan. (I use a cutting board or sheet pan.)
- Prepare the filling: In a small skillet, melt 4 tablespoons of the butter. Whisk in 4 tablespoons of the brown sugar, 2 teaspoons of the cinnamon, and a pinch of flaky sea salt. Remove from the heat and let cool briefly.
- Stretch the dough : Using lightly oiled hands, gently dimple the dough, stretching it to fit the pan. Pour the brown sugar filling as evenly over the top of the dough as possible, and use your hands to distribute it over the surface. Reserve the skillet.
- Fold the dough: Starting with a short end, fold the dough envelope style: if, for example, you are starting with the right edge, fold it to the left covering two-thirds of the dough, then fold the left edge over to the right to cover (and vice versa if starting with the left edge). Then turn the bundle of dough so that the open ends face the short ends of the pan. Video guidance here . Cover the pan and let the dough rest for another 1.5 hours. ( Note: At this point, you can tuck the entire pan into a 2-gallon ziptop bag or cover with plastic wrap and return it to the fridge for another day. Remove it one hour before you plan on baking it, the proceed with the recipe.)
- Preheat the oven to 425ºF.
- Prepare the remaining filling: In the same small skillet, melt the remaining 4 tablespoons of butter. Whisk in the remaining 4 tablespoons of brown sugar, remaining 2 teaspoons of cinnamon, and a pinch of flaky sea salt. Remove from the heat and let cool briefly.
- Dimple the dough: Uncover the pan, pour the filling over the surface of the dough, and rub with your hands to distribute it evenly. Using lightly oiled hands, gently dimple the dough, creating bubbles and craters as you do. Sprinkle lightly with sea salt.
- Bake the dough: Transfer the pan to the oven and bake for 25 minutes or until the focaccia is evenly browned. Remove the pan from the oven, let the focaccia cool in the pan briefly (2 to 3 minutes), then run a spatula around the edges of the pan, and transfer the focaccia to a cooling rack to cool for 5 minutes.
- Make the glaze: In a small bowl or liquid measure, whisk together the confectioners’ sugar, milk, and vanilla.
- Finish the focaccia: Transfer the focaccia to a serving board. Drizzle the glaze over the top. Using a serrated knife, cut the focaccia into pieces (or more) and serve.
- Prep Time: 30 minutes
- Cook Time: 25 minutes
- Category: Bread
- Method: Oven
- Cuisine: American
When focaccia meets cinnamon roll, good things happen. In this union, focaccia dough gets folded and dimpled with a cinnamon-brown sugar-butter mixture and baked until bubbly and golden all around. Cinnamon rolls without all the fuss? Yes. You. Can 🎉
Assembling cinnamon rolls always feels like a process, from making the dough and rolling it out, to spreading on the filling and coiling it up, to slicing, baking, and making the glaze.
Cinnamon roll focaccia feels effortless in comparison. As you know, focaccia dough , made with 4 ingredients, takes no time to stir together, and it can hang out in your fridge for days.
Moreover, with cinnamon roll focaccia, there’s no rolling and coiling — you’ll fold and dimple the dough, but all of this takes place in the confines of the 9×13-inch pan you’ll bake the focaccia in. You won’t flour a work surface or your hands, you won’t coil or cut. Overall, it’s very simple.
This would be the perfect thing to make for a fall or winter brunch, when you need something sweet to feed a crowd but maybe don’t have the energy for a more elaborate ensemble. Find step-by-step instructions below.
Cinnamon-Sugar Focaccia, Step by Step
First, gather your ingredients:
Whisk together the flour, salt, and instant yeast, then…
…add the water:
And stir with a spatula until you have a sticky dough ball:
Cover the bowl and let rest for 30 minutes, then stretch and fold it. Video guidance:
Slick the dough with oil, cover the bowl, then stick in the fridge for at least 12 hours or as long as 3 days.
Remove from the fridge and take a moment to marvel at its beauty:
Then deflate it with a flexible bench scraper.
Prepare your pan:
Turn the dough into the pan, and turn it in the oil to coat.
Don’t touch it for 1.5 hours:
Then stretch it to fit the pan:
In a small saucepan over low heat, combine some butter, brown sugar, and cinnamon:
Whisk until smooth…
… then pour over the dough, distributing it as evenly as possible:
Spread the cinnamon-sugar mixture over the dough, then fold the dough envelope-style, and turn it so that the open ends of the envelope face the short ends of the pan:
Cover the pan, and let it rest for another 1.5 hours or return to the fridge for another 24 hours (see notes below):
Then mix another batch of the cinnamon sugar butter mixture over the dough and dimple, distributing the mixture as your dimple:
Sprinkle with sea salt, then transfer to the oven…
… and bake until evenly golden:
Transfer the focaccia to a cooling rack:
Let cool briefly, while you mix up a simple glaze:
Then transfer the focaccia to a serving board, and drizzle the glaze over the top:
Cut into squares and serve:
Make It Ahead
If you want to reduce the amount of work on the morning you want to serve this, you can make the recipe through step 8, but after you cover the pan, you’ll return it to the fridge. You can use plastic wrap or a zip-top bag. I love these 2-gallon bags for this purpose:
Remove it one hour before you plan on baking it and let it rise at room temperature (covered):
Then proceed with the recipe, dimpling and spreading over the final layer of the brown sugar-cinnamon-butter mixture. Note: as you dimple, you will feel the cold inside layer of the initial brown sugar-cinnamon-butter mixture — it will feel slightly solidified… don’t worry, it will be fine.
Bake as directed:
Glaze as directed:
Cut and enjoy the deliciousness:
Description
When focaccia meets cinnamon roll, good things happen. In this union, focaccia dough gets folded and dimpled with a cinnamon-brown sugar-butter mixture and baked until bubbly and golden all around. Cinnamon rolls without all the fuss? Yes. You. Can 🎉
In sum, this is this overnight focaccia recipe folded with a cinnamon-sugar-butter layer inspired by @_lacebakes
Notes:
- As always, for best results, use a digital scale to measure the flour and water.
- Flour: If you live in a humid environment, I would suggest using bread flour. If you are in Canada or the UK, also consider using bread flour or consider holding back some of the water — reference the video for how the texture of the bread should look; then add water as needed.
- Salt: The rule of thumb with bread dough is that the weight of the salt should be 2 to 3% the weight of the flour. For this recipe, that is 10 to 15 grams. If you are sensitive to salt, use 1o grams. If you are not, use 12 to 15 grams salt. I use Diamond Crystal kosher salt.
- Yeast: I love SAF instant yeast . I buy it in bulk, transfer it to a quart storage container , and store it in my fridge for months. You can store it in the freezer also. If you are using active-dry yeast , simply sprinkle the yeast over the lukewarm water and let it stand for 15 minutes or until it gets foamy; then proceed with the recipe.
- The Pan: I love this 9×13-inch USA pan for focaccia.
- Adapting the recipe for sourdough: Make this sourdough focaccia through step 5, then proceed with the recipe here, picking up at step 5, letting the dough proof for 1.5 hours in the pan before proceeding with the recipe.
Timing:
- Plan ahead: Ideally, the mixed dough spends a day or two in the fridge — this creates an especially bubbly-textured focaccia. Once the dough is removed from the fridge, you can take one of two paths: Make the recipe through step 8, but return the pan to the fridge for another day. Here’s a rough schedule of what that would look like: Wednesday or Thursday: Mix dough, stick it in the fridge. Friday: When you have time, remove the dough, let it proof for 1.5 hours in the pan, layer it and shape as directed, then return it to the fridge (covered). Saturday: Remove the pan from the fridge 1 hour before you want to bake it. Let the dough rest for 1.5 hours, then proceed with the recipe. With this method, you’ll be baking the focaccia roughly 4 hours after you remove the dough from the fridge. So, if you wanted to serve this for a 10 or 11 am brunch, you would want to remove the dough from the fridge around 6 or 7 am.
- If you are short on time and want to make this start to finish in one day: Use lukewarm water and let the mixed dough rise at room temperature until doubled, about 1.5 to 2 hours. Then proceed with the recipe as written.
For the dough:
- 4 cups (512 g) bread or all-purpose flour, see notes above
- 2 to 3 teaspoons (10 to 15 grams) kosher salt, see notes above
- 2 teaspoons (8 g) instant yeast , see notes above if using active dry
- 2 cups (455 g) cold or room temperature water
- olive oil
- Softened butter, for the pan
For the cinnamon-sugar mixture:
- ½ cup (113 grams) butter, salted or unsalted butter, divided
- ½ cup (100 grams) brown sugar, divided
- 4 teaspoons cinnamon, divided
- flaky sea salt, such as Maldon
For the glaze:
- 1 cup (113 grams) confectioners’ sugar
- 2 tablespoons (28 grams) milk or heavy cream
- 1 teaspoon vanilla extract
- Make the dough: In a large bowl, whisk together the flour, salt, and instant yeast. Add the water. Using a rubber spatula, mix until the liquid is absorbed and the ingredients form a sticky dough ball. Cover the bowl and let it rest for 30 minutes.
- Stretch and fold the dough: Fill a small bowl with water. Using a wet hand, stretch and fold the dough by grabbing an edge and pulling it up and towards the center. Repeat this stretching and folding process, 8 to 10 times, moving your hand around the edge of the dough with every set of stretches and folds. As you stretch and fold, you should feel the dough transform from being sticky and shaggy to smooth and cohesive. Find video guidance in the post above as well as here .
- Let it rise: Rub the surface of the dough lightly with olive oil. Cover the bowl with a lid or plastic wrap and place in the refrigerator immediately for at least 12 hours or for as long as three days. (See notes above if you need to skip the overnight rise for time purposes.)
- Prepare the pan: Grease a 9×13-inch pan with softened butter. (Note: This greasing step may seem excessive, but with some pans, it is imperative to do so to prevent sticking. With my USA pans, I can get away with olive oil alone; with my glass baking dishes, butter is a must.) Pour 2 tablespoons of oil into the pan.
- Deflate the dough: Using a flexible bench scraper or a lightly oiled hand, deflate the dough by releasing it from the sides of the bowl and pulling it toward the center. Rotate the bowl in quarter turns as you deflate, turning the mass into a rough ball. Turn the dough out into the olive oil in the prepared pan. Turn the dough several times in the oil to ensure it is completely coated. Let the dough rest for 1.5 hours. Cover the pan. (I use a cutting board or sheet pan.)
- Prepare the filling: In a small skillet, melt 4 tablespoons of the butter. Whisk in 4 tablespoons of the brown sugar, 2 teaspoons of the cinnamon, and a pinch of flaky sea salt. Remove from the heat and let cool briefly.
- Stretch the dough : Using lightly oiled hands, gently dimple the dough, stretching it to fit the pan. Pour the brown sugar filling as evenly over the top of the dough as possible, and use your hands to distribute it over the surface. Reserve the skillet.
- Fold the dough: Starting with a short end, fold the dough envelope style: if, for example, you are starting with the right edge, fold it to the left covering two-thirds of the dough, then fold the left edge over to the right to cover (and vice versa if starting with the left edge). Then turn the bundle of dough so that the open ends face the short ends of the pan. Video guidance here . Cover the pan and let the dough rest for another 1.5 hours. ( Note: At this point, you can tuck the entire pan into a 2-gallon ziptop bag or cover with plastic wrap and return it to the fridge for another day. Remove it one hour before you plan on baking it, the proceed with the recipe.)
- Preheat the oven to 425ºF.
- Prepare the remaining filling: In the same small skillet, melt the remaining 4 tablespoons of butter. Whisk in the remaining 4 tablespoons of brown sugar, remaining 2 teaspoons of cinnamon, and a pinch of flaky sea salt. Remove from the heat and let cool briefly.
- Dimple the dough: Uncover the pan, pour the filling over the surface of the dough, and rub with your hands to distribute it evenly. Using lightly oiled hands, gently dimple the dough, creating bubbles and craters as you do. Sprinkle lightly with sea salt.
- Bake the dough: Transfer the pan to the oven and bake for 25 minutes or until the focaccia is evenly browned. Remove the pan from the oven, let the focaccia cool in the pan briefly (2 to 3 minutes), then run a spatula around the edges of the pan, and transfer the focaccia to a cooling rack to cool for 5 minutes.
- Make the glaze: In a small bowl or liquid measure, whisk together the confectioners’ sugar, milk, and vanilla.
- Finish the focaccia: Transfer the focaccia to a serving board. Drizzle the glaze over the top. Using a serrated knife, cut the focaccia into pieces (or more) and serve.
- Prep Time: 30 minutes
- Cook Time: 25 minutes
- Category: Bread
- Method: Oven
- Cuisine: American
Find it online : https://alexandracooks.com/2025/09/13/cinnamon-sugar-focaccia-no-knead-no-fuss/
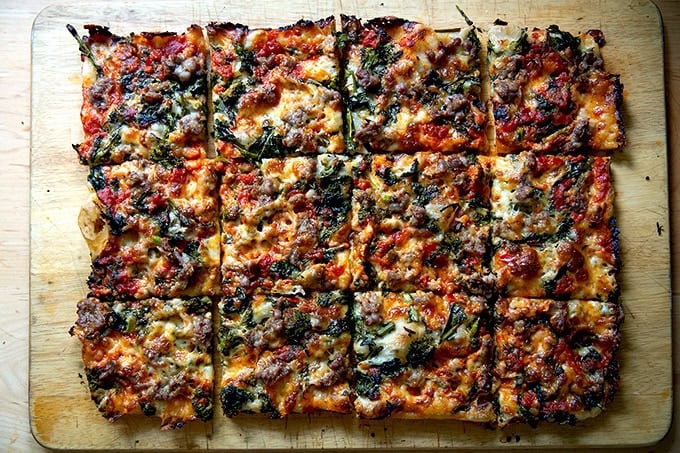
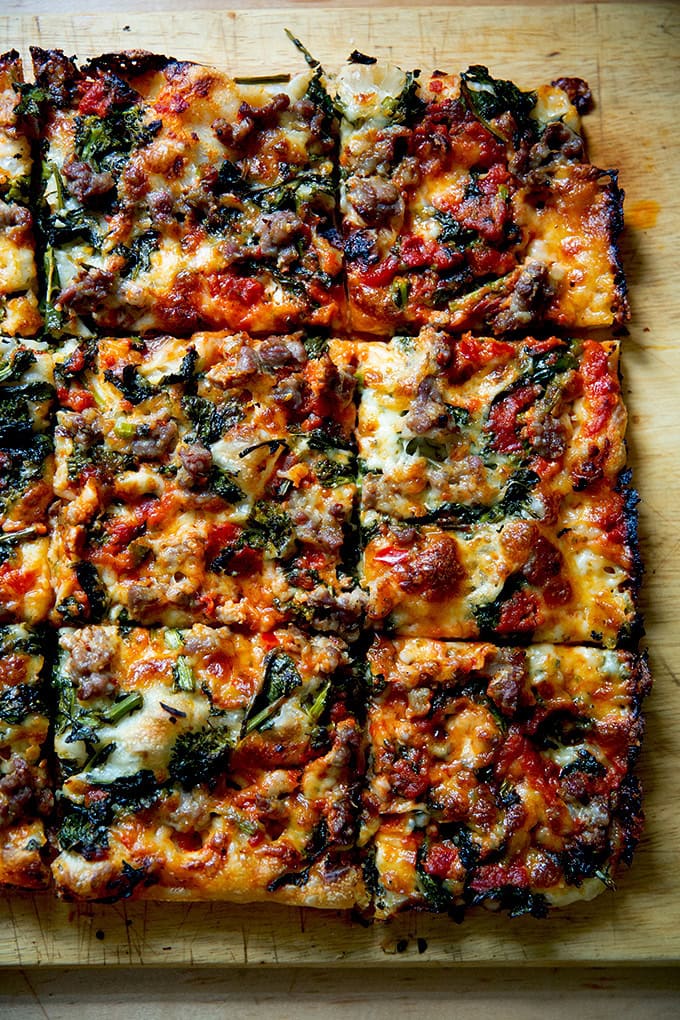
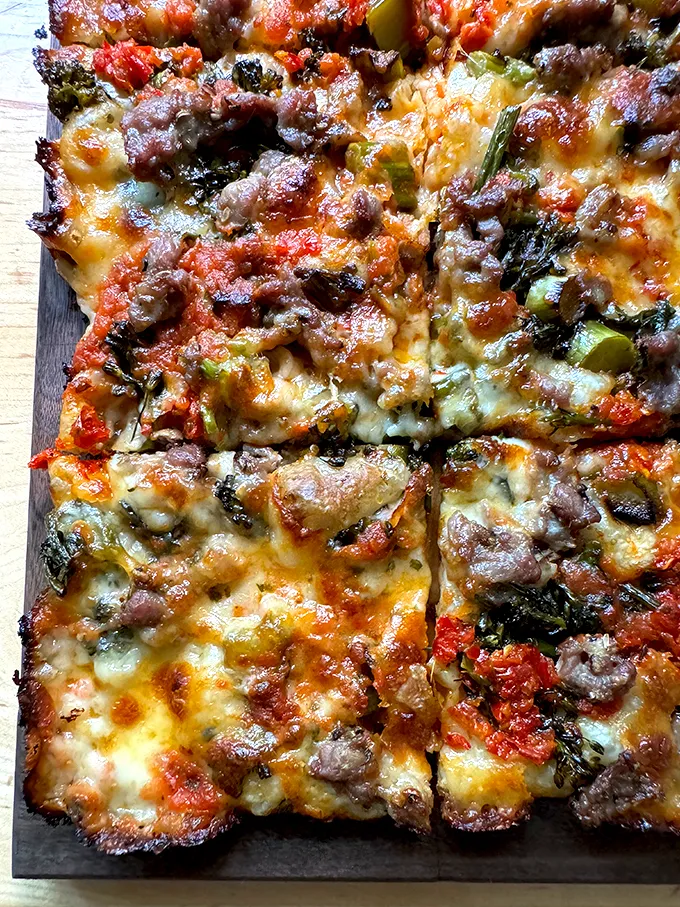
Grandma-style pizza is pan pizza with a light crust and crisp edges. The dough is nearly identical to focaccia and, as such, is just as easy to make. No mixer required. No fancy techniques. This style of pizza is perfect for feeding a crowd! Find step-by-step instructions below.
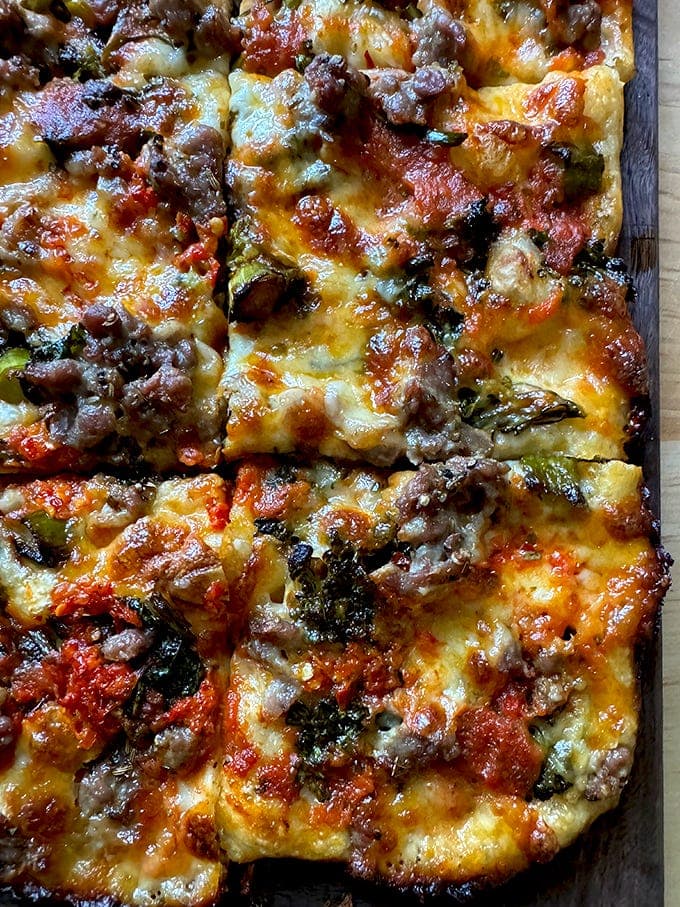
Grandma pizza is sheet pan pizza, similar to Sicilian-style pizza but thinner: you use the same size pan but half the amount of dough. Unlike Sicilian-style pizza, with grandma pizza, there’s no parbake, which makes the process simpler.
I love the various styles of pan pizzas for different reasons — Detroit-style for its irresistible frico crust, Sicilian for it’s pillowy airiness — but for me, grandma is the best: it’s the thinnest of the three styles, and I love the ratio of toppings to crust as well as its texture: light and airy, like focaccia, but with crisp edges, too.
As with Sicilian and Detroit-style pizza, grandma pizza is great for feeding a crowd. What’s more, so much of the process can be done ahead of time, from making the dough to stretching and topping it. A Lloyd steel pan makes for an especially crispy crust, but a standard half sheet pan works well, too. Find a how-to video and step-by-step instructions below.
How to Make Grandma-Style Pizza, Step by Step
First, make the dough. You’ll need bread flour, instant yeast ( SAF is my preference ), salt, and water:
The process is the same as making focaccia: Combine the dry ingredients in a large bowl:
Whisk them together, then add the water:
Mix until you have a sticky dough ball.
Let the dough rest for 30 minutes, then stretch and fold the dough. Video guidance is above (and in the recipe card.) After the stretches and folds, your dough will be a more cohesive ball. Slick it with olive oil, cover the bowl, and let it rest at room temperature for 6 to 10 hours.
Uncover the bowl…
… deflate it …
… and turn it out onto a floured work surface.
Divide the dough into two equal portions. Each portion should weigh roughly 525 grams.

Ball up each portion. The dough will be very wet and sticky, so use flour as needed.

Transfer each portion to a lightly oiled vessel. I love this 2-quart vessel . (I have 4 of these! So handy for so many things.) Drizzle each ball lightly with oil and turn to coat. Cover the vessels and place them in the fridge for 1 to 3 days (or for as long as 5). See recipe box if you need to shorten this timeline.
On baking day, remove one (or both if you are making two pizzas) of the vessels.
Prepare your pan. This is a Lloyd grandma-style pizza pan, and it makes an especially nice crust but you can use a standard sheet pan in its place. You want to butter the pan first — this provides flavor, promotes browning, and prevents sticking — before pouring in 1 tablespoon of olive oil.
Turn the dough out into the pool of oil and turn it to coat.

Let the dough rest at room temperature for 1 to 4 hours, depending on your timing needs.
Using lightly oiled hands, stretch the dough to fit the pan.
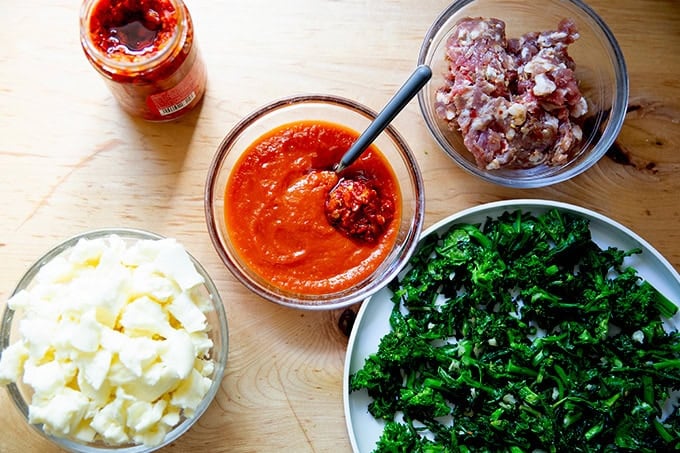
Meanwhile, gather your toppings. This is a favorite combination from Pizza Night : broccoli rabe, sausage, mozzarella, and spicy tomato sauce (sauce + Calabrian chili paste ).

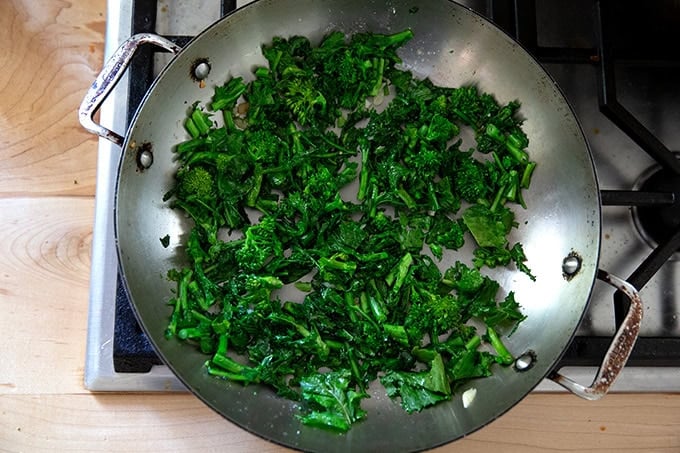
For this pizza, you’ll need to quickly sauté the broccoli rabe (or other green) with olive oil and garlic.
And you’ll need to stir 1 to 2 tablespoons of the Calabrian chili paste into the tomato sauce. Simply omit it if you don’t have it.
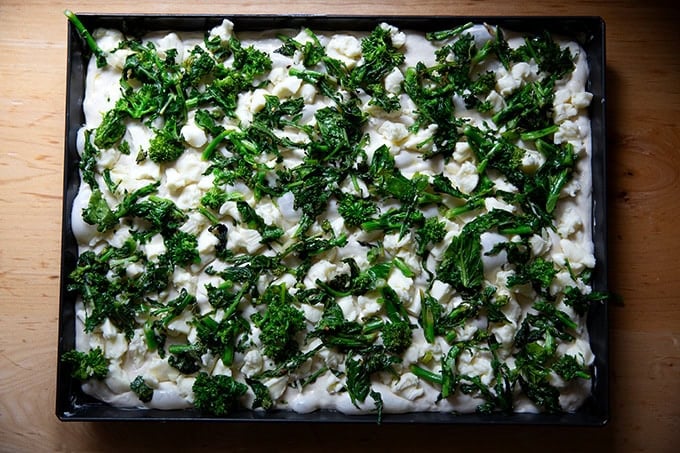
Top the pizza with the mozzarella first…
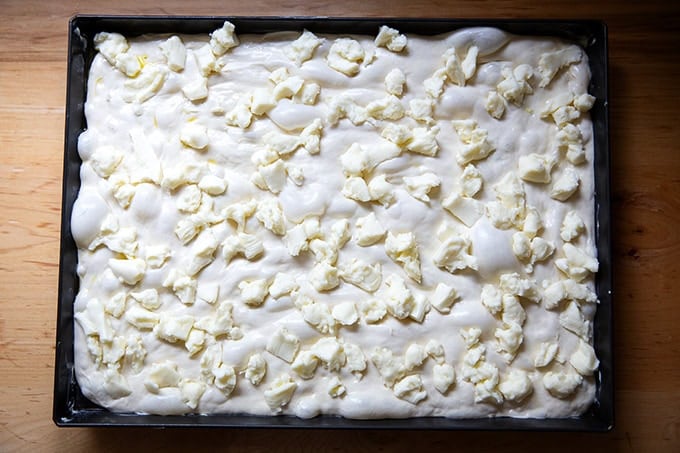
… followed by the broccoli rabe. I find placing the cheese and other toppings down before the sauce helps keep the crust crisper.
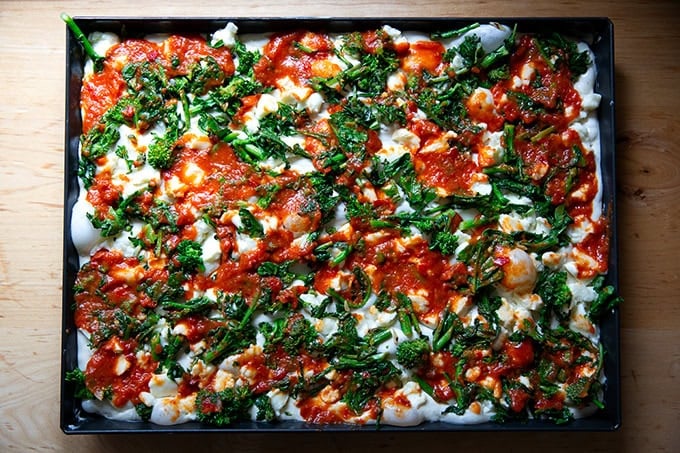
Drop spoonfuls of the sauce all around, then spread with the back of a spoon.
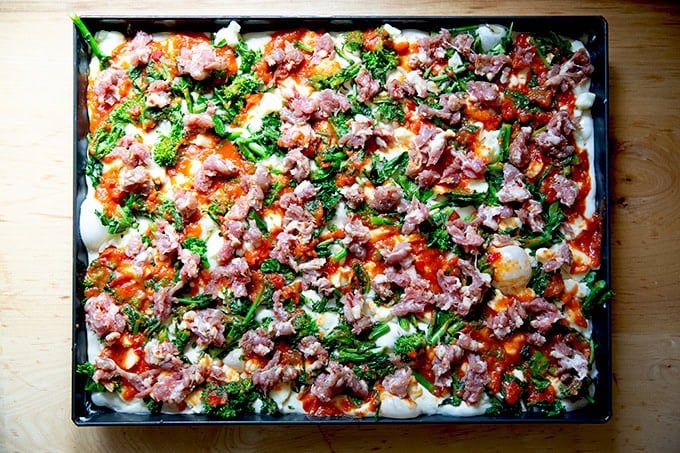
Top with the sausage, if using:
Bake @ 450ºF for 23-25 minutes on a preheated Baking Steel or pizza stone.
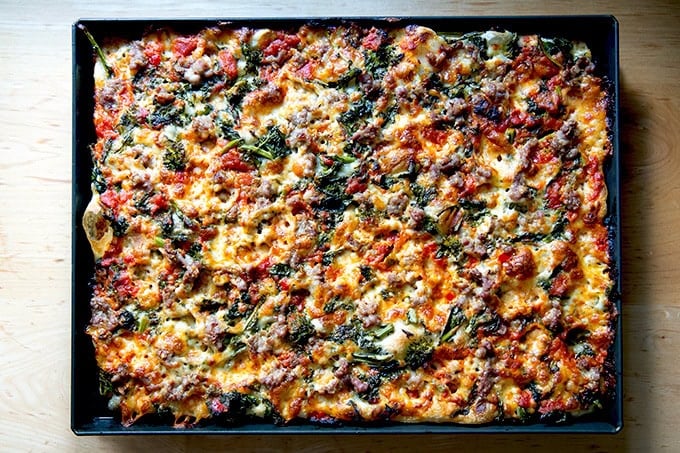
Transfer to a cutting board, and cut into squares:
Description
Grandma-style pizza is pan pizza, similar to Sicilian-style in that it’s baked on a sheet pan, but it’s thinner and crisper. It’s perfect for feeding a crowd!
Recipe from my cookbook, Pizza Night.
Notes:
- As always, for best results, use a digital scale to measure the flour and water.
- Flour/water: If you live in a humid environment, I would suggest using bread flour. If you are in Canada or the UK, also consider using bread flour or consider holding back some of the water — reference the video for how the texture of the bread should look; then add water as needed. In my recent experiments, I used King Arthur bread flour and Central Milling bread flour — the dough made with Central Milling flour was stiffer and easier to work with because it absorbed more water. This example is simply to show that it may take some trial and error to get the ratio of water to flour right. And do keep in mind: it is supposed to be a wet and sticky dough, and it takes practice handling these sorts of doughs.
- Salt: The rule of thumb with bread dough is that the weight of the salt should be 2 to 3% the weight of the flour. For this recipe, that is 10 to 15 grams. If you are sensitive to salt, use 1o grams. If you are not, use 12 to 15 grams salt. I use Diamond Crystal kosher salt.
- Yeast: I love SAF instant yeast . I buy it in bulk, transfer it to a quart storage container , and store it in my fridge for months. You can store it in the freezer also. If you are using active-dry yeast , simply sprinkle the yeast over the lukewarm water and let it stand for 15 minutes or until it gets foamy; then proceed with the recipe.
- Plan Ahead: The first rise takes 6-10 hours, and ideally, the balled-up dough should spend a day or two in the fridge. That said, if you want to shorten the timeline, you can skip the fridge rise and simply proceed with the recipe after the first rise, i.e. proofing the dough at room temperature in the pan. And if you need to shorten the first rise, use as much as 2 teaspoons of instant yeast and lukewarm water. Let the rough rise at room temperature for 1 to 3 hours; then proceed with the recipe.
Equipment:
- A Lloyd grandma pan makes for an especially nice crust.
- A Baking Steel or pizza stone further promotes a crisp crust.
- Two 2-quart dough storage vessels are handy for storing the grandma-style dough balls in the fridge for a few days.
For the pan pizza dough (which yields enough for 2 Grandma pizzas):
- 550 grams (about 4¼ cups ) bread flour or all-purpose flour, plus more for dusting, see notes above
- 15 grams salt, see notes above
- 2 grams (about ½ teaspoon ) instant yeast
- 485 grams (a heaping 2 cups) cold (about 60 °F) water
- Extra-virgin olive oil
For one pizza:
- 2 tablespoons unsalted butter, at room temperature
- 2 tablespoons extra-virgin olive oil, divided, plus more as needed
- One 525 -gram ball of pan pizza dough (from above)
- 8 ounces broccoli rabe, ends trimmed
- 1 clove of garlic, minced
- squeeze of lemon
- 12 ounces (about 3 cups ) shredded low-moisture whole-milk mozzarella cheese, I love Calabro
- ¾ cup tomato sauce, such as this one or your favorite jarred sauce
- 1 to 2 tablespoons Calabrian chili paste , optional
- 8 ounces bulk hot or sweet Italian sausage
For the dough:
- Mix the dough: In a large bowl, whisk together the flour, salt, and yeast. Add the water and use a spatula to mix until the water is absorbed and the ingredients form a wet, sticky dough ball. Cover the bowl with a towel and let rest for at least 15 minutes and up to 30 minutes.
- Stretch and fold: Fill a small bowl with water. Dip one hand into the bowl of water, then use the dry hand to stabilize the bowl while you grab an edge of the dough with your wet hand, pull up, and fold the dough toward the center. Repeat this stretching and folding motion 8 to 10 times, turning the bowl 90 degrees after each set. By the end, the dough should be smoother and more cohesive, though still very wet. Do not worry if you do not execute this step perfectly — in addition to creating some strength in the dough, the purpose of this step is to ensure any dry patches of dough have been fully hydrated and incorporated into the dough.
- Let it rise: Pour about 1 teaspoon of olive oil over the dough and use your hands to rub it all over. Cover the bowl tightly and let the dough rise at room temperature until it has nearly doubled in volume, 6 to 10 hours. The time will vary depending on the time of year and the temperature of your kitchen.
- Portion the dough: Using lightly oiled hands, release the dough from the sides of the bowl. Turn the dough out onto a lightly floured work surface and use a bench scraper to divide the dough into 2 equal portions roughly 525 grams each.
- Ball up the dough: Using flour as needed, form each portion into a ball by grabbing the edges of the dough and pulling them toward the center to create a rough ball. Then flip the ball over, cup your hands around the dough, and drag it toward you, creating tension as you pull. Repeat this cupping and dragging until you have a tight ball. The dough will be wet and sticky! Do not worry if you do not create a perfect ball… it is forgiving.
- Store the dough: Place the dough balls in individual airtight containers and transfer to the fridge for 1 to 3 days.
For the pizza:
- Proof the dough: Grease a 12 × 16-inch grandma-style pan or a 13 × 18-inch sheet pan with the softened butter. Pour one tablespoon of the olive oil into the center of the pan. Place the dough ball in the oil and turn to coat. Let rest uncovered for 1 to 4 hours, depending on your time constraints.
- Stretch the dough: Lightly oil your hands and use your fingertips to dimple and stretch the dough to fit the pan. When the dough resists, let it rest for 30 minutes, then stretch it again using the same technique. Repeat this stretching and resting until the dough fits the pan.
- Prepare the oven: If you have a baking steel, place it on a rack in the middle or lower third of the oven and preheat the oven to 450ºF.
- Prepare the broccoli rabe: Cut the broccoli rabe into 1-inch segments. In a large skillet, heat the remaining tablespoon of oil and garlic over medium-high heat just until the garlic begins to shimmer and take on the slightest amount of color, 1 to 2 minutes. Add the broccoli rabe, season with a pinch of kosher salt, and cook, stirring and rearranging frequently with tongs until wilted, about 2 minutes. Add 2 tablespoons water, cover, and cook for 2 minutes more. Remove the cover, squeeze the lemon over the top, stir, taste, and adjust with salt or more lemon to taste.
- Season the tomato sauce: In a small bowl, stir together the tomato sauce and 1 to 2 tablespoons of Calabrian chili paste, depending on your heat tolerance.
- Assemble the pizza: Using lightly oiled hands, stretch the dough one final time to fit the pan. Sprinkle the mozzarella evenly over the pizza, spreading it all the way to the edges. Spread the broccoli rabe evenly over the top. Drop spoonfuls of the tomato sauce evenly over the top, then smooth with the back of a spoon to spread. Finally, pinch the sausage into small pieces and scatter them evenly over the top.
- Bake the pizza: Bake until the edges look very caramelized, 23 to 25 minutes.
- Remove the pan from the oven. Run a paring knife or spatula around the pan’s edges. Use an offset spatula to carefully transfer the pizza from the pan to a cutting board. Cut into 12 to 16 squares.
- Prep Time: 24 hours
- Cook Time: 25 minutes
- Category: Pizza
- Method: oven
- Cuisine: Amerian
